Customization and Personalization is something that creates an emotional bondage among individuals,
How???
Simple…. When we personalize stuff, it gains a human touch that it completely lacks before because it was recorded in emotionless machine language.
Let’s take an example— A custom message works quite smoothly or catches one’s attention more than a formal one.
Similarly, WordPress custom fields are also an important part of what makes WordPress a flexible content management system, rather than “just a blogging platform without any emotion“.
When it comes to WooCommerce custom fields, the freemium Advanced Custom Fields plugin is one of the most well-known names. It makes it easier to work with custom fields in all aspects.
Comprehensive Guide’s Outline…
I. WooCommerce Custom Fields: In Detail
- What Are Custom Fields in WooCommerce Exactly?
- What Do WooCommerce Custom Fields Do Actually?
- Why Should You Use WooCommerce Custom Fields?
II. What WordPress and Custom Fields Have to Do With Each Other?
- WordPress Includes Built-In Custom Fields Functionality
- Usability of Custom Fields in WordPress as Well as in WooCommerce
Might all this sound complex to you…..let me detail you in the simplest way possible.
WooCommerce Custom Fields: In Detail
Here, I’ll elaborate you about the various custom fields, their types and usages in a WooCommerce site. This all can help you for sure, so without wasting a sec— let’s start with the basics first.
What Are Custom Fields in WooCommerce Exactly?
When it comes to working with WordPress, the notion of custom fields usually carries with it a different definition. But mine is the simple one—
Custom Fields refers to anything that is customized or modified in addition to the machine-formed jargons that are provided. Simple to say is, custom fields in WooCommerce are nothing more than a set of extra information displaying features.
Yes. If you want to display any sort of additional information within your website fields given— then Custom Fields would take charge of that.
For instance— If you own a WooCommerce website and want to display additional information in that, let’s say— multiple seller contacts for every product and your theme doesn’t support such field structure, then you can display that with ease using an additional custom field for that.
Hope, I’ve cleared myself here. For extra information, let me tell you— you can also call this custom field as Metadata.
WordPress has the ability to allow post authors to assign custom fields to a post. This arbitrary additional information is referred to as meta-data.
For non-developers, this type of information can be a bit more complex and unnecessary. But if you’re used to working with it, then it’s important to note that when I refer to custom fields in this tutorial, I’m talking about something completely different.
Interested, then let’s proceed further….
What Do WooCommerce Custom Fields Do Actually?
There isn’t any rocket science in their working. Simple as that—the WooCommerce custom fields let you add, store, and display additional information about a piece of content or a product in WordPress. On a more technical level, custom fields help you store metadata.
Even if you’re not familiar with this term, custom fields power much of the functionality in your favorite plugins and themes.
Midst of a Process to Develop Your WooCommerce Site, but Stucked in Theme Selection???
Why Should You Use WooCommerce Custom Fields?
You might be wondering why custom fields are necessary in the first place.
Couldn’t you just put all of that information as plain text in the WordPress editor if you wanted to post an event on your WordPress site?
Yes, you certainly could. Custom Fields, on the other hand, are a superior option for a few reasons—
1. Better Data Input
Instead of wasting your precious time in entering each and everything from the start, a well-designed custom field group will make data entry much easier. You can, for example, select a date using a date picker rather than putting it in..
2. Accuracy
Don’t worry at all the data you provide in your custom fields will always display according to your settings, ensuring that it is consistent across your whole site.
3. Simple Upgrades and Maintenance
Instead of editing each and every post manually, if you want to alter anything about how other information appears hereafter, you can just adjust one element. That’s it.
What WordPress and Custom Fields Have to Do With Each Other?
Custom fields in WordPress are metadata that you may use to add more information to the post or page you’re updating. When you create a new post, page, or other sort of content, WordPress saves it in two places by default.
Custom fields are data chunks that travel in key/value pairs with posts and pages. This data may be extracted and used in your templates in any way you want, allowing you to perform all sorts of clever and intriguing things.
The body of your material, which you add using the post editor, is the first part. The second section contains information regarding the content in question. For instance, title, author, date, time, and other information.
Metadata refers to the information portion of the post. WordPress provides all of the needed metadata to each post or page you create automatically.
WordPress Includes Built-In Custom Fields Functionality
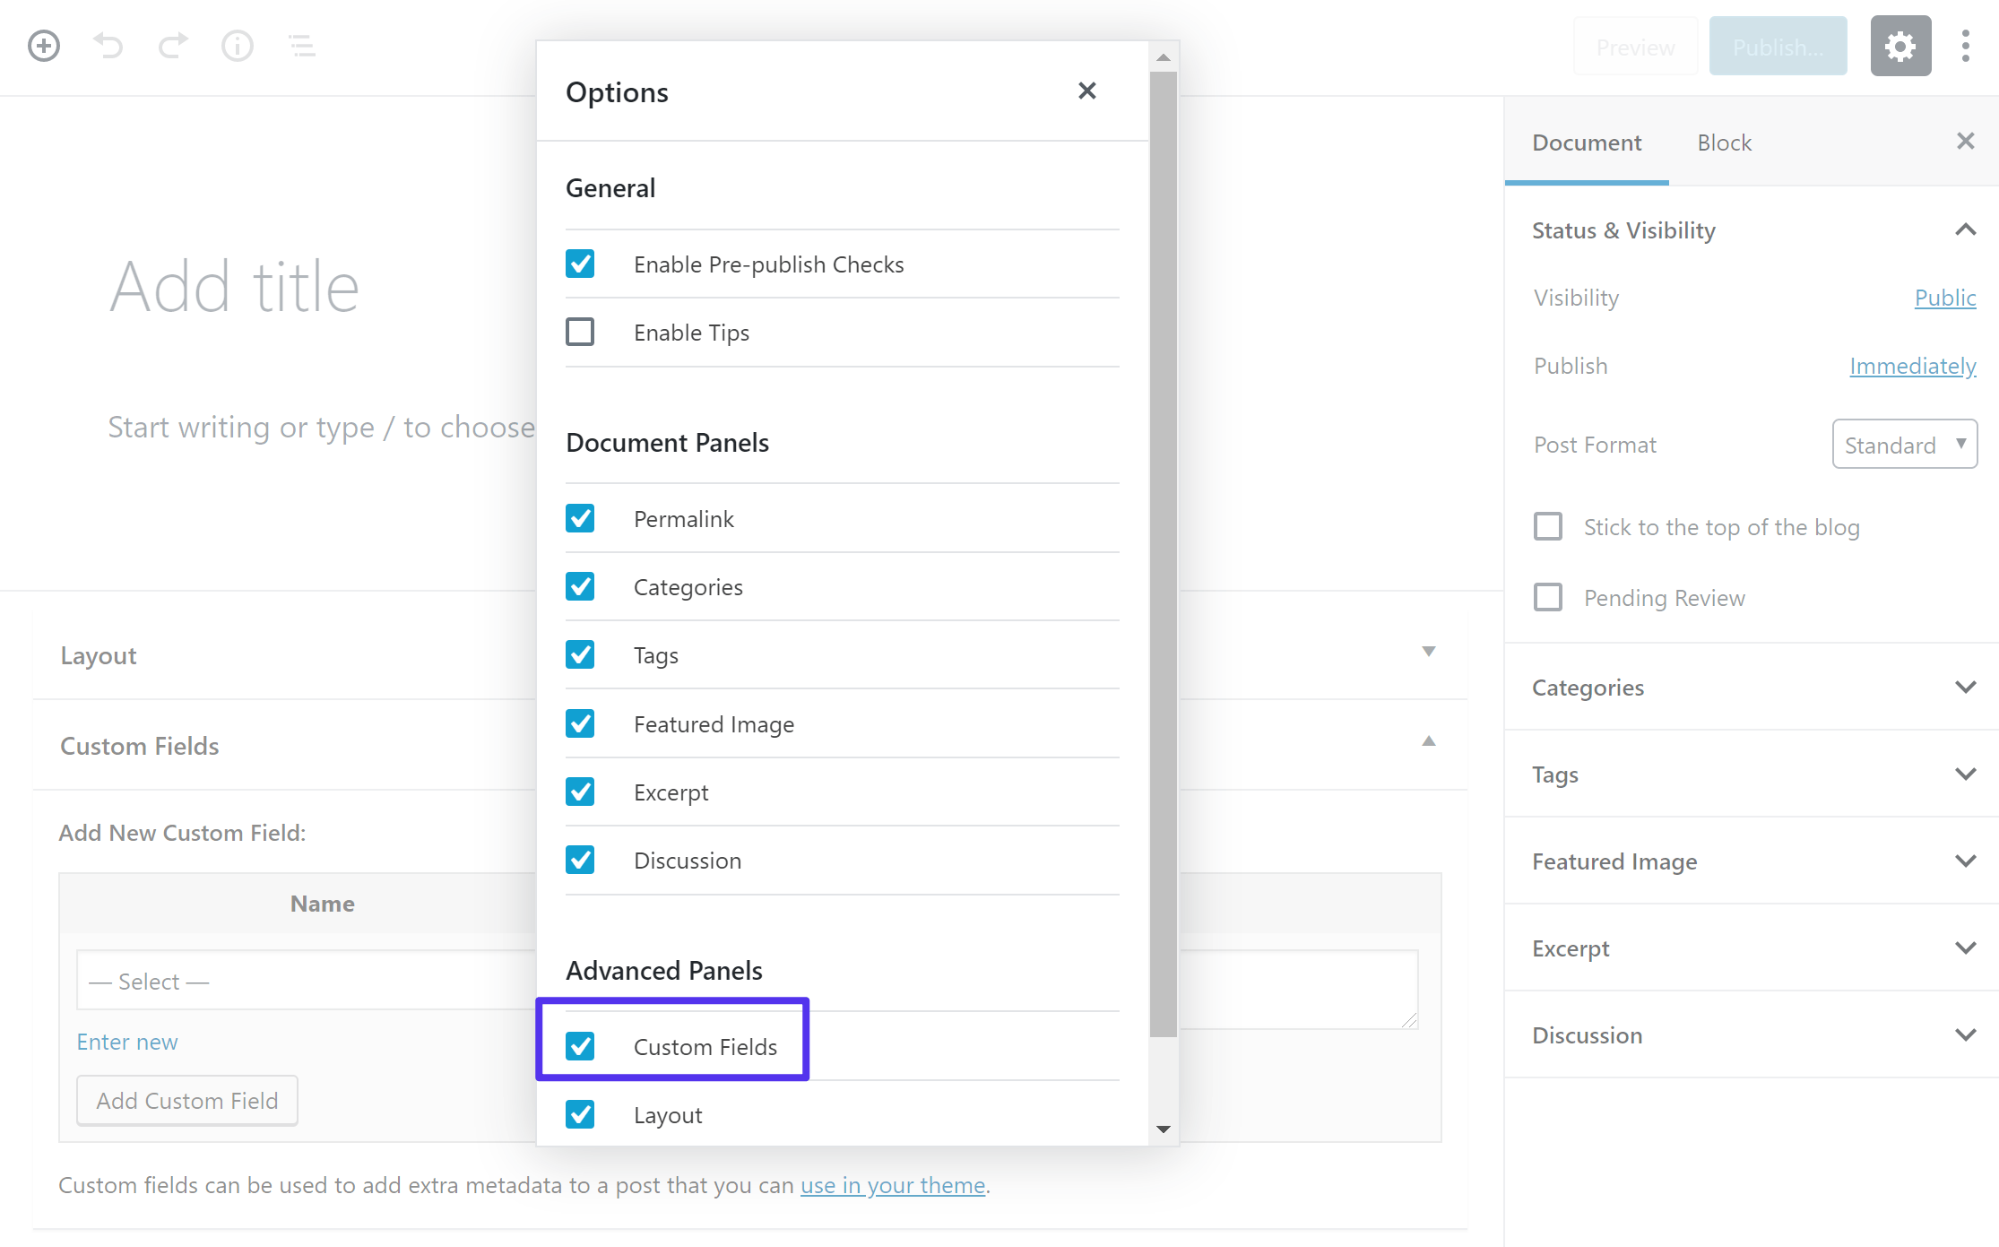
The ability to add custom fields to your text is actually built-in to WordPress. You may enable this in the Screen Options area of the original WordPress classic editor. You can also enable it in the new block editor’s Options area—
Let me detail you here—How to add custom fields utilizing the block editor in WordPress???
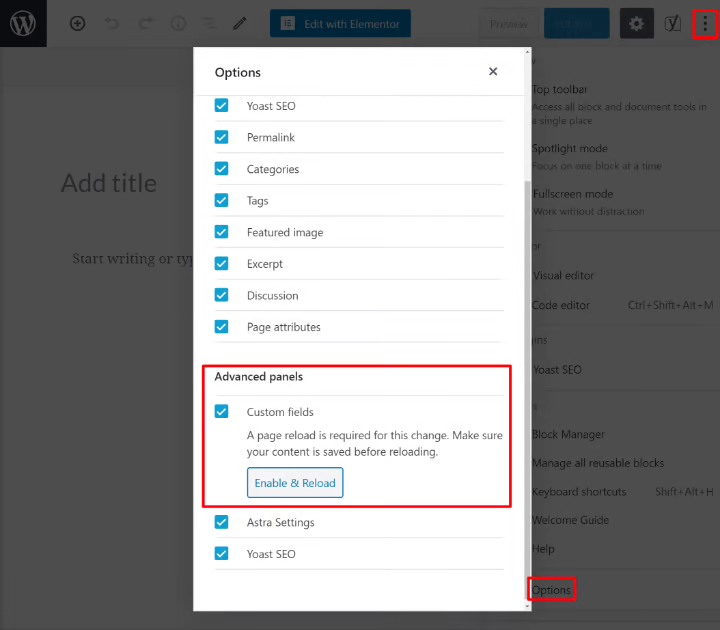
To access the custom fields interface, open the menu in the top-right corner and pick Options from the drop-down menu. Then, under Advanced panels, tick the box for Custom Fields.
After that, you’ll be asked to reload the website in order to see the custom fields—
If you’re using the Classic Editor, you may enable custom fields by selecting the Custom Fields box in the Screen Options toggle at the top of the interface.
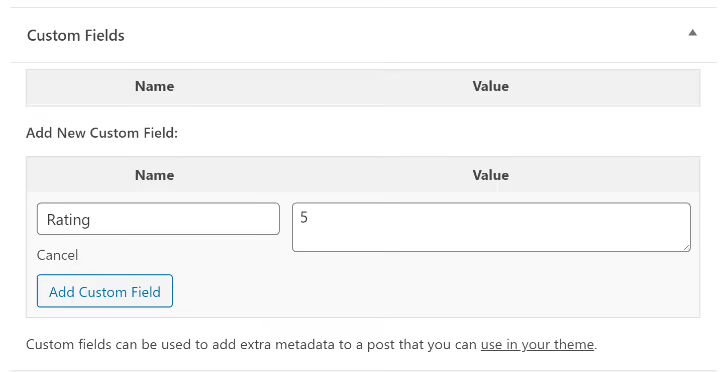
After that, you’re able to notice a new Custom Fields box somewhere below the editor after reloading the page.
- From that, you can choose from existing custom fields on your site using the Name column drop-down (you’ll probably see several from your theme or plugins). You can also name your own custom field.
- Then, in the Value box, type in the information you wish to add in the custom field.
You could then use PHP to display this data on your website. Although the original custom fields feature is entirely functional, it is not the most user-friendly option, thus many people prefer to use the Advanced Custom Fields plugin instead.
Isn’t it a bit bland and boring? I’ve warned you that the manual technique is inconvenient to use. It’s also limited in terms of the types of data you may enter into your custom fields.
Usability of Custom Fields in WordPress as Well as in WooCommerce
Custom Fields in WordPress as well as in WooCommerce can be used for a variety of purposes, including enhancing the products information on your WooCommerce site.
You can quickly learn–how to add WooCommerce custom fields to a product that specifies WooCommerce Custom Fields usefulness, as well as how to compliment your static blog site feature updation, i.e. WordPress Custom Fields right here.
Don’t get the names mixed up. That all refers to the type of WordPress website you’re running.
Let me go over the capabilities in detail; take a look —
1. Supplement Additional Data Display
Any unusual or extra data you’d like to incorporate on a product page that either isn’t supported through WooCommerce or it’s easier to complete with custom fields.
Let’s say, for adding additional product information for things like computers, where you’d show technical specs such as RAM and processing power. Similarly, Dates and times for when you have a countdown, auction, or release date for a product.
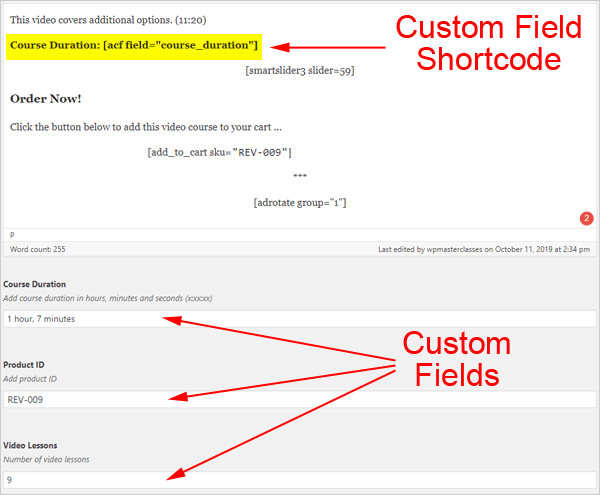
For Instance- Let’s say you’re uploading a video and would like to determine how long it would take to watch it. Storing the running time as a Custom Field and displaying it anywhere you want is as simple as this—
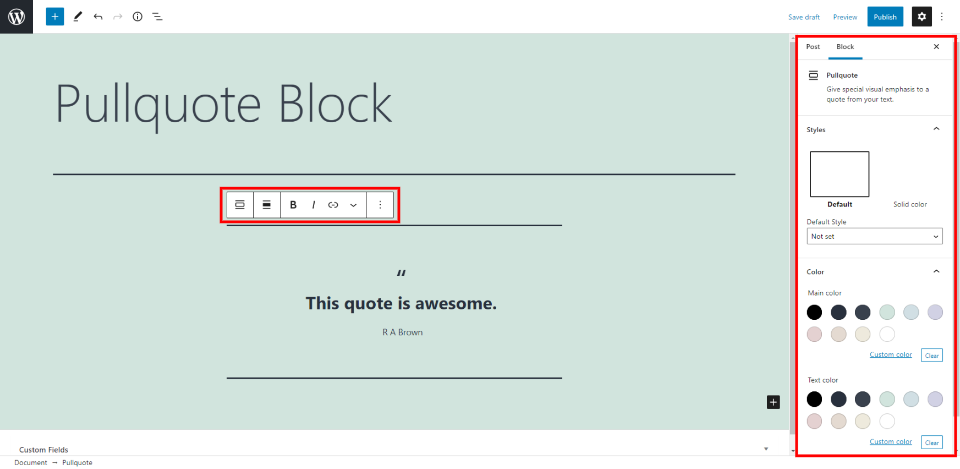
2. Showcase Unique Pull Quotes
In order to display multiple promotional messages that you can quickly change to something else.
For Instance- Use a custom template for that category, such as category- favquotes.php, if you have a particular Category archive that displays a set of posts that contain the same category. Maybe you create a custom field called main-pullquote that pulls a custom quote from each article.
3. Display Extra Product Data
Additional product information is presented in these fields. Let’s start with WooCommerce extra product data fields, which are custom fields that display more information about your products.
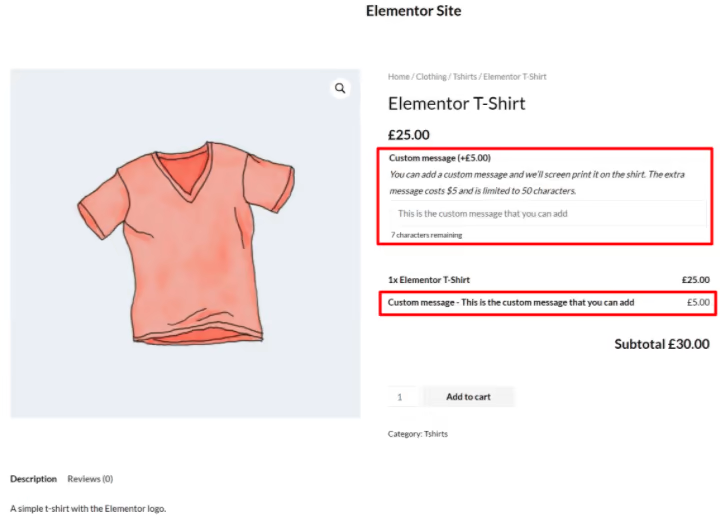
For Instance– Extra product data fields that display additional information about a product are noted in the example below. These additional data addition fields are to be added within the product information utilizing the custom fields.
There is no user interaction in this case; instead, it is merely new content i.e. content added through custom fields inclusion to display metadata.
4. Introduce Custom Add-Ons Fields
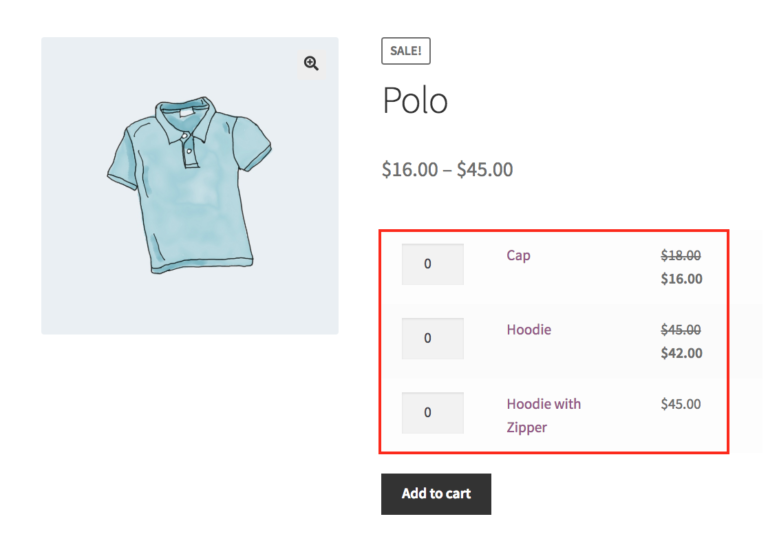
These are the fields that the user can utilize to personalize his or her product. Text fields, select fields, checkboxes, and other custom input fields (also known as product add-ons) that allow the user to enter additional, personalized information about a product are also added using custom fields.
For Instance– A product page for a clothes website is shown in the example below. You’ll see that there are a few extra fields, such as ‘Cap‘ and ‘Hoodie‘, where the user can enter the number of pieces required in the number input field as their own information and make specific product choices. This is an example of a custom field of the add-ons type.
Note- The distinction between the two sorts of custom fields is as follows: Data fields just provide information about the product; add-ons allow the user to enter information about the product.
5. Display Additional Media
Unique media elements that can’t be inserted using the standard WooCommerce features, like an extra video, that might act as Extra product options, in addition to variants, that customers can look through.
6. Multiple Content Features
Let’s imagine you’d like to be able to collapse the Comments section on different blog entries at different periods. Set the value of should toggle comments to true in a custom field called should toggle comments.
For instance- Taking an example of CSS-Tricks. The output an ol> of all the comments in our comments.php template, but if this custom field is present, they wrap the entire thing in a details> element, collapsing it by default.
<?php if (get_post_meta($post->ID, 'should_toggle_comments', true)) { ?>
<details class="open-all-comments">
<summary>Toggle All Comments (there are a lot!)</summary>
<?php } ?>
<ol class="commentlist" id="commentlist">
<?php wp_list_comments('type=comment&avatar_size=512&callback=csstricks_comment'); ?>
</ol>
<?php if (get_post_meta($post->ID, 'should_toggle_comments', true)) { ?> </details><?php } ?>
7. For Data Segmentation and Management
Yes, you get me right. Custom Fields can do wonders with the contact management related work, so the businesses who require that let’s say—real estate ones are to be benefitted miraculously.
Custom fields are particularly useful for categorizing contacts in unique ways. For more complicated settings, these benefits are amplified.
Consider for example— you’ve created a real estate listing website with thousands of listings. You wouldn’t want to hand-draw every house’s design, would you? Now, you’re manually formatting the number of bedrooms, bathrooms, and other amenities for each listing. It’ll take an eternity!
Instead, you might enter all the basic characteristics for bedrooms, bathrooms, and other places using custom fields, and then let your design arrange it for each property.
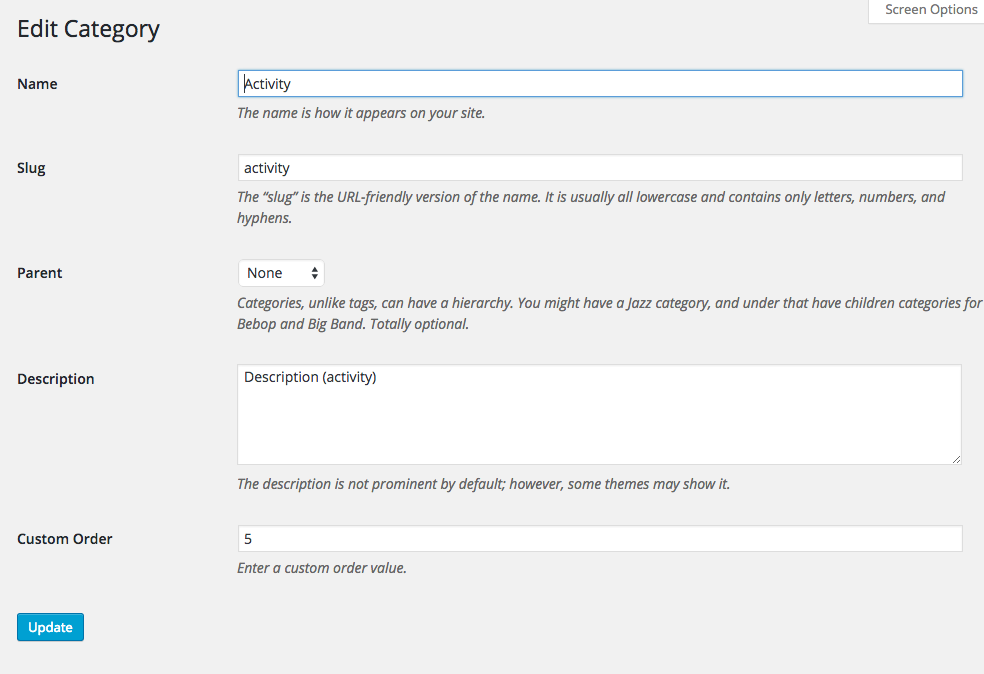
What you have to do is to—Consider a narrow category or one with two or more narrow subcategories. Before you develop a custom section, think about if it’s accurate enough to not need to be changed frequently.
If this is the case, a custom field can come in handy. You could use a custom zone to store a Billing ID for customers, for example—Assume you run an affiliate website where you publish new product reviews on a regular basis. You can add a custom score’ field to your postings to clearly show a rating for each product.
Want to Earn Extra Utilizing Affiliate Marketing, but Don’t Know How to Start With???
This all sounds convincing to you, yet creating a dilemma that—Why to custom fields when you can use custom taxonomies in WordPress??? Although that’s quite fair to be a doubt, don’t worry we’ll not let you overthink on that.
Below is the solution, stay tuned…
Custom Fields v/s WooCommerce Custom Taxonomies
Taxonomies, like WooCommerce custom fields, are a means to store and display additional product data. However, they are designed to hold reusable information that may be used to categorize and filter products.
For example, you can create a dedicated archive page listing all products that share a specific custom taxonomy term. You can also use taxonomies to filter products using the WooCommerce Product Variation Table plugin.
Wanna Know More About Our Product Variation Table Plugin??
WooCommerce product categories are quite similar to custom taxonomies. Under the hood, WooCommerce categories are actually set up as a taxonomy. When you create a custom taxonomy in WooCommerce, tick boxes/check boxes appear on the right hand side of the Add/Edit Product screen, similar to categories.
Here are several scenarios in which WooCommerce custom taxonomies might be useful—
1. Extra product data, such as the year of publication, author, and publisher, must be stored in a WooCommerce bookshop. Customers must be able to sort and filter by this data because multiple books have the same year, author, or publisher. This is possible with WooCommerce custom taxonomies.
2. If your products are related to a specific geographic area, you can group them using custom taxonomies. You could, for example, establish a custom taxonomy named ‘Area‘ and add a taxonomy word for each state or county to it. Customers can then filter by region or browse solely product lists from that region.
3. Custom taxonomies can be used by a WooCommerce clothing business to store extra information such as brand names. Because this feature isn’t incorporated into WooCommerce by default, customers can search and filter to find products with their favorite brands.
In short summary, I recommend you to leverage custom fields for one-of-a-kind data and taxonomies for information that you intend to use for sorting or other forms of classification.
I guess, I possibly made you people sort that dilemma. If still not clear with the difference consider detailing below too…
Their Basic Differences
When it comes to WooCommerce product data, the terms ‘custom fields‘ and ‘custom taxonomies‘ are frequently used. However, many individuals are confused about what they are and how they differ.
Custom fields in WooCommerce are used to record random, one-time information about a product. A custom taxonomy is used to categorize items. The way you add custom fields and taxonomies for products in the WordPress admin reflects this—
Appearance
Custom fields appear in the Add/Edit Product screen’s focusing primarily. This is where you can add additional information about the product, including the title, description, and pricing.
Whereas, Custom taxonomies, on the other hand, display in the right hand column beneath the product categories and tags. Each WooCommerce taxonomy term, like categories and tags, should be used for many products.
When Should You Use Whom?
When you know the difference between a WooCommerce custom field and a taxonomy, you’ll know when to use which.
“Is the data I’m adding unique to each product, or does it apply to several products?” is a good rule of thumb for deciding between custom fields and taxonomies.
- A custom field is required if the data is unique for each WooCommerce product.
- A WooCommerce taxonomy is required if you wish to select the same value for numerous goods and utilize it to group them together (for example, using a product filter).
Consider these scenarios below for better understandings—
Case 1– Take an example of a WooCommerce clothing store that has a variety of colored products and wants to display that information for each of them.
If you’re selling garments through WooCommerce, you’ll most likely want buyers to be able to search for items by color. Various goods will be used to represent each hue. Customers can filter the list of products to find the color they want by building a WooCommerce custom taxonomy called ‘Color.’ With a custom field, this isn’t possible.
Case 2– Taking an example of a WooCommerce second hand site that is into storing ‘condition’ information about their used products.
If you’re selling used products on eBay, you’ll need a field to record any damage or other information. Because the condition description for each item will be unique to that product, you should build a WooCommerce custom field for it.
Case 3– Taking instance of a WooCommerce product directory with a large product database.
In a WooCommerce directory-style website with large number of products, extra product information is frequently presented in the directory listings that somehow make use of the custom fields for that.
Seems, everything is clear till here….let’s proceed then.
How to Add Custom Fields in Your WordPress Website?
In WordPress, each page and post has its own metadata, which includes information such as the title and description. The platform adds this information for you using specific fields. You can, however, use WooCommerce custom fields to construct your own information.
This can be done in two ways possibly, we will discuss that below–
- Add custom fields to WordPress manually and change your theme to make them visible.
- Make use of any WooCommerce custom field plugin
Note— The Manual Method to add custom Fields in WordPress, I’ve explained earlier in this article in the section heading that says—WordPress Includes Built-In Custom Fields Functionality refer the same from there only.
Let me detail you with the second method possible i.e. utilizing a plugin to unleash the power of custom fields.
Adding Custom Fields in WordPress Utilizing a Plugin
A decent custom fields plugin will also allow you to collect multiple types of information in your custom fields, in addition to making custom fields easier to deal with. You’ll find field kinds for things like—Text, Numbers, URLs, Image/file uploads, Google Maps locations, etc.
The wonderful thing about WordPress is that there is always a plugin for whatever you need. Custom fields are no different. While WordPress has ample capabilities for working with custom fields. Still, there comes a time or situation when you need a more advanced solution.
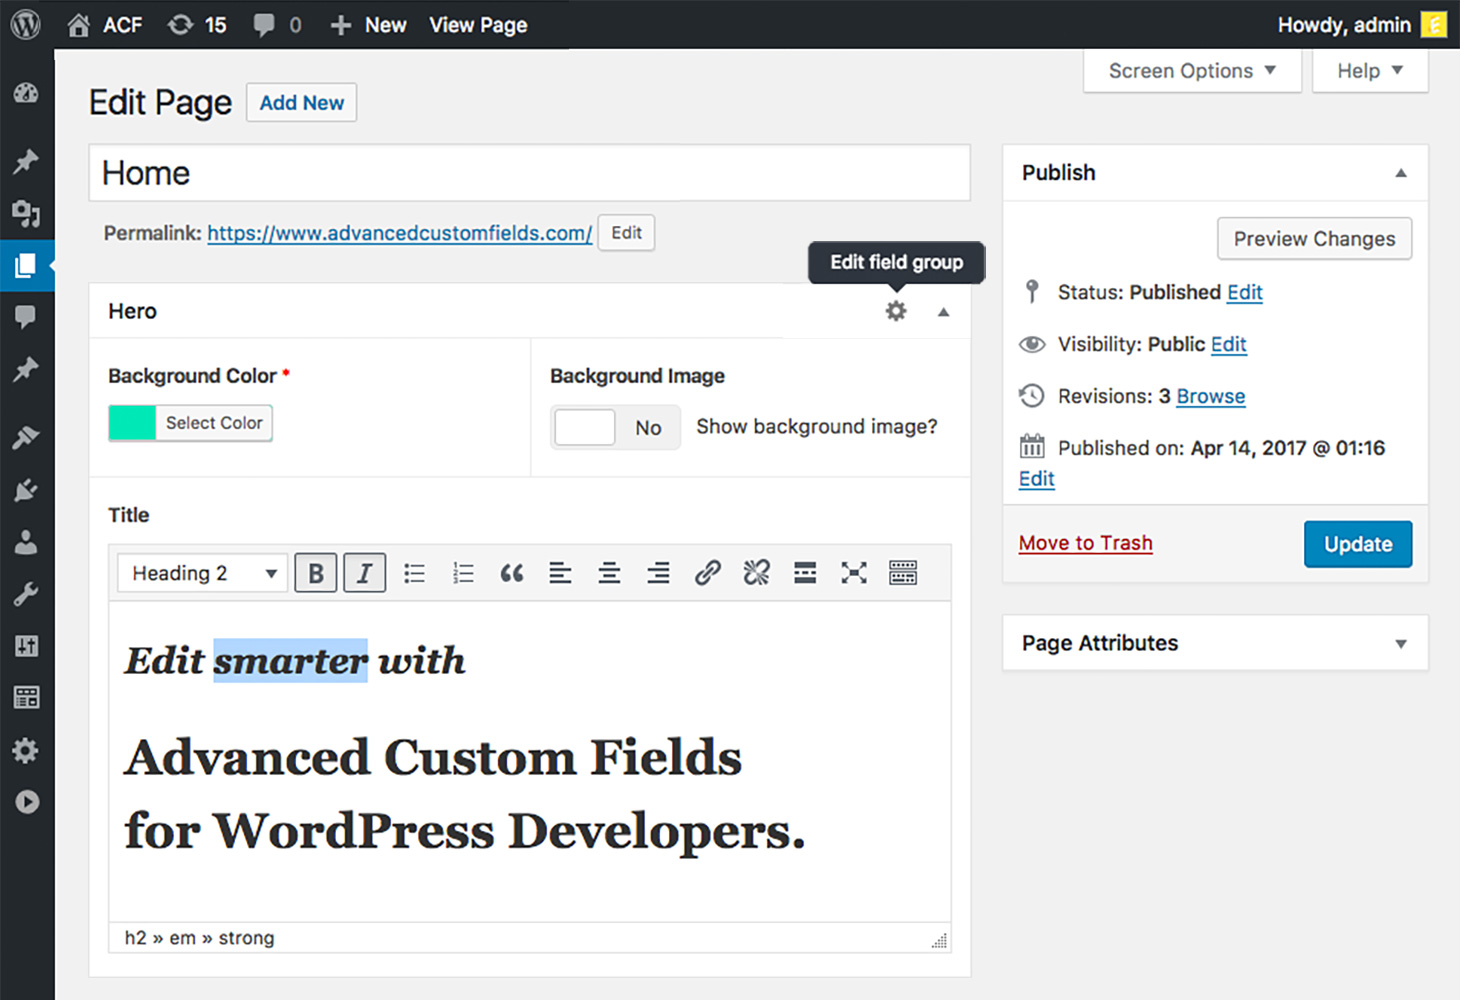
That’s where you require plugin support. Taking into consideration with the fact, we’re here with the demonstration of the popular custom fields plugin i.e. Advanced Custom Fields i.e. ACF.
In essence, it allows you to reduce the amount of coding required for your own fields while also displaying a range of various types of data. Advanced Custom Fields is a tool that allows you to set rules for when your custom field appears and when not.
Advanced Custom Fields plugin mainly designed for the Developers. That clearly means that you can only utilize their API to swiftly access as well as manipulate the custom fields.
As a result, if you’re a theme author, you’ll be able to create powerful templates to extend your theme or website.
Step-1
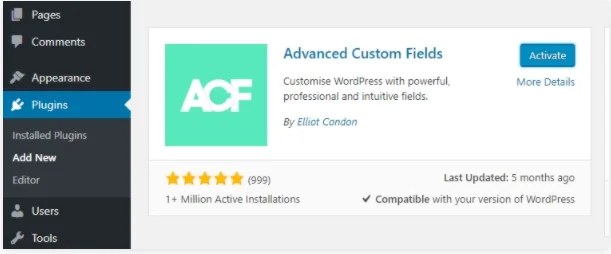
Simply go to the Plugins -> Add New tab on your dashboard. Use the search bar to browse for Advanced Custom Fields after you’ve arrived.
Step 2-
Simply press the Install Now button. Wait for the text to change to Activate before clicking on it again.
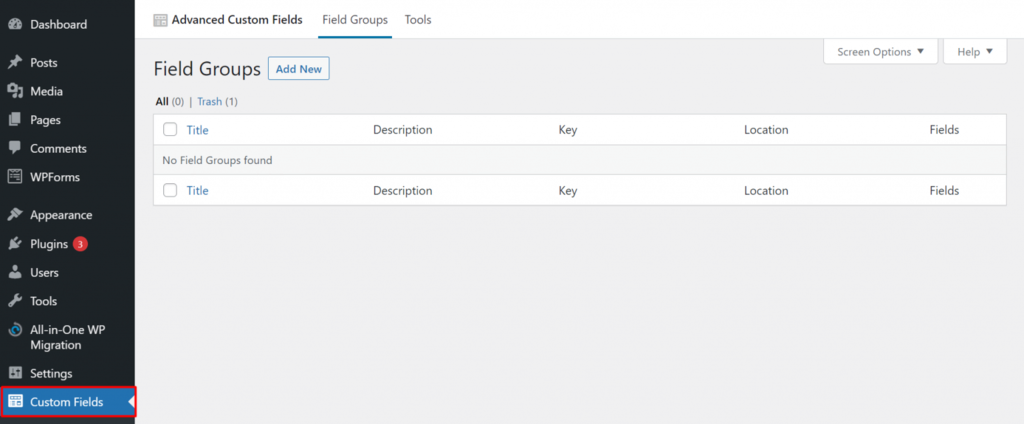
You’ll see a new Custom Fields tab in your dashboard once Advanced Custom Fields is up and running. When you click on it, a list of custom field groups appears, all of which should be empty.
Step 3-
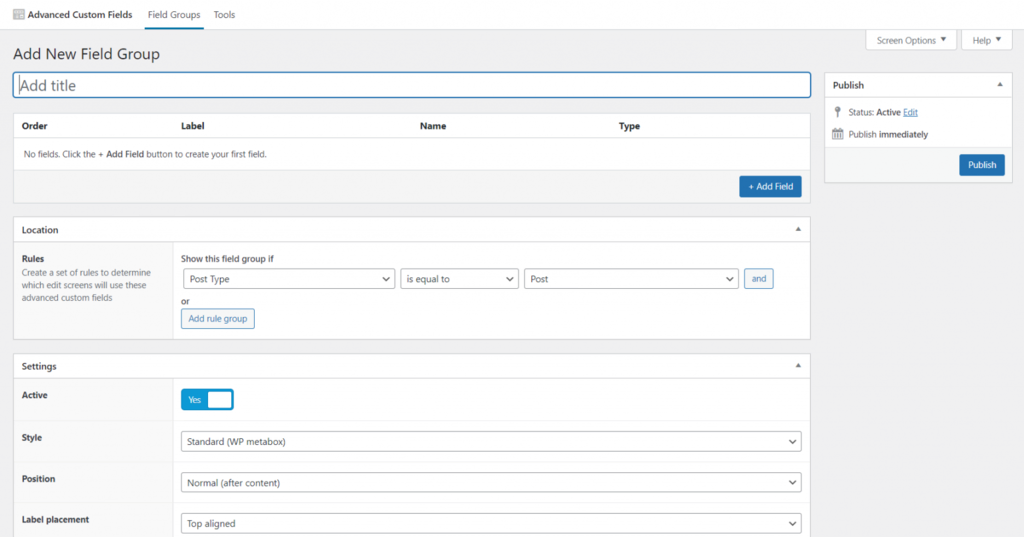
Simply click the Add New button at the top of the page to create a field group.
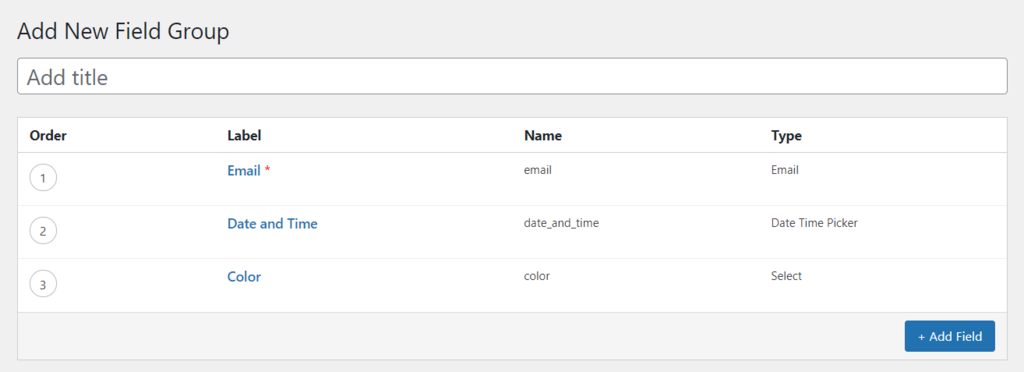
Click the Add Field button to continue. Choose a name for your new field that also serves as a label. You must also select the sort of field you wish to create, which includes text, checkboxes, and email.
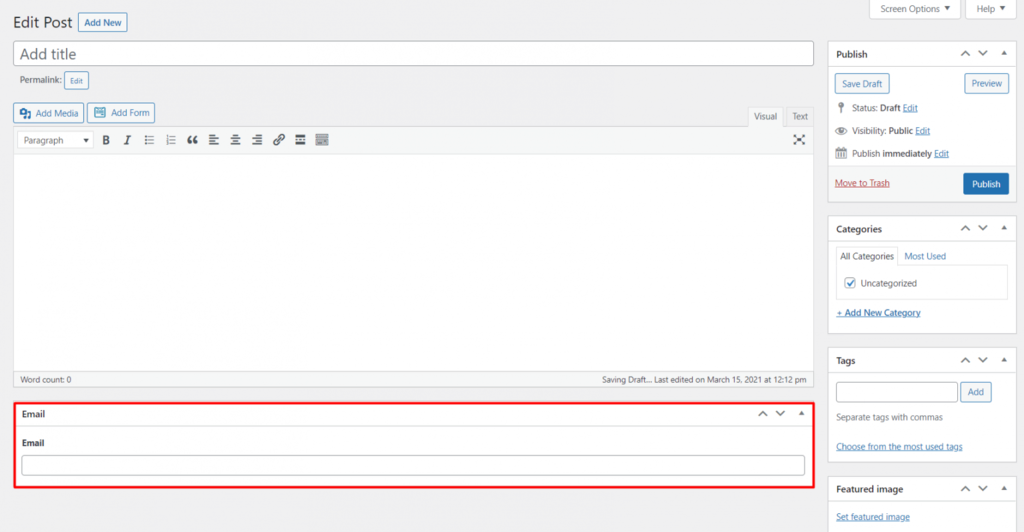
For this example, we’ll construct an Email field to collect the email addresses of all authors.
Step 4-
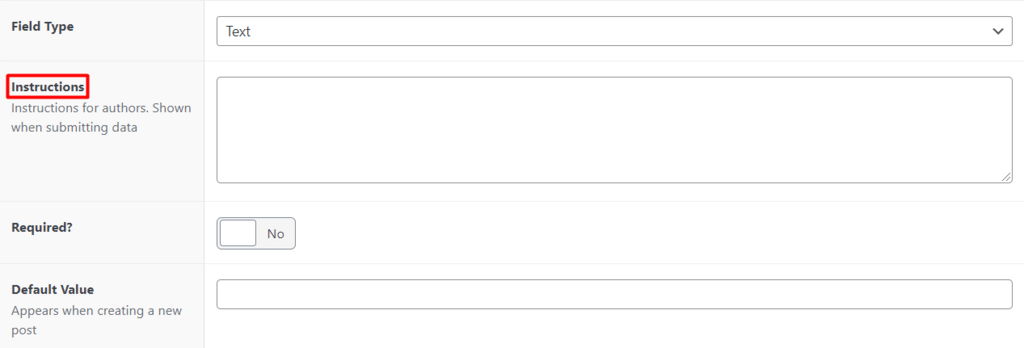
Simply fill in the supplied space to create a set of instructions. “Please fill out your email address before publishing your post,” for example.
Whereas, this step is totally optional to perform. Yet, it assists many administrators to understand usability of custom fields.
Step 5-
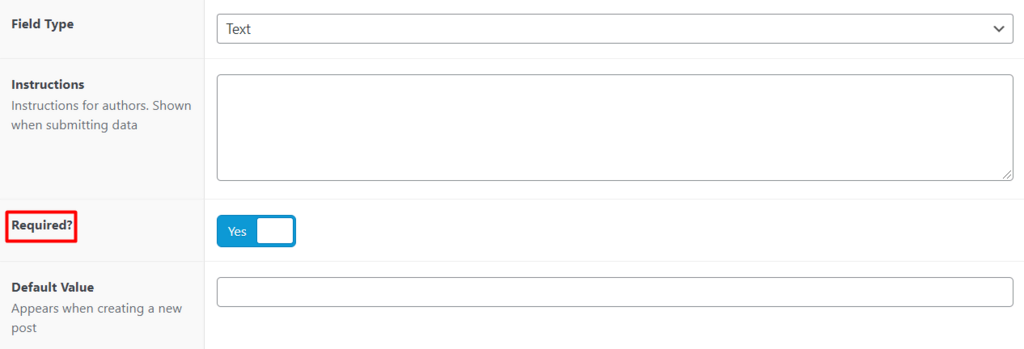
After that, you’ll need to specify whether or not this field is mandatory. It will be impossible to save posts or pages without first filling them out.
If necessary, you can tweak a few more complex options likewise advanced settings. After you’ve filled out the basic properties, scroll down to find the Close Field button.
Step 6-
After that, select the field option and this would automatically add your custom field group. Simply select the Add Field option and repeat the process to add other custom fields.
Step 7-
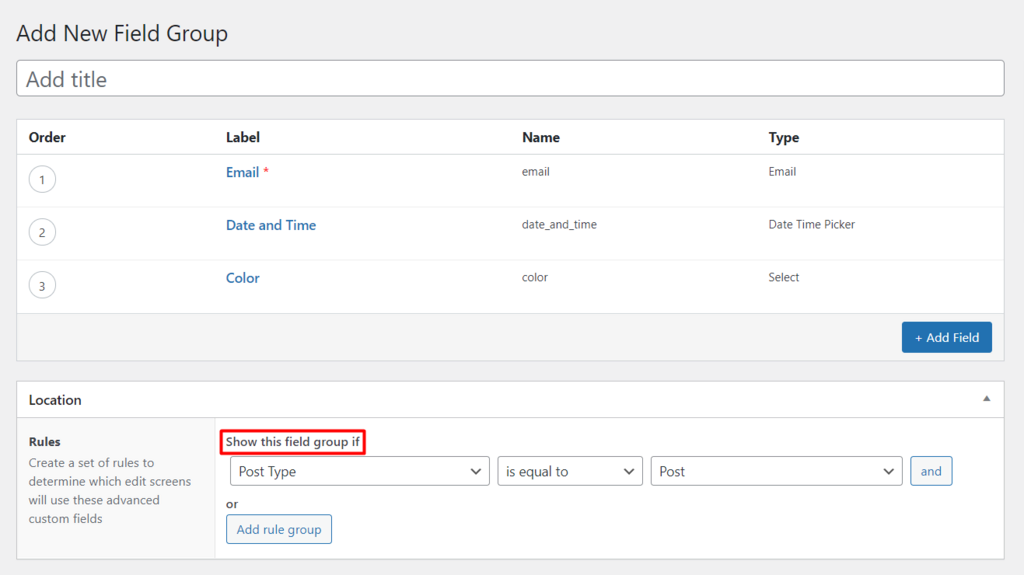
After you’ve generated your custom field groups, you’ll need to customize the Location settings to determine where these custom field groups will appear.
Show this field group if it is an option that you can use to customize the display settings.
We set up the custom field to appear on ordinary posts in this example. Using the Add rule group option, you may add more than one location to display your custom field.
Step 8-
Finally, save your new custom field by clicking the Publish button.
Open the WordPress post editor once your field is ready. The custom field will appear directly beneath the text editor.
Remember that, Advanced Custom Fields cannot help you display your created custom fields over your website for your visitors. Rather, they would appear on your dashboard.
How to Actually Use/Display Custom Fields in Your WordPress Site???
Now that you know how to add custom fields to WordPress, you can move on to the next step. But that’s just half the story; you’ll also need a mechanism to show the data from those custom fields on your website’s front end. Otherwise, it’ll just be sitting in your database, doing nothing!
You can use the following methods to show custom field data—
- Inclusion of a page builder
- Utilization of PHP code
- Use of shortcodes
Let’s take a quick look at these three approaches.
1. Utilizing an Advanced Page Builder
Taking Elementor Pro as an example here for the page builder. This page builder offers you access to Elementor’s dynamic content feature, that lets you “dynamically” display as well as use the content from custom fields in your Elementor page designs.
Let me detail you with an example of— How it Works, for more clarity review the screencasts attached carefully???
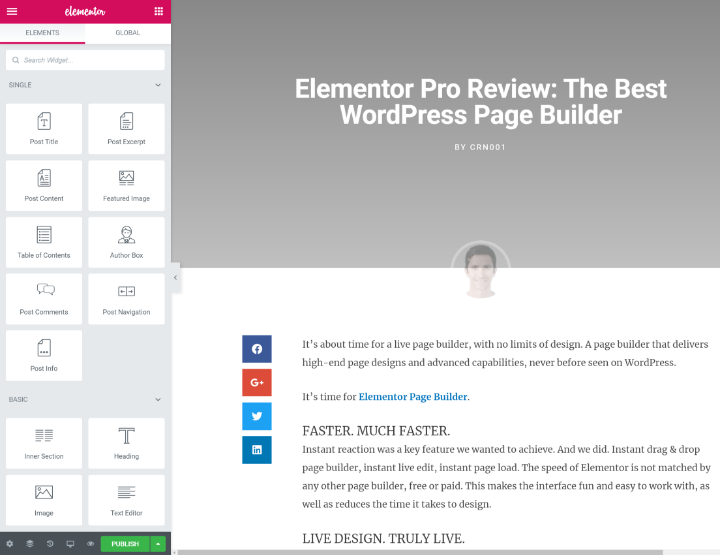
To begin, launch the Elementor editor for a single piece of content or a template created with Elementor Theme Builder. Here, for this we are now creating a template for all review rating websites.
As you can see, our initial template only displays the post title and content from the editor’s body:
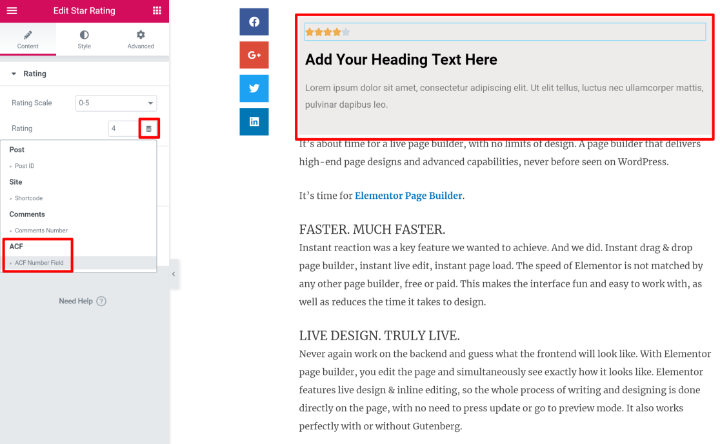
Next, we’ve included a simple review box with the following information.
- A rating of one star
- A text widget for headings.
- A description in a paragraph
We want to dynamically populate the content in this box with information from our custom fields, rather than the static rating and text that currently exists. Elementor Pro’s dynamic content capability comes in handy here.
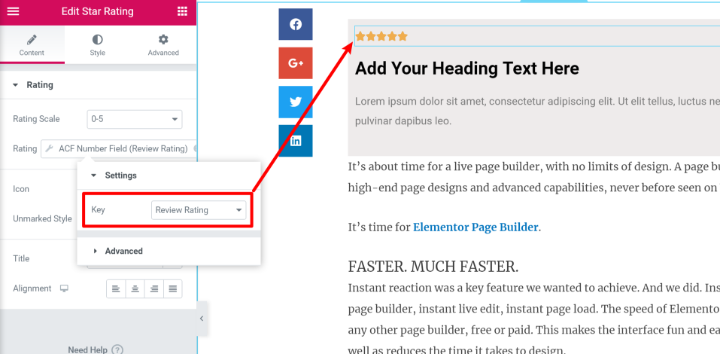
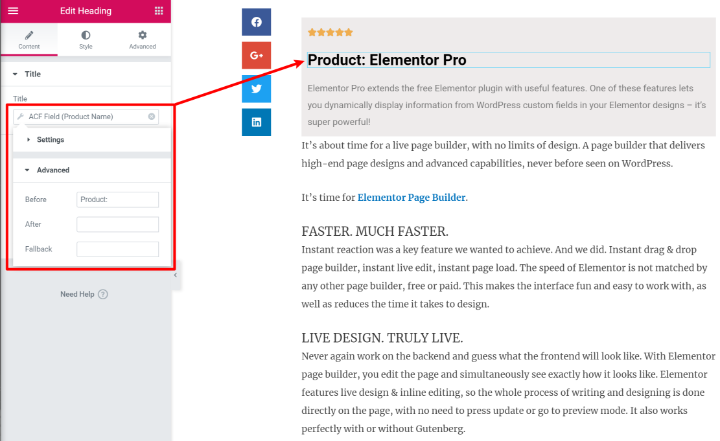
To link the content of a widget to a custom field, just modify the widget and select the Dynamic Tags option. You will then be able to select your ACF field:
The number of stars in the star rating widget are calculated directly utilizing the review rating custom field given.
You may do the same thing with the text content. The ability to put static content before or after the custom field information is a useful feature here—
That’s all there is to it! You can use information from custom fields in a variety of ways by repeating the same procedures, such as:
- Custom field images can be used as backgrounds, slider items, and other things.
- Adding a URL from a custom field to a button widget’s link destination
- A statistic widget, such as the pricing tables, can be filled with a value that is gained by a custom field.
2. Utilizing PHP
Using custom fields before page builders necessitated at least a basic understanding of PHP. You must remain focused on the task at hand—
- Edit the template files in your theme.
- Make a programmatic reference to the custom fields you want to appear.
Note- ACF includes a detailed documentation for all of the different PHP functions that you can utilize for your ease.
For example— In order to get the custom field value for the let’s say “Review Rating” field in the current post, you can utilize a simple PHP code i.e.
get_field( “review_rating” );
That’s much better; if you know PHP and WordPress templating, you can use this to show custom fields wherever on your site.
3. Utilizing the Specific Shortcodes
Some custom fields plugins contain shortcodes that work in a pinch if you need to display custom fields on the fly.
This isn’t ideal because it necessitates a lot of manual labor — rather than developing a template with a theme builder or your own PHP, you’ll have to manually include the shortcode each time.
Refer This Resource, to Know More About WooCommerce Shortcodes???
It does, however, provide a straightforward, non-technical approach to show data from custom fields as needed.
For Instance—With ACF, all you need is this shortcode, To display a field, use the the_field() in a similar fashion. Here’s a basic usage example, and please be sure to view the code example page for more.
<?php
/** * Template Name: Home Page */
get_header();
?>
<div id="primary"><div id="content" role="main">
<?php while ( have_posts() ) : the_post(); ?>
<h1><?php the_field('custom_title'); ?></h1>
<img src="<?php the_field('hero_image'); ?>" />
<p><?php the_content(); ?></p>
<?php endwhile; // end of the loop. ?>
</div><!-- #content -->
</div><!-- #primary -->
<?php get_footer(); ?>
Custom Fields in WooCommerce, Now Over To You…
Custom fields are a powerful tool in WordPress that can be used to improve any website or theme. Plugin developers also utilise it a lot to interact with the plugin’s functionality.
Although, initially Custom fields and metadata these two terms seem quite perplexing. But with time and patience, you’ll discover that they allow you to obtain even more for your site from the WordPress platform.
Fortunately, there are a few useful plugins that can assist you with like ACF, Toolset, Custom Field Suite, Smart Custom Fields, Filter Custom Fields & Taxonomies, etc.
Custom fields are an excellent approach for agencies to ease content editing and eliminate human-related errors. Whether it’s a review site, an eCommerce marketplace, or just a nice blog where you want to share what’s going on in your life, being able to adjust and perfect your posts’ and pages’ metadata will take your website to new heights.
Let us know— How do you utilize WooCommerce Custom Fields in your projects, or How you switched to WooCommerce custom fields? We’re waiting in the comments section, do mark your suggestions for this article too.
Happy Customizing!!!


