Are you a beginner and don’t know how to write a blog post in WordPress Classic Editor? WordPress might seem intimidating to new users, but it’s very simple and obvious to use. All you have to do now is familiarize yourself with its features and hidden parts, and creating new posts and pages will be a pleasure.
Taking the first step might seem difficult to you. But, all you need is an optimistic mindset and a little patience. You’ll see that what you thought was difficult but in actuality, it’s quite simple.
I hope now you are ready to go for the interesting dose of new information… Definitely, YES is the only option.
But wait…
Are you aware of How to Start a Blog?
Your text editor may differ from the one described below if you are a new blogger who has just installed the latest version of WordPress. Gutenberg, a new WordPress block editor, debuted with the release of WordPress 5.0.
Firstly, let’s start with…
What Is WordPress Classic Editor?
Classic Editor is an official plugin of the team WordPress. With its help, you can restore the previous (“classic”) WordPress editor and the “Edit Post” screen. It enables plugins to extend that screen, add old-style meta boxes, or otherwise rely on the prior editor.
The Classic Editor plugin will be fully supported and maintained until at least 2022, or for as long as it is required.
If you are the owner of the website you must know every single feature of the editor you are using for your website. As a writer, I must tell you WordPress Classic Editor is an Easy-To-Use tool and plays a very vital role for any eCommerce website. Because the classic editor is not limited to only blog posts. It also enhances the frontend of your whole website including landing pages, product pages, and many more.
How Is WordPress Classic Editor Beneficial for Your Ecommerce Store?
WordPress Classic Editor plugin adds the following features that will be helpful for your eCommerce Store:
- As an Admin, you can select the default editor for all users.
- As an Admin, you can allow users to change their default editor.
- Users can choose which editor to use for each post if they are given the option.
- Regardless of who updated it last, each post opens in the last editor used. When editing material, this is critical for ensuring a consistent experience.
Not only this, the Classic Editor plugin includes several filters that let other plugins control the settings, and the editor choice per post and per post type.
This plugin disables all functionality in the new Gutenberg block editor.
Here are some steps to format your blog post using the Classic Editor. Kindly go through these for a better understanding.
Steps to Format Blog Post With WordPress Classic Editor
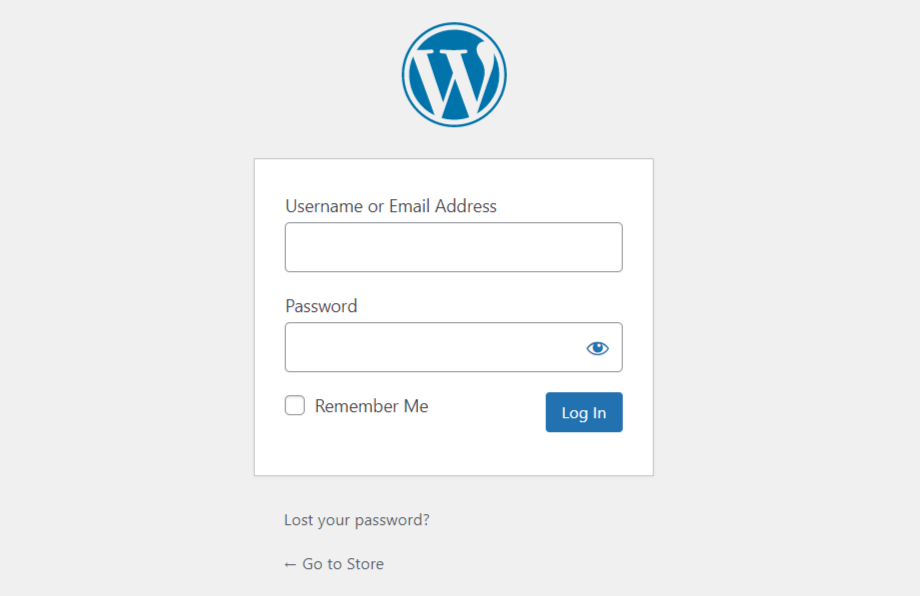
Step 1. Login to WordPress
Log in to your WordPress Admin Panel.
Step 2. How to Create a New Post
You can create your new post in three different ways:
- If you are a first-time creator then, Go to Dashboard > Click on Write your first blog post.

- This point is quite simple and direct Go to Dashboard > Click on +New > Post.

- In this you need to Go to Dashboard > Click on Posts > Add New.

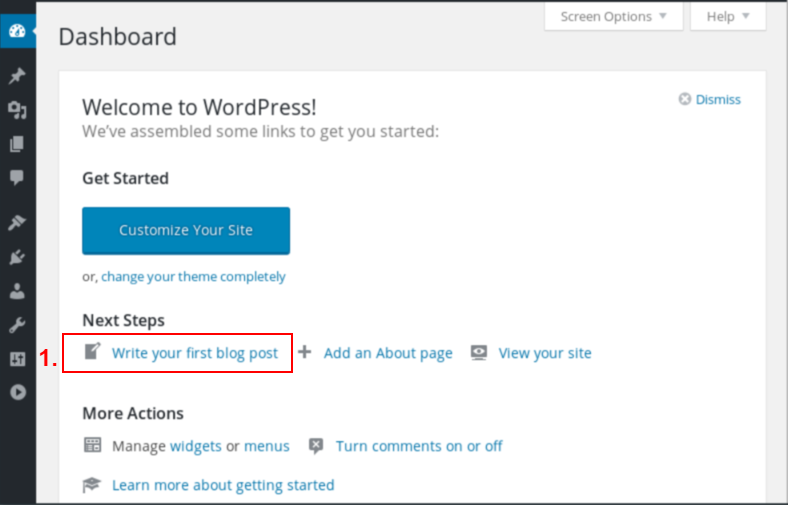
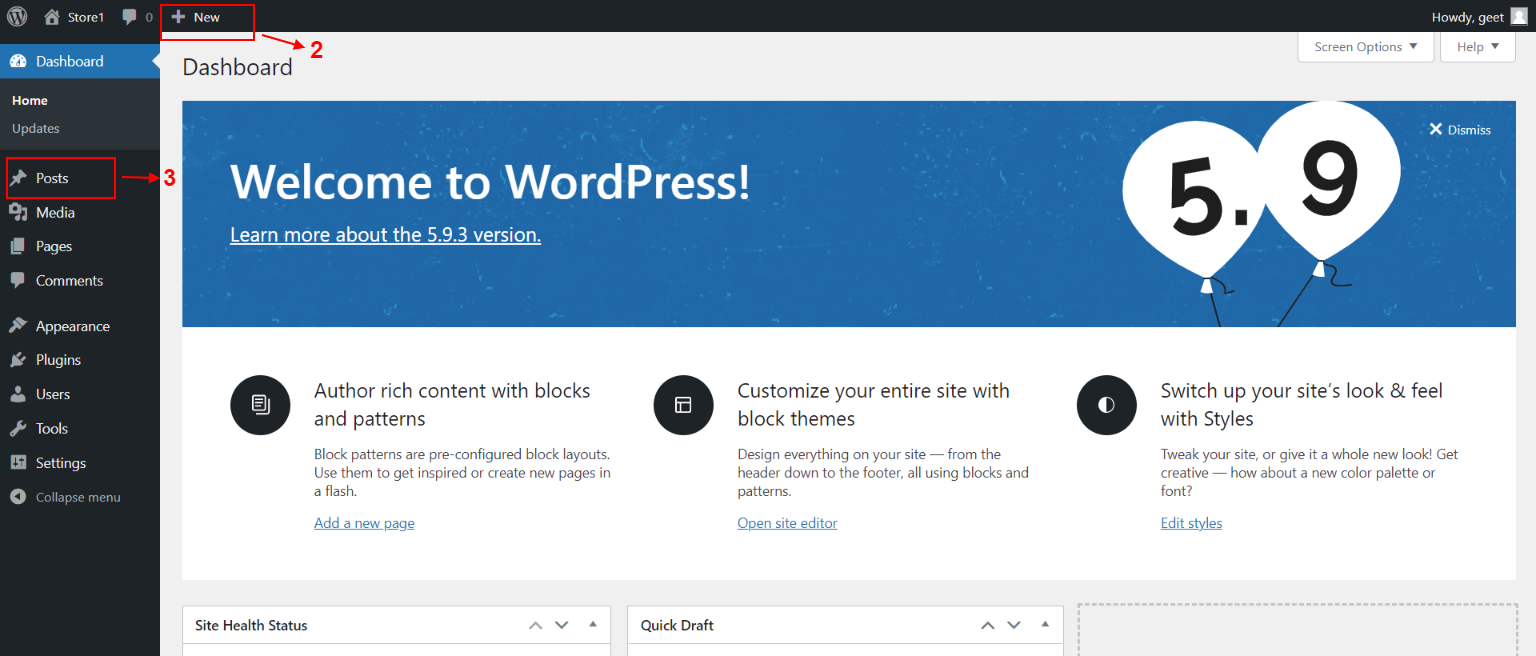
On the next screen, you will see your blog editor.
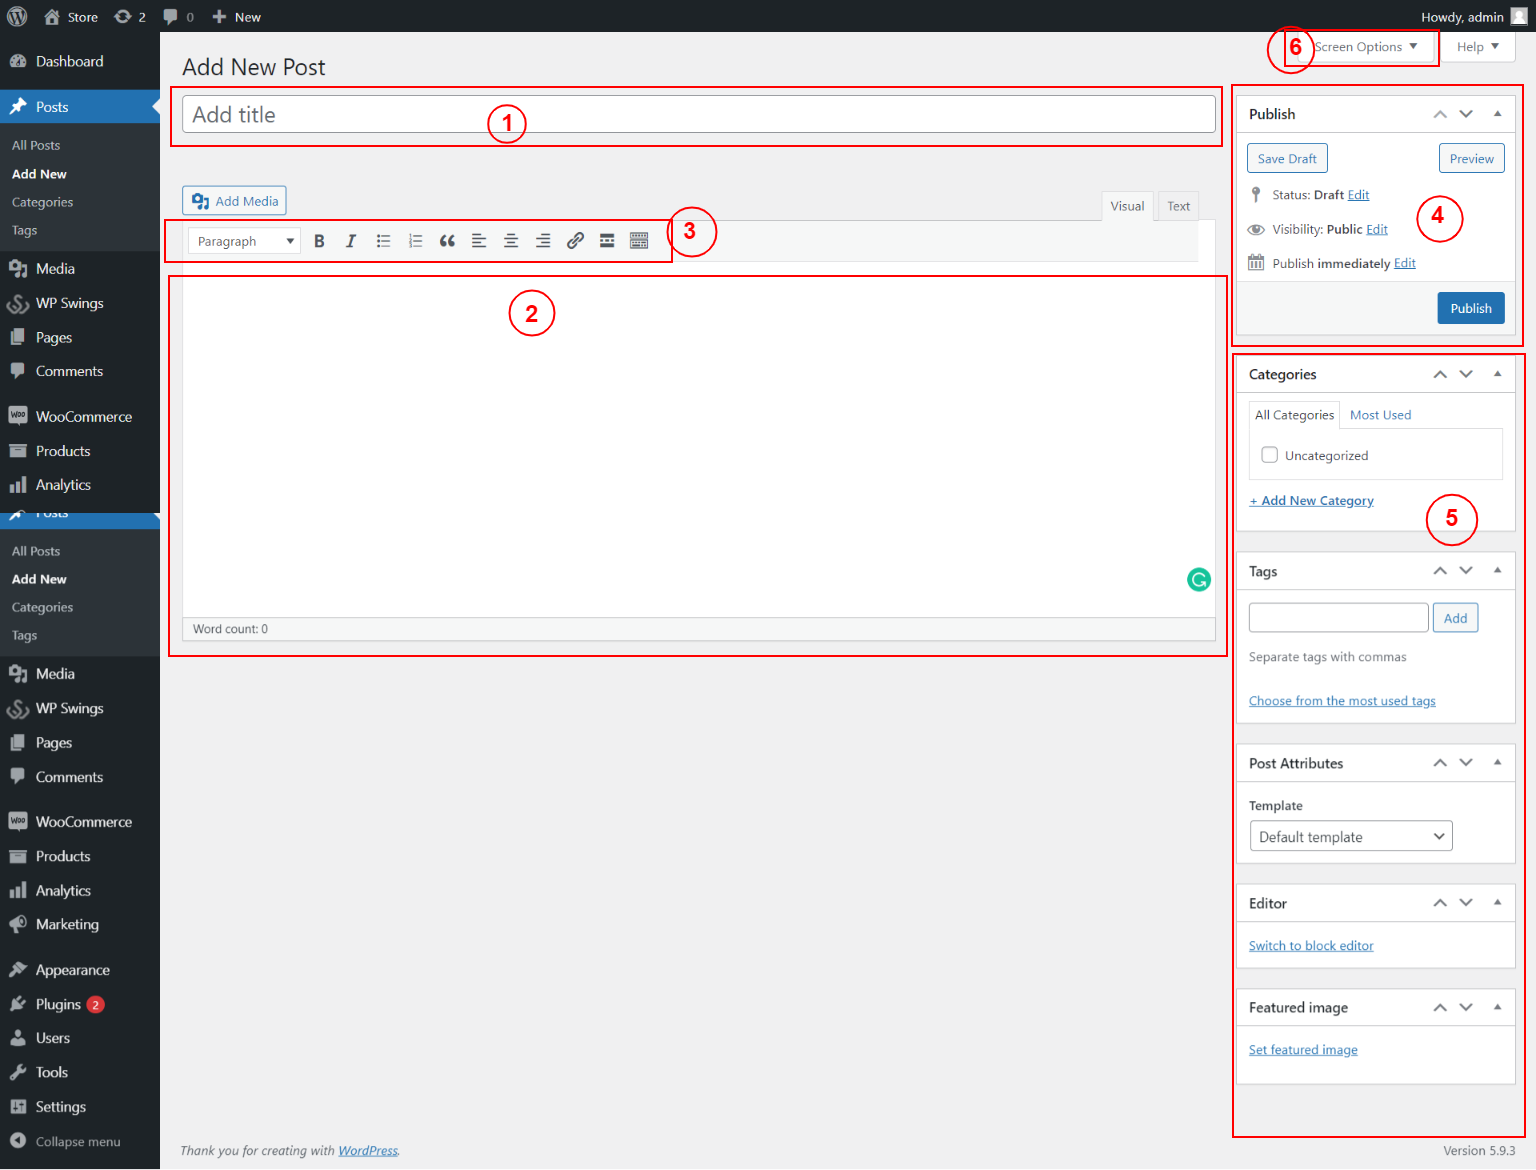
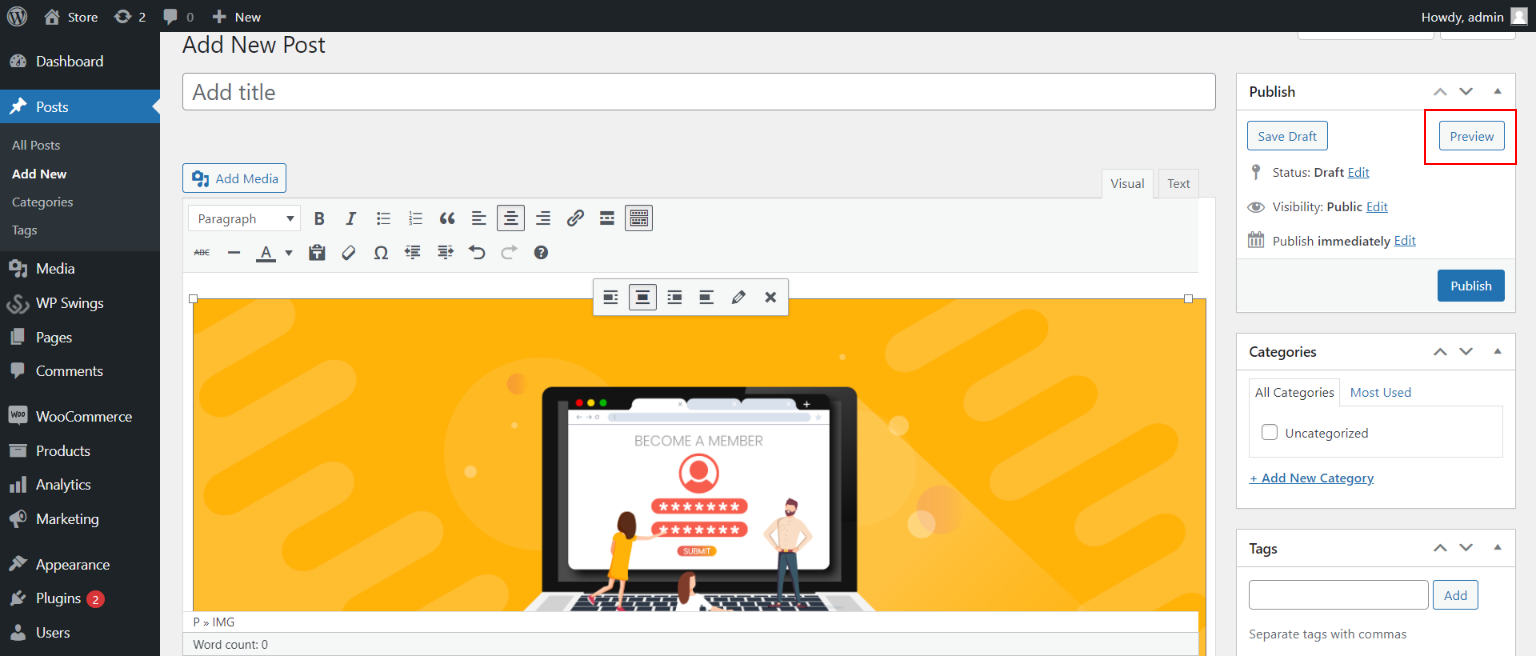
WordPress Classic Editor: All you need to know!
WordPress classic editor is a quick, simple, and easy-to-understand tool you must know before you start your blogging. So, let’s discuss the main features of WP classic editor according to the numbers marked in the image above:
1. Add Title:
Here in this box, you can write your desired title of the blog.
2. Content Box:
Here in this section, you can frame your content according to the flow.
3. Editing Tools:
With the help of these tools, you can enhance your content in more attractive ways so that readers stay on your content at first sight.
4. Publish Section:
This section is used at the last to publish the blog with all updates. In this section ‘Preview’ Button allows you to view the post before making it live. The ‘Save Draft’ Button allows you to save the copy or content. And ‘Publish’ Button allows you to make your blog live.
Not only this, in the status section you can check the status of your blog whether it is in draft or published. Visibility is to check whether your blog is public or it is private. Publish comes with an option of Immediately publishing your blog or you can schedule it for later.
5. Additional tools:
These tools include-
- Categories: In this section, you can categorize your blog related according to your title. For example, if your blog is WordPress-oriented, you can add that in the category of WordPress.
- Tags: Tags are pieces of content that provide information to visitors about your blog.
- Post Attributes: In this tool, you can set the template accordingly.
- Editor: This tool allows you to switch to block Gutenberg editor
- Featured Image: Here you can add the main image of your content.
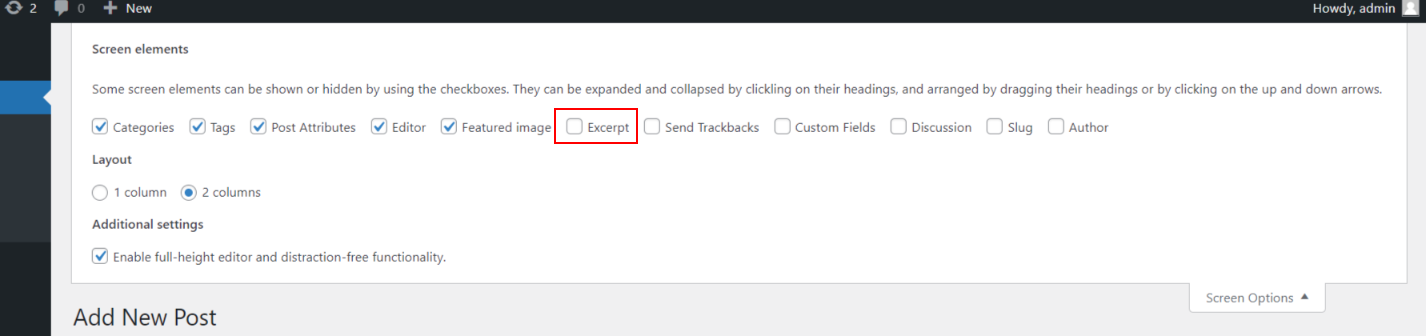
6. Screen Options:
This tool allows you to edit the WordPress screen to your specific requirements. You can disable or enable individual boxes by ticking the checkboxes, changing the layout of the WordPress panel, and so on.
Screen Option Panel
Here are some key factors to keep in mind when writing blog posts:
Excerpt
A summary or teaser of your post that appears on your site’s top page.
When the Excerpt box is selected, an excerpt field appears at the bottom of the Body Copy Box (Content Area). Here you may write your article’s introduction.
As a result, it’s worth asking if the template may be changed and tailored to your requirements.
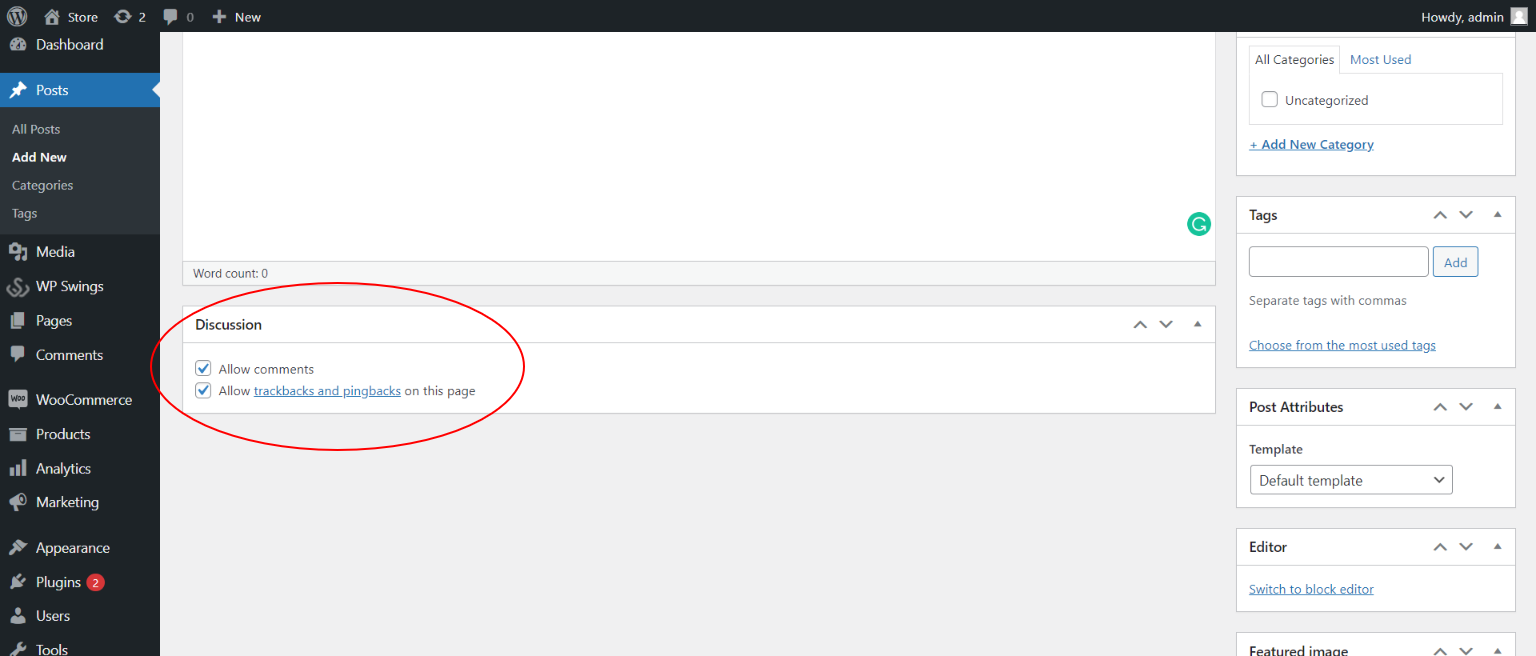
Discussion
Your site’s comments are really significant. You can engage your readers and thanks to them.
But what if you don’t want people to comment on your article?
Nothing could be simpler! In a given post, WordPress provides you the choice of turning them off or on.
Slug
It’s included in the post’s URL (part of the permalink).
WordPress generates the post slug based on the title of the post. It appears beneath the title of the post.

Author
This option is not essential to you if you are the only author on your blog because you will always be the author.
As the site owner, you can add additional users and assign them responsibilities that govern what each user can and cannot do on your website.
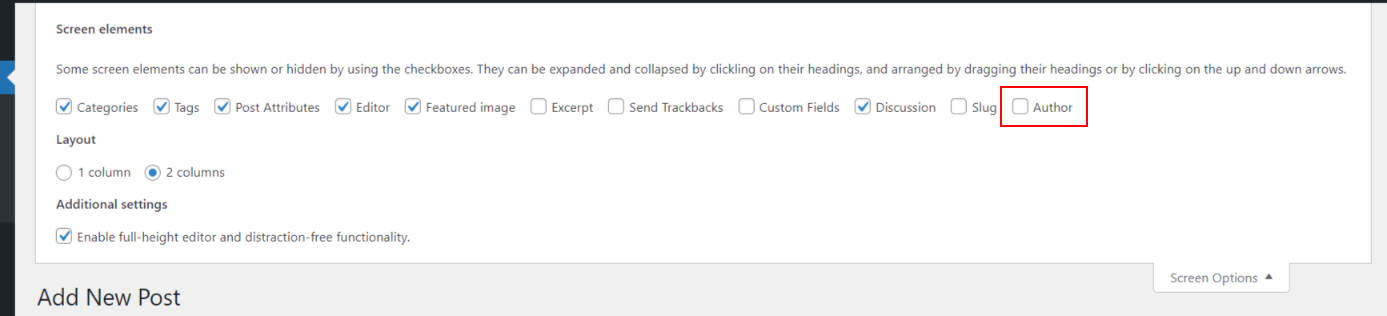
WordPress fills in the author of the post automatically in this case. You sign in and make a post, indicating that you are the author.
Check the Author box if you want to alter the author of your post. A meta box with extra options will show at the bottom of the page.
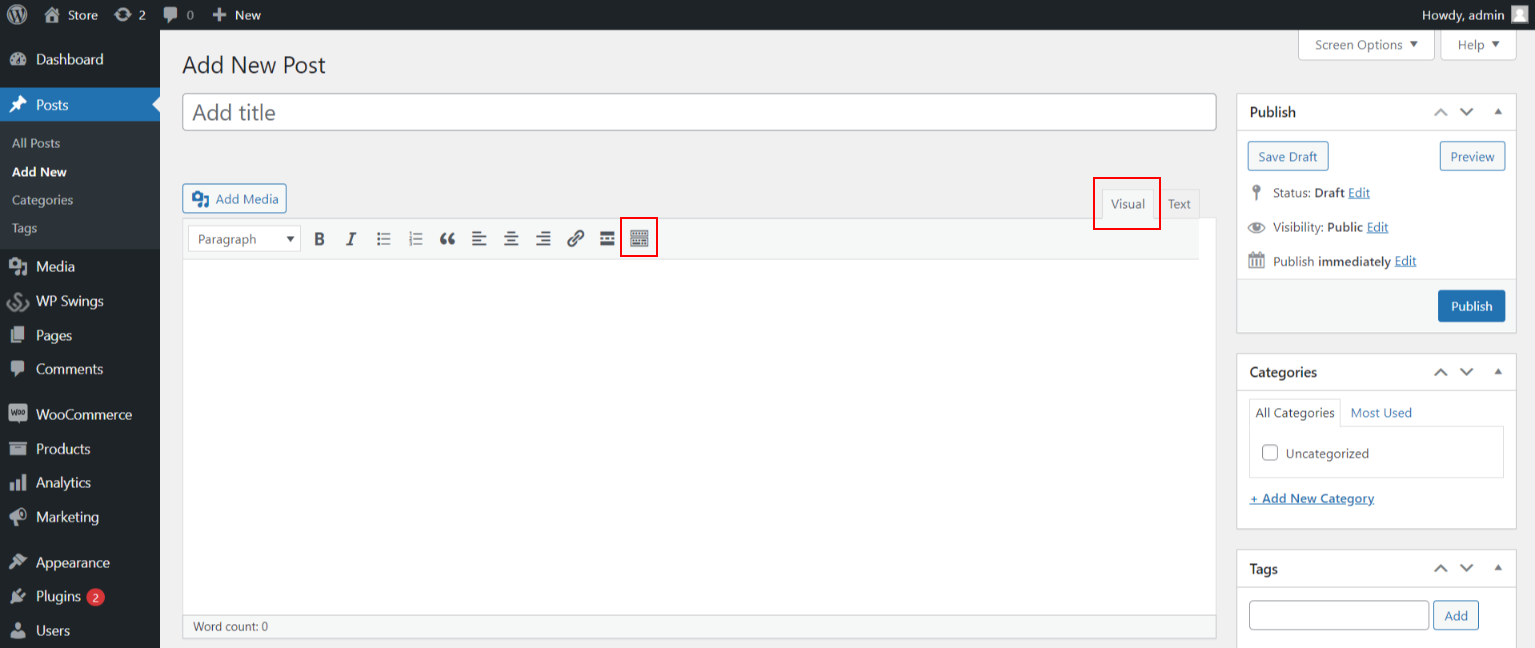
Step 3: Get More Formatting Options
Make sure you’re on the Visual tab first, which allows you to quickly alter text (The text tab is used for writing in HTML code).
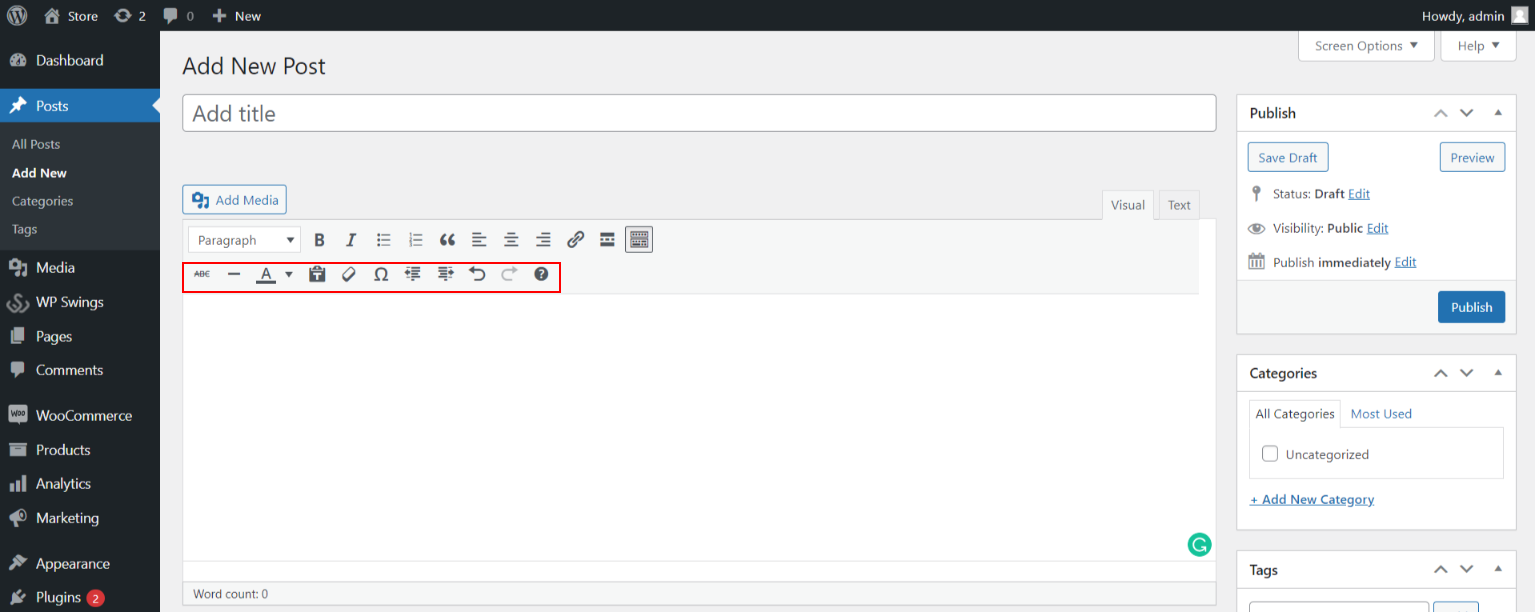
Standard Editing Tools, such as bold, italics, lists, and headings, are located above the Content area. There is an icon named Toolbar Toggle at the very end. When you click on it, you’ll get text formatting options like text color, underlining, and so on. They’ll come in handy throughout the editing stage.
Step 4: Start Your Post
You can now begin creating your own post.
In the text box, type your post’s text, and in the space above, provide its title.
Click the ‘Preview’ button in the Publish box to check how your post looks before posting it.
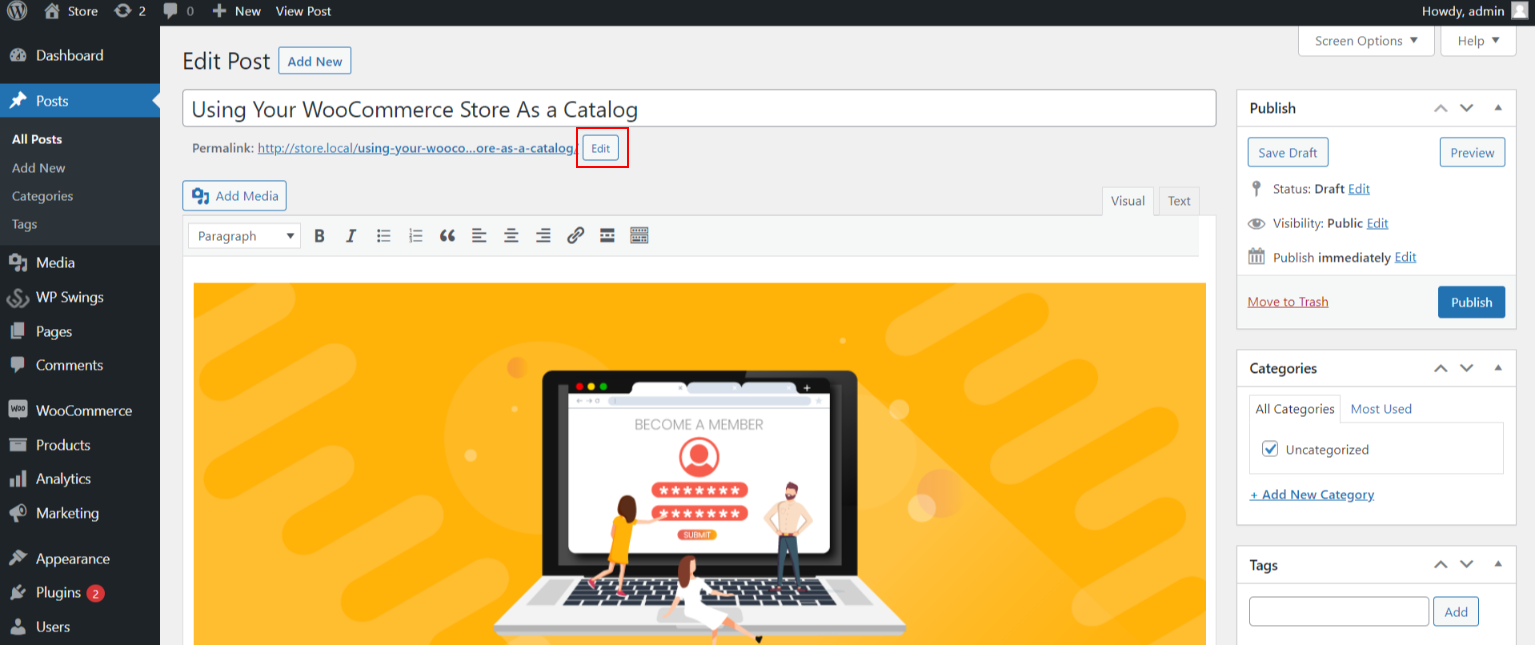
Step 5: Change Permalink
As soon as you add the title of the blog, a permalink will appear under the title.
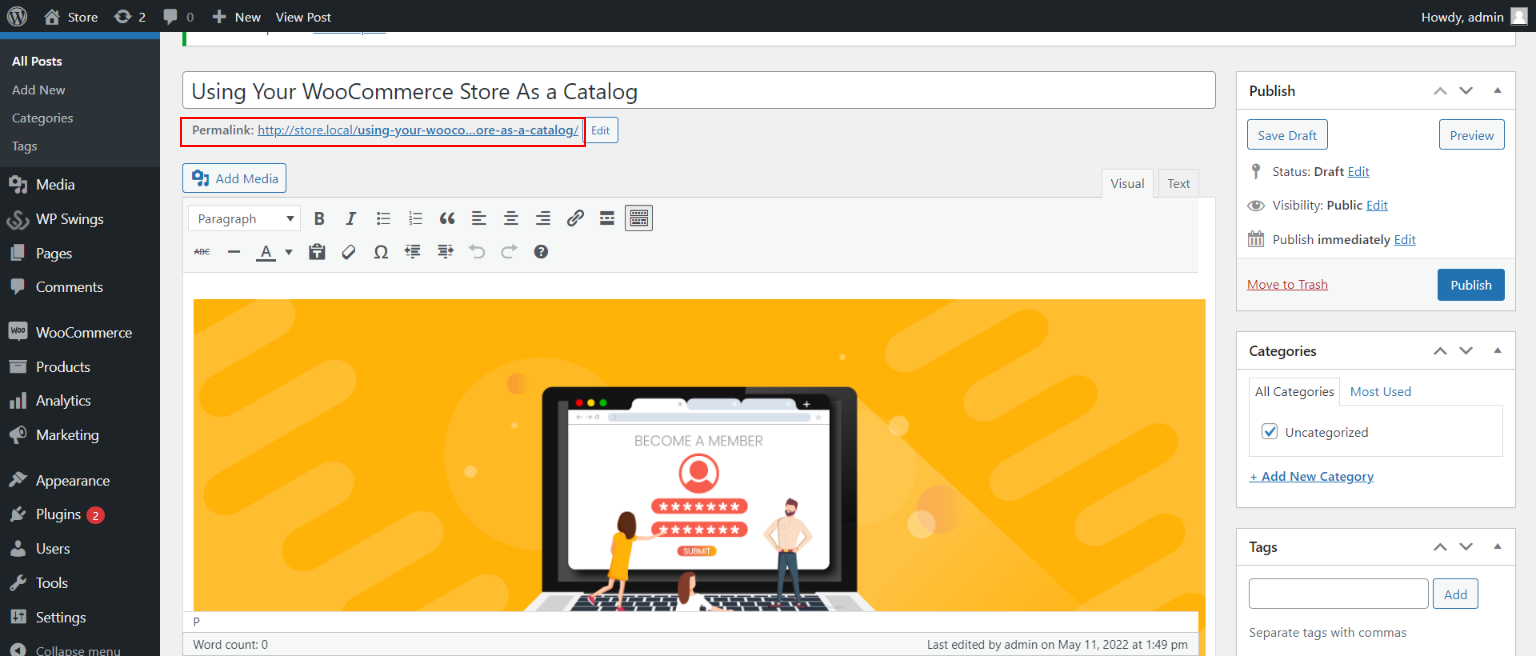
WordPress permalinks are one of the most important settings to set up shortly after you establish a WordPress site.
Do it before releasing the information to save time.
Remember the following features that permalinks should meet while creating the suitable structure:
- brief, simple, easy to remember,
- refers to the site’s content,
- and includes, if feasible, a focus keyword
You can update your permalink before publishing your post if you already have the proper permalink structure in place.
Restructure your permalinks by clicking the Edit Button.
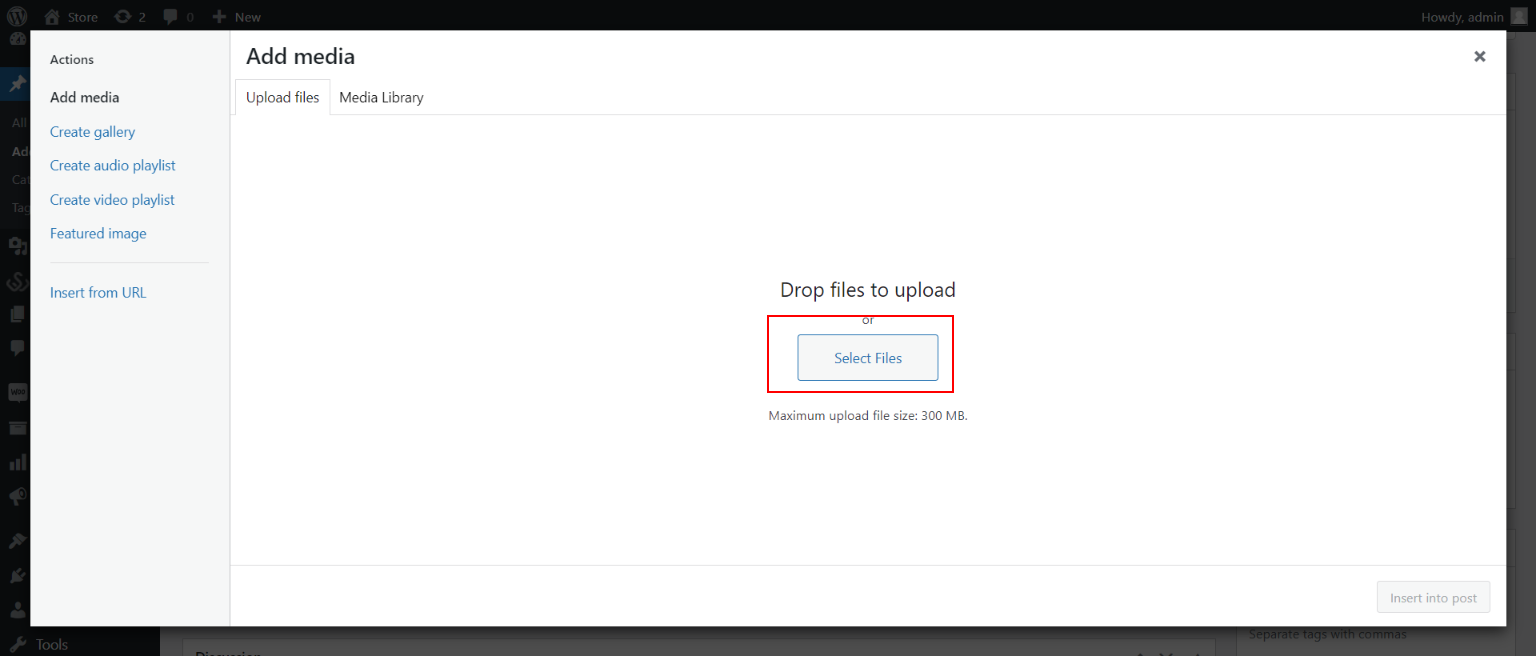
Step 6: Adding Images, URLs, and Videos in Your Post.
Adding Image:
Place your cursor over the content area where you want your image to appear, then select Add Media > Upload File > Drop Files or the ‘Select Files’ option.
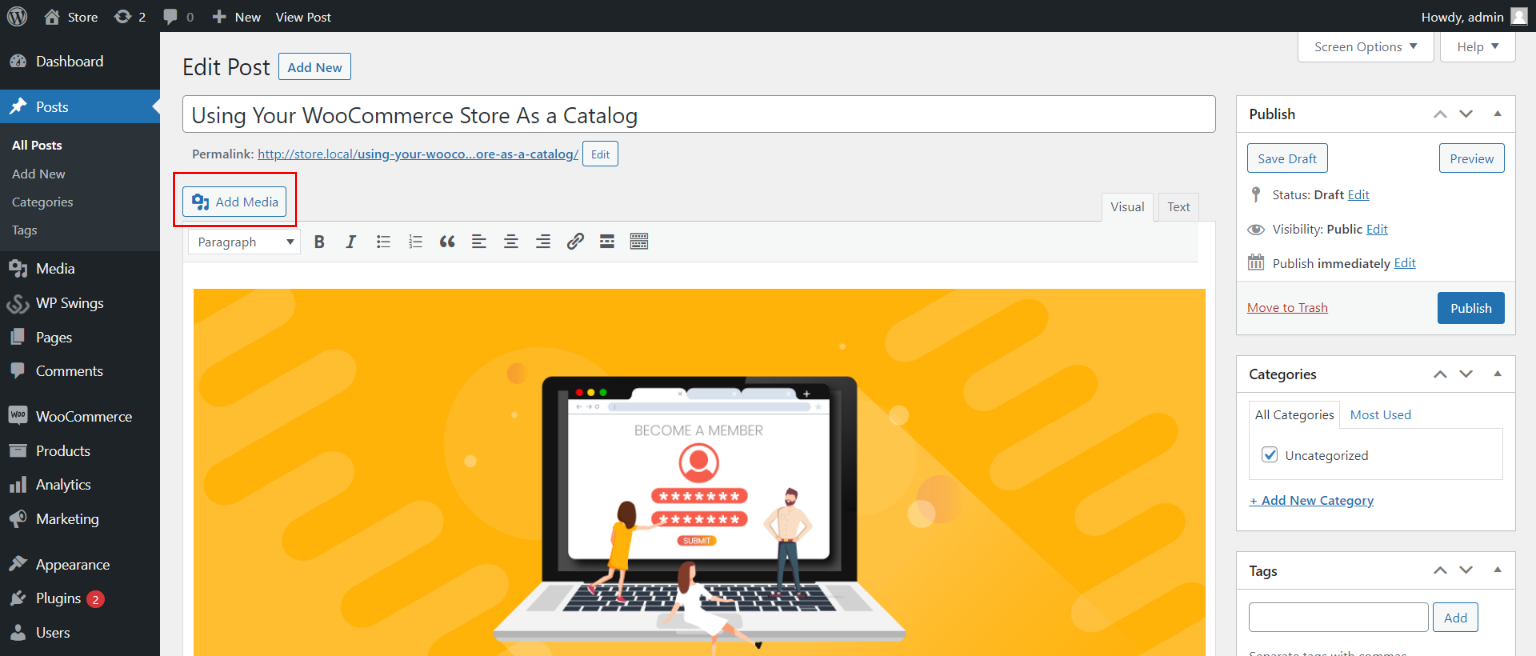
Select the right image.
- To do so, simply click on your image and check that it has been marked, as seen in the image above (if you click on it for the second time, it will be unmarked).
- Fill up the Alt Text and Caption fields. It’s necessary for SEO – (Search Engine Optimization)
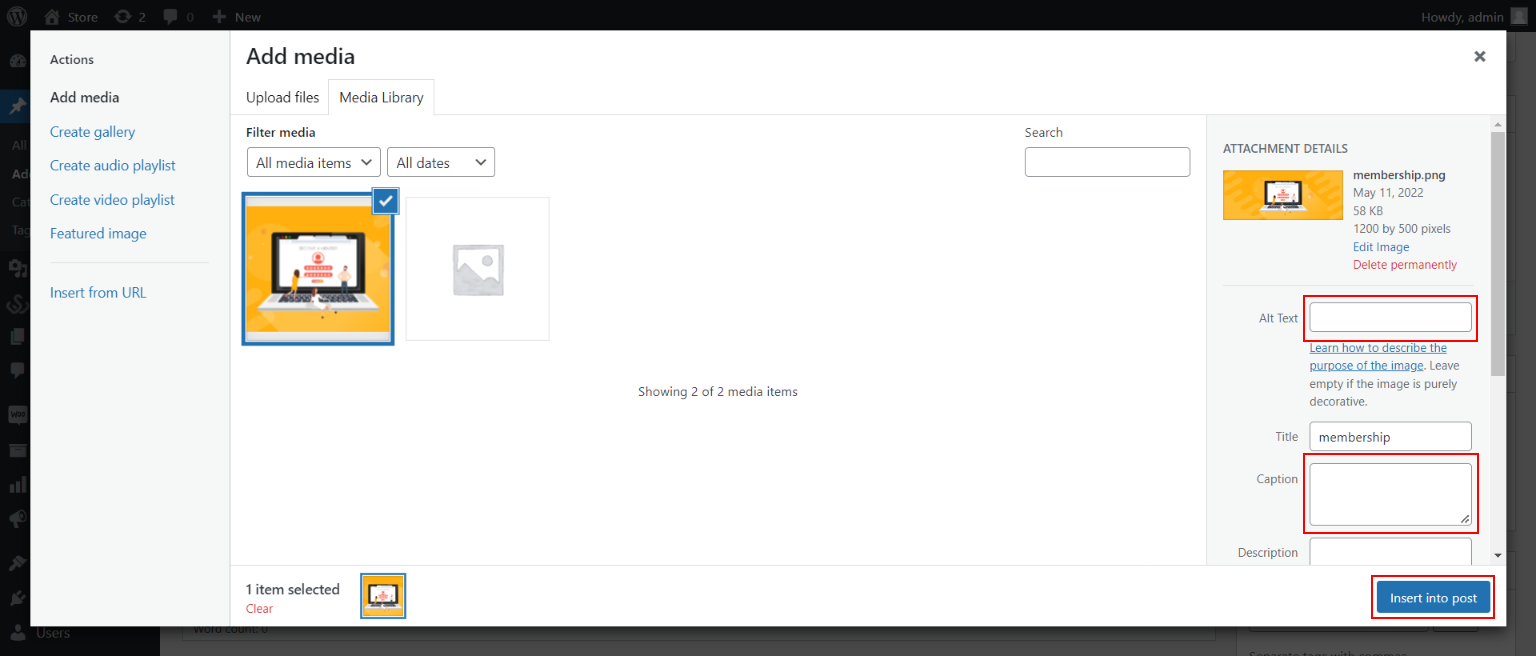
Finally, press the “Insert into post” button. And your image is updated.
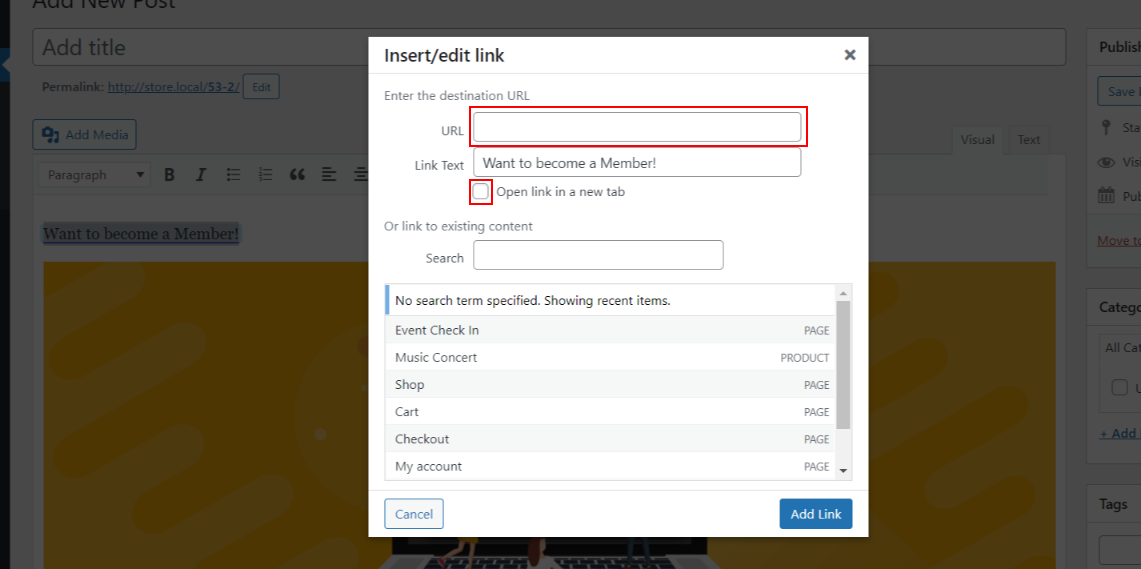
Adding URLs
- Select the text you want to link and then click the ‘Insert/edit link’ icon.

- You’ll see a space where you may type in your URL address and then click the ‘Enter’ symbol in blue or the ‘Link Options’ icon to see all of the available combinations.
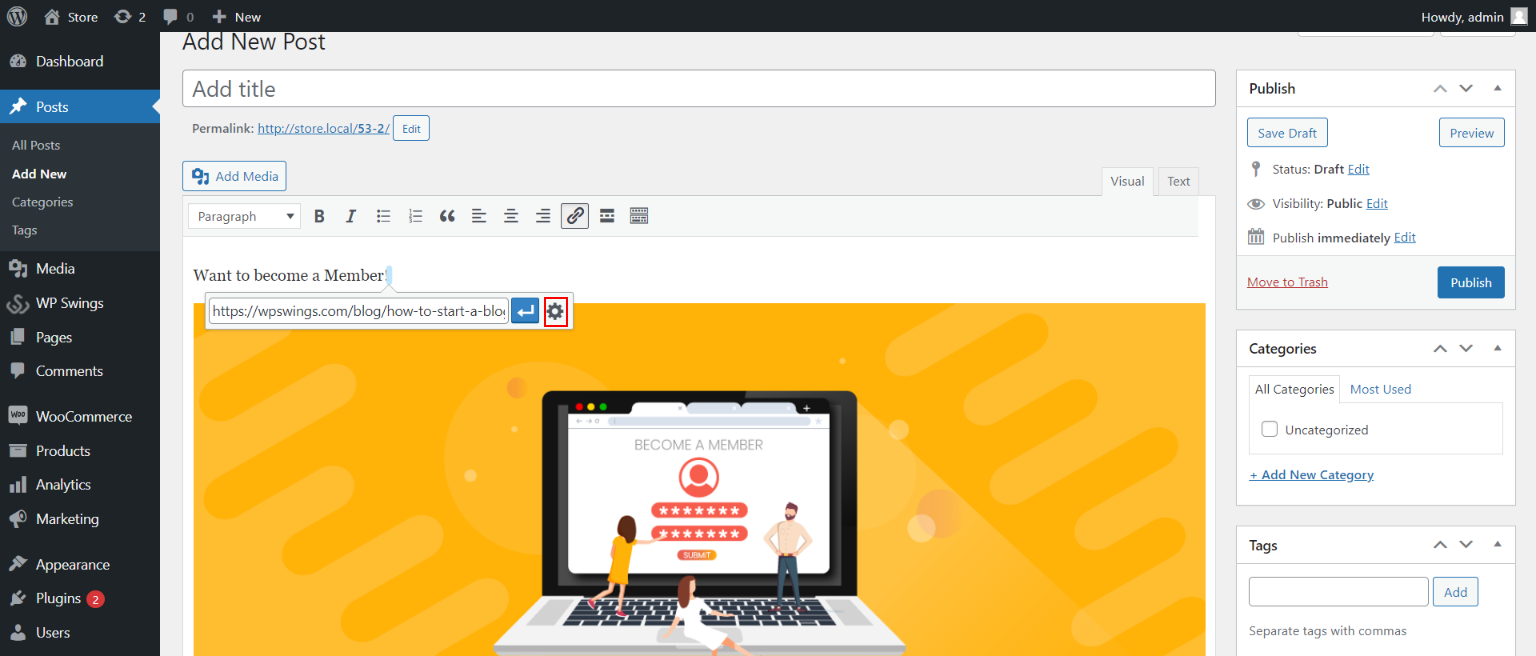
- Fill in the appropriate fields and click ‘Add Link.’
Adding a Video
To embed a video on your website, go to the YouTube video’s individual page. Click the ‘Share’ link under the video on the right, then click the ‘Embed’ option.
- Select the options that interest you and click ‘Copy.’
- Return to your own site, navigate to the TEXT TAB, and paste this link anywhere you see fit.
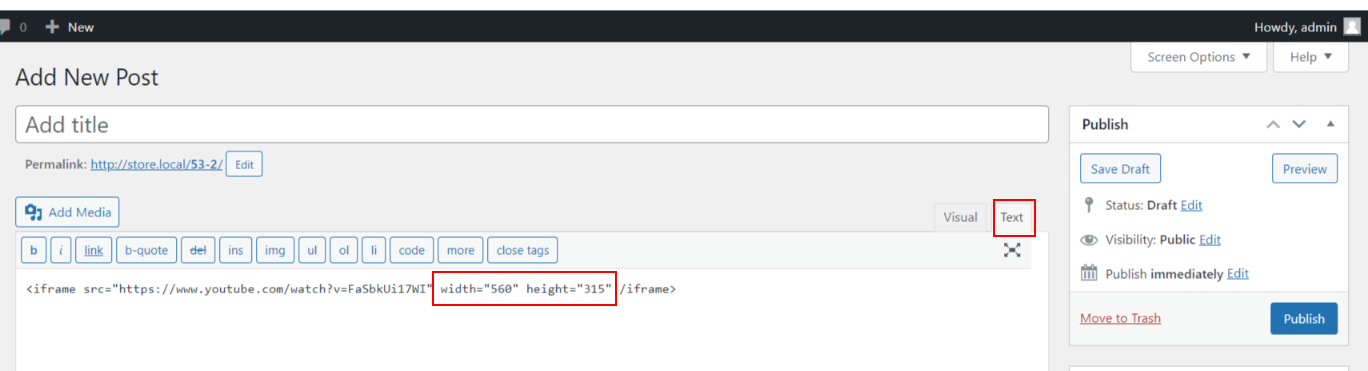
- You may always adjust the video’s size.
- You can achieve this by changing the dimensions in the Text Tab, but be careful not to change the video’s proportion.
Finally, remember to save your modifications. Then press the ‘Update’ button.
Step 7: Tags and Categories
Tags and categories aid in the organization of your material. They organize your content, making it easier for your users to find things that they find fascinating.
Categories and tags are normally accessible in the WordPress panel’s right-hand column.
Click ‘+Add New Category‘ to create a new category. To add a new tag, type it into the Tags area and hit the ‘Add‘ button.

Go to Administration Panels > Posts > Categories or Tags to manage your categories and tags.
Furthermore, categories and tags aid in the organization of your information, allowing users to find what they’re looking for more quickly.
The most crucial benefit is that categories help your site’s SEO.
SEO robots can better rank your content thanks to categories.
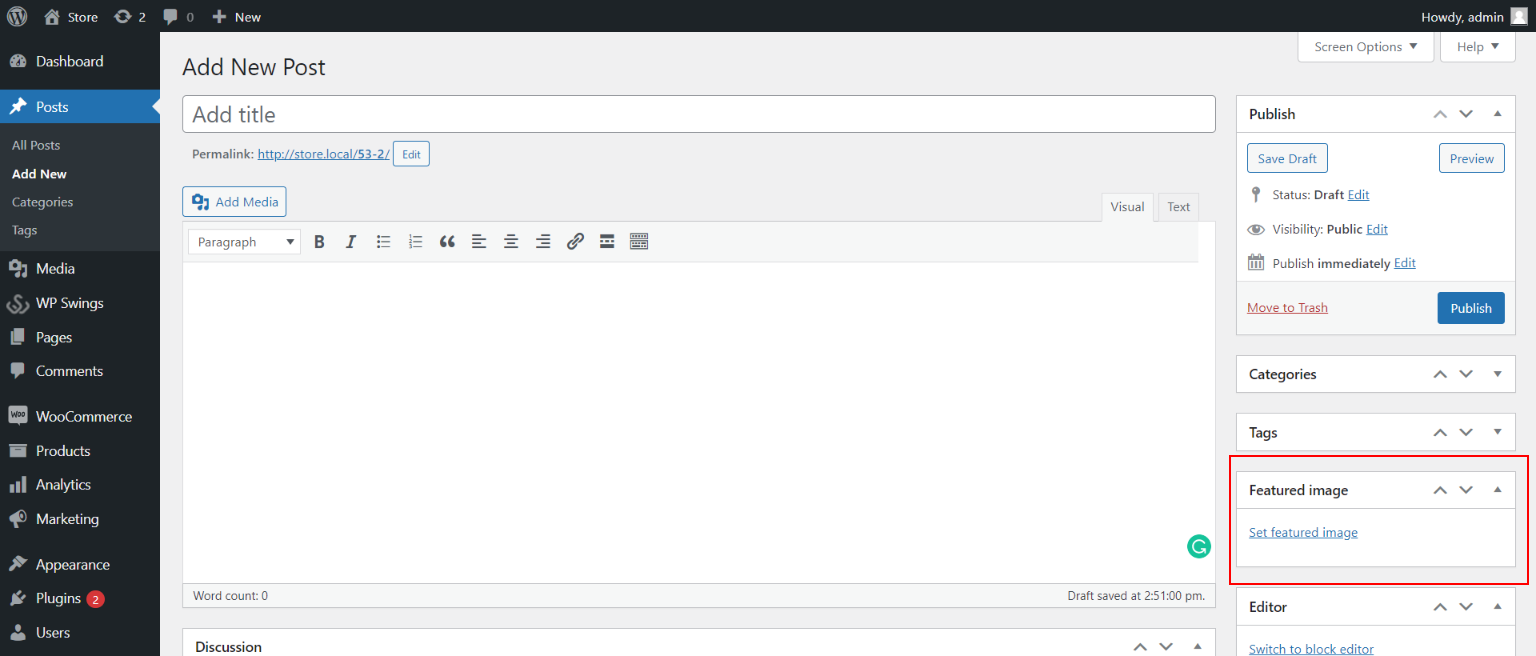
Step 8: Add Featured Image
A featured image (also known as a post thumbnail) is an image that is chosen to represent Posts, Pages, or Custom Post Types. The theme determines how this image is displayed, but most WordPress themes support featured images.
Simply click the ‘Set up featured image’ link, which is normally situated at the very bottom right, and select a fresh image from your computer to use as the featured image.
Step 9: Save, Schedule or Publish Your Blog
WordPress is extremely adaptable to the needs of its users. There is an option you can save a post or a page in a variety of ways.
You can save a draft – if your article isn’t ready to go live yet – or schedule it to go live on a specified date. You can also simply publish, which gives you three options:
– public– everyone can see your posts,
– private – only you and other editors or admins on your site can see them,
– password-restricted exclusively for logged-in users. Anyone who wants to see the post must have the password you set.
Click the ‘Publish’ button on the right side of the Publish Box section to publish your post.
Click the ‘Save Draft’ button on the right side of the Publish Box section to save the draught version of your post.
If you wish to publish your post later, click the ‘Edit’ link next to the ‘Publish immediately’ option in the ‘Publish Box’ area and choose the appropriate date. Then, for confirmation, click the ‘OK’ and ‘Schedule’ buttons.
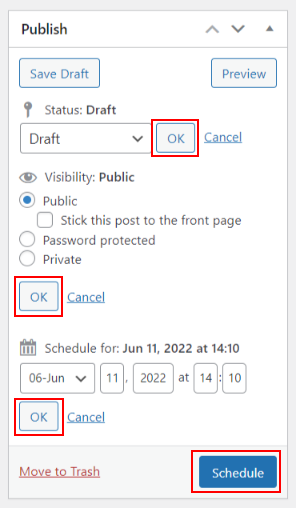
To ensure that you have set the correct time zone, go to Settings > General on the main Administration Screen.
To make your post private or password-protected, go to the ‘Edit’ link next to ‘Visibility’ and select the appropriate option, then click ‘OK’ and ‘Update.’
With these steps, now you can easily decide which editor you should go for— Classic Editor or Gutenberg Editor.
From here I will explain the WordPress Gutenberg editor and then its comparison with the stats of usage of both the editors.
What Is Gutenberg Editor and How It Is Different From Classic Editor?
WordPress Gutenberg Editor, commonly known as the WordPress block editor, is WordPress’s new default editor. It has taken the place of TiniMNC. It has dramatically transformed the way we edit.
In December 2018, the Gutenberg Editor was released. It was made available as part of WordPress 5.0.
The new editor has a large number of blocks that cover practically every aspect of creating a content-rich and visually pleasing webpage.
Classic Editor is an easy text editor with formatting options at the top. Unlike Gutenberg, which allows you to add extra design elements to your writing using blocks, the Classic Editor only has very basic formatting options.
Individual content elements can’t be changed greatly because the editor’s material isn’t in the form of blocks.
As I have discussed and mentioned both Classic Editor and Gutenberg Editor… So let’s move on to the differences:
What to Go For— Gutenberg Editor or Classic Editor
Both the Gutenberg and Classic editors are built into the WordPress core and are the default editors. They are similar in many ways, despite their significant distinctions.
The introduction of Gutenberg Editor has simplified the process of writing and modifying posts. The new editor is more user-friendly and comprehensive. First, look at the differences will be obvious in the comparison table below.
WordPress Classic Editor Vs. Gutenberg
Gutenberg Editor |
Classic Editor |
| WYSIWYG(What You See Is What You Get) | While editing, there is no preview |
| Predefined blocks | NA |
| Inline image editing | NA |
| Scrolling with parallax effect | NA |
| Lets you create content with blocks | Provides a blank canvas on which to write your content |
| You can set items inside the editor | For editing, you must visit the library |
| User-friendly drag & drop interface | NA |
| Create complex elements with custom blocks | Requires HTML knowledge |
| You can directly upload media files to the editor | First, the media files are uploaded to the library, then to the editor |
| Improved performance. Images can be added and edited online | When working on long postings, there may be a brief halt or lag. |
| Contact form, table, video embedding, and more advanced features | These tools require extra plugins |
According to the comparisons shown in the above table you might have got a clear indication of the Gutenberg WordPress Editor, as Gutenberg Editor is nowadays acquiring the market with its Easy-To-Use Features.
Do you know?
WordPress is presently used by around 62% of websites that use a content management system (CMS). With this in mind, it’s no surprise that the Gutenberg WordPress editor, which was released in December 2018, caused a firestorm of debate among amateur and professional web developers. The Gutenberg editor is a WordPress platform add-on, not a third-party plug-in designed to replace the previous editor.
In addition, Gutenberg’s future looks promising. We don’t think Gutenberg will completely replace or substitute WordPress’s visual builders, but we do think it will play an important part in website development.
Still Confused about the features of WordPress Gutenberg Editor!
Look at Some Stats for More Clearance…
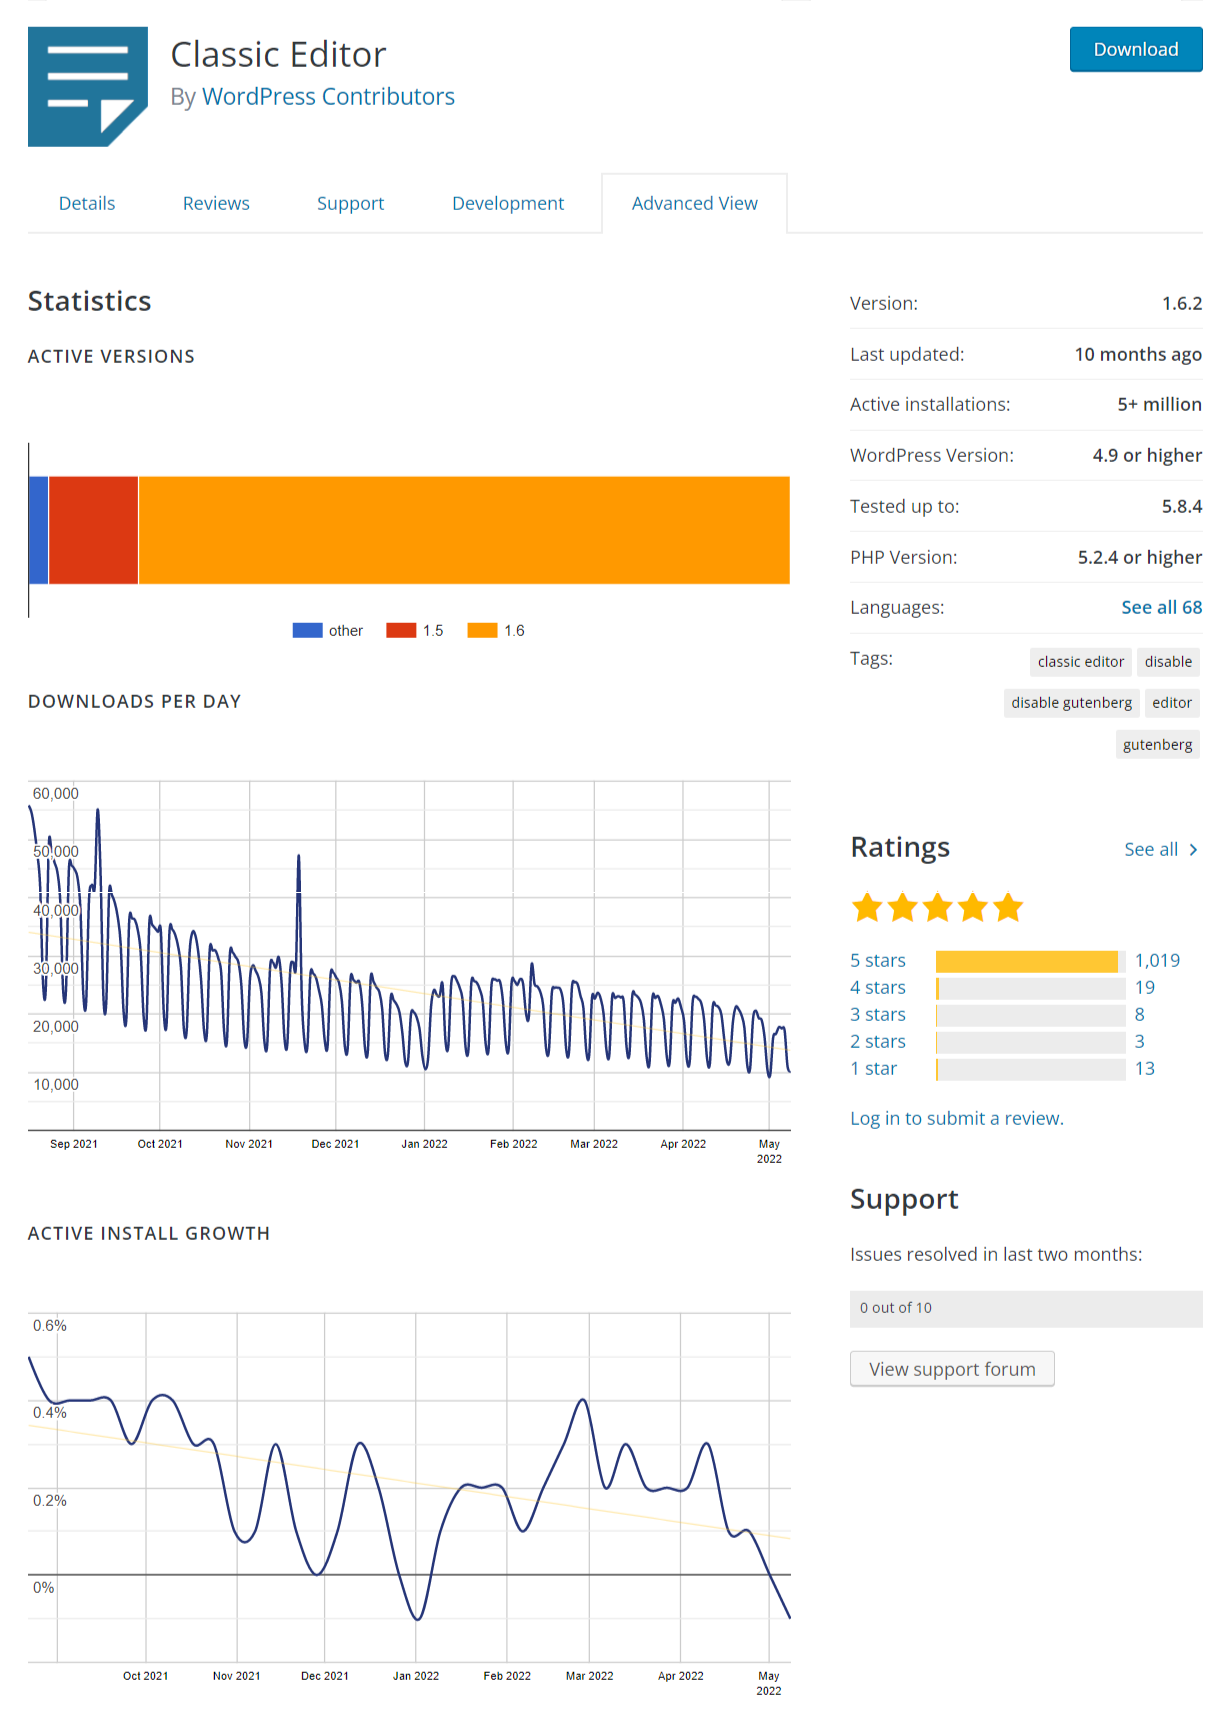
Here is the stat of WordPress Classic Editor.
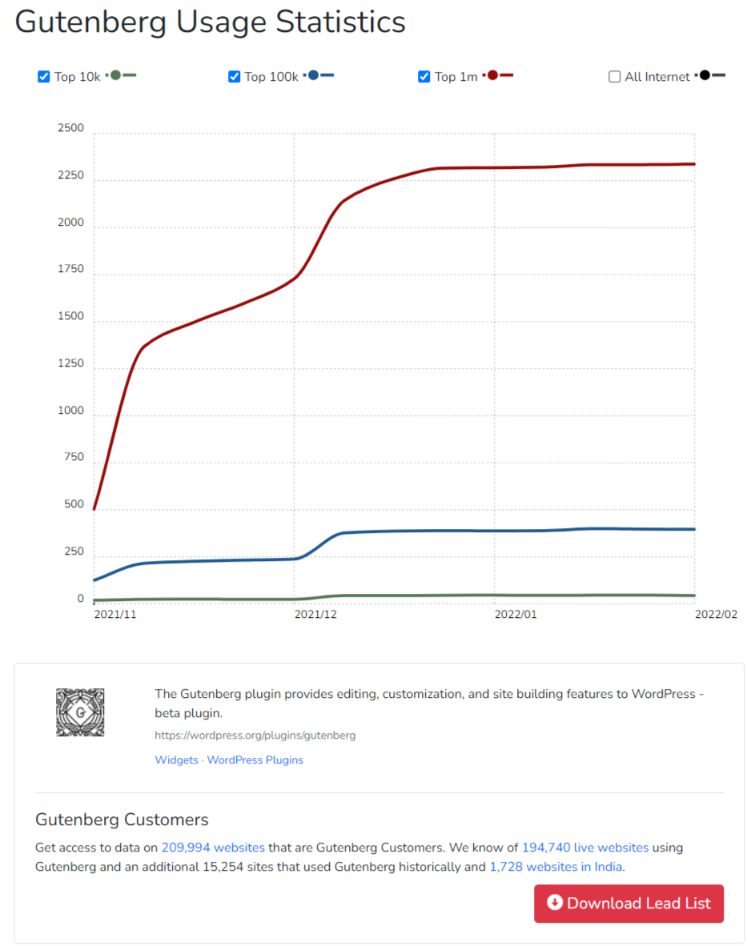
Here is the stat of WordPress Gutenberg Editor
After looking at both the above stats your mind might be questioning…”Which boat to step on to reach the Destination” So don’t worry I am here to make you clear with the future of the Classic Editor…
Future of WordPress Classic Editor!
The Classic Editor, according to Jonathan Desrosiers, “is not going away” and will “remain listed in the.ORG repository for the foreseeable future.”
Classic Editor users can use the plugin until 2022, at least officially, thanks to the extended support.
After all, plugins like Disable Gutenberg will allow users to continue using the conventional editing experience after the 2022 deadline. This provides some stability to the Classic Editor’s otherwise uncertain future.
“You may be pleasantly surprised,” Desrosiers says, urging users to give Gutenberg Editor a chance.
Let’s Wrap Up With Final Thoughts
In conclusion, I would like to say it’s up to you and your requirements to make the final selection. It can be time-consuming to switch from the Classic Editor to Gutenberg, especially if your website has been heavily customized.
But it’s still worth thinking about. Remember that obsolete software might provide long-term security threats to your website, so stay updated to avoid any unpleasant surprises down the road.
However, I want to say while using WordPress Classic Editor you should give a try Gutenberg WordPress Editor too. It is a new WordPress editor that is completely redesigned. It will change the way you create posts, pages, goods, and pretty much anything else on your website.
Both the editors are equally important. But once you’ve tried the Gutenberg WordPress Editor, you won’t find them intuitive Block editing experience even more exciting? So let us know how this article helped you and the option you opted for in the comments section below. Have a Good Day!