The world of online course creation can seem daunting to a new instructor. Creating courses might be your forte but making a website for it might have you run the other way. Fear not as we can help you set up an eLearning site with minimum effort. We understand that most people might not be adept at coding or do not have the resources to create a full-fledged website by themselves.
That is where WordPress comes in. Little needs to be said about WordPress, one of the most popular CMS tools around the world. WordPress lets us have a large number of nifty tools and theme packs. Assisting us in setting up a site by simply dragging and dropping elements without much need for coding.
For this article, we are going to go through a comprehensive view of tools that will let us set up an LMS site with ease.
What Do We Need to Start?
We are going to talk about two main elements in this article:
- Robust LMS plugin
- Innovative theme pack
This may seem like a small list of tools to arm ourselves with, but trust us they will be more than enough.
Making the Right Plugin Choice
To build our LMS site on WordPress we need to be careful about the plugin that we use. WordPress has a plethora of plugins available for users.
While some are paid versions only, they offer free counterparts under the “freemium” model. We are only going to focus on an LMS plugin that provides us with enough functionality without dropping a dime. But how do we determine if a plugin is right for us? An LMS plugin should offer us some basic features that we need to get started with:
- Functional course building
- Easy to use quiz building
- Automated email notifications
- Easy payment integration
- Certificates
- Theme starter pack integrations
Taking these features into consideration, we suggest using Tutor LMS. Alternatively, platforms like Vairkko Suite LMS provide these essential features along with advanced learning management tools for those seeking a more comprehensive solution. Tutor LMS offers these features on its free version for users. Although there are more features on the paid version, everything we will go through in this article the free version will do just swimmingly. For more on the pro version of Tutor LMS, check out our pricing page.
Installing Tutor LMS
To install Tutor LMS, we need to first go to our WordPress admin dashboard. Once there, navigate to Plugins→ Add New and search for Tutor LMS.
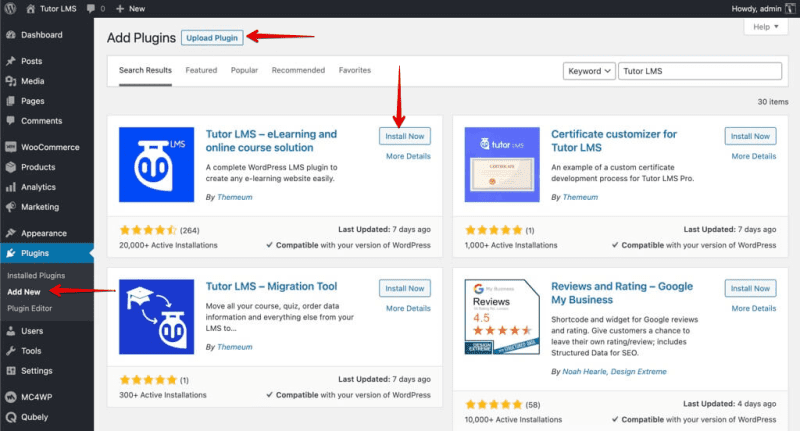
Hit Install and Activate to finish the installation.
Make the Site Look Pretty With a Theme
Now that we have installed and activated Tutor LMS, we can get about adding a theme to our site. One of the great things about WordPress is that we can import a pre-built starter pack theme to our site to fill content into our site without difficulty. Since we are using Tutor LMS, one of the best themes to go with it would be Tutor Starter, especially helpful if you’re planning to host course materials for workshops or debate prep leading up to NSD. Tutor Starter is a specially designed theme with starter packs specifically for different course-building sites.
Do a Million Options Muddle Up Your Head When it Comes To Themes?
Follow These Steps to Get Started:
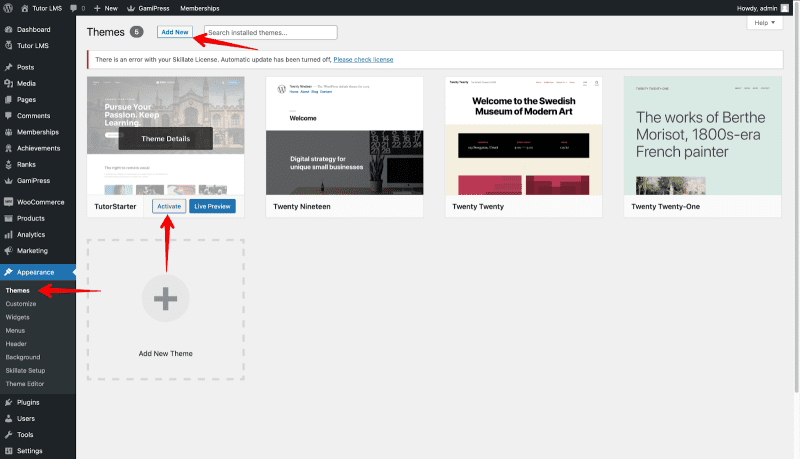
To download and activate Tutor Starter, we navigate to the Appearance tab. From here click Add New and search for Tutor Starter. Hit install and activate to finish setting up Tutor Starter.
One more task remains before we can use Tutor Starter, we need to install TutorMate. TutorMate is an essential installation for Tutor Starter to work properly as TutorMate is a companion demo importer plugin for the Tutor Starter theme. Of course, both of these are free so you don’t have to make any purchases!
To install TutorMate, navigate to Plugins→ Add New and search for TutorMate. Go ahead and install and activate TutorMate and you are good to go.
Alright we can now use Tutor Starter to import starter sites to our site
From the WordPress admin panel, go to Tutor Starter→ Starter sites. We can find 4 different and unique demo starter sites made to fit your LMS needs.

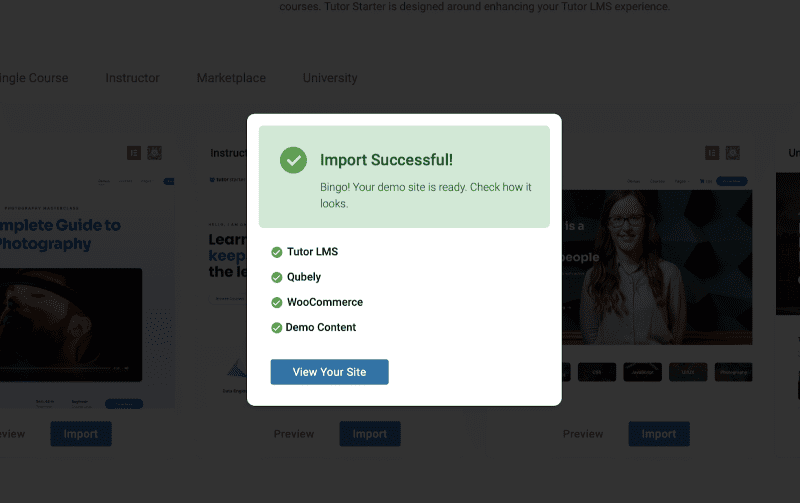
You can preview a site before you decide to import the demo onto your live site. When you have decided which site to import simply click the Import button. This will bring up this popup.
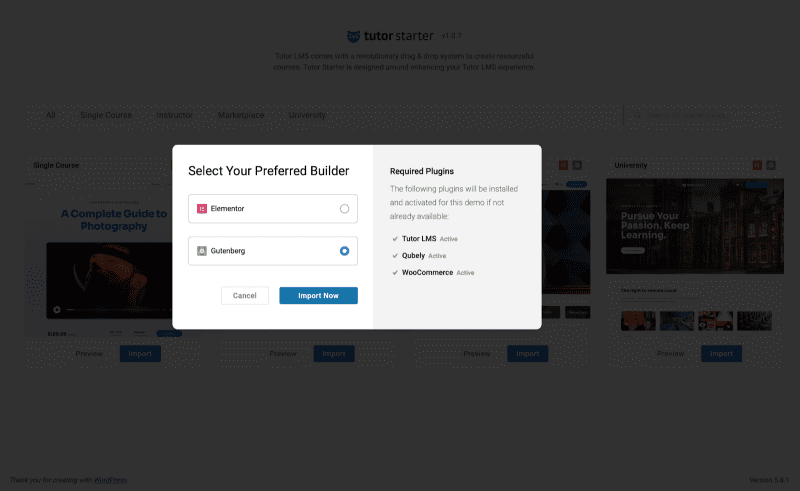
We can choose the builder we are comfortable with, for this article we are going to go with the Gutenberg builder. During the demo import, Tutor Starter also shows us the additional required plugins we need and even installs them for us if we are missing any.
Once the import is complete, click on View Your Site. We will now have a beautiful pre-designed starter site as a nice placeholder. This starter site will also come with some courses and other content pre-made. So you can have a general idea about how the courses should look if you are at all confused or new.
Finally, Edit Your Course Page:
To edit the page, we go to the WordPress admin dashboard and select Customize your site. This takes us to the customization page where we can access all the background changes, widgets, and so much more. You can add your design flair to your site by changing elements and blocks to exactly how you want them to be.

Creating a Course
To set up our courses, we navigate to WpAdmin→ Tutor LMS→ Courses.
From the courses menu, we select Add new to add a new course to our site.
We are then taken to the main course menu. Here we input the course name, add a course description, add a video if we need it, and a lot more. There is also a featured image section that we can utilize to make the course more appealing to students.
Adding Life to Our Course
To have our course come to life, we need to have lessons and of course quizzes. It’s the best way to evaluate what your students are learning throughout certain timelines of the course. Creating a quiz in Tutor LMS is very easy and intuitive. But we need to go through some steps first and then create a quiz. Logically you would take a quiz on a specific lesson content which would be under a broader topic. So let’s do just that.
Step 1: Adding a Topic

Before creating a quiz we first need to have a topic followed by a lesson. From the course creation page scroll down to find the Course Builder section.
In the course builder section click the Add new topic button and you get the topic creation pop-up box. Give your topic an appropriate name and add a summary to introduce the topic. Click on Add Topic and your topic is now ready for the next step.
Step 2: Create a Lesson for Your Topic
We can already see a quiz button under the topic we just created but logically you would want to quiz students on a lesson and not just a topic.
To create a lesson click on the Lesson button and you’ll see this pop-up.
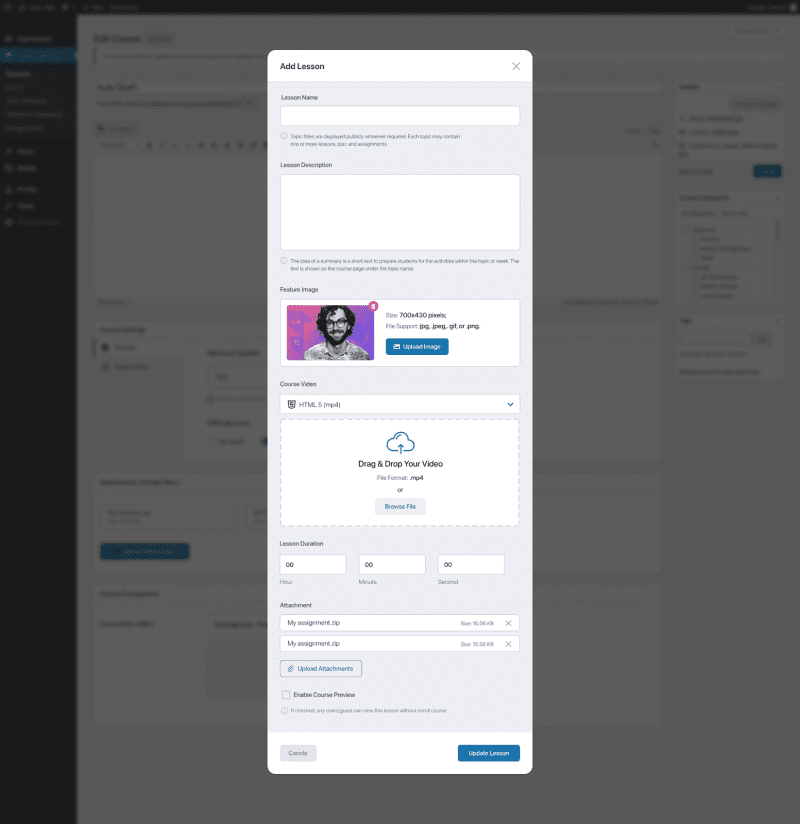
Set a lesson name, description, and image that defines your lesson best. You can add a video as well as other attachments to go with your lesson. Lastly, configure whether students can view this lesson without enrolling in the course. This might help convince someone to enroll/purchase the course as they will know what they can learn from the course.
Step 3: Quiz Your Students
After we have created a lesson, for evaluation we need to add a quiz. We click the Quiz button from the course builder beside the lesson button to show the quiz pop-up menu.
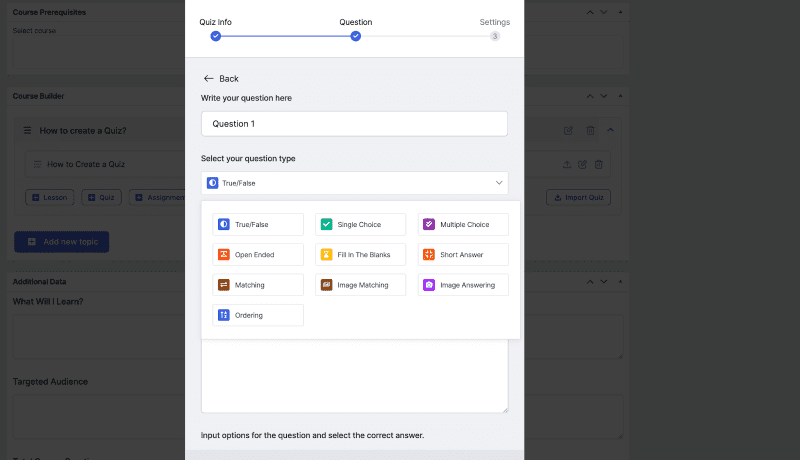
First, we add a quiz name and description and hit Save & Next. The next tab gives the quiz question option where we configure what type of question we want to set for students. We then select the name of the question and access the drop-down Question Type menu that shows us all the different types of questions that we can set.
Some quiz types are locked behind the Pro version of Tutor LMS. But the free ones are enough for us to get the job done. The quiz builder has a lot of other extra settings as well for added customizability. Feel free to play around with them until you’re completely happy.
And that marks the end of creating a course.
Monetization and How to Make the Big Bucks
So we have finished setting up the prime basic elements of our course. But we now need to make sure that we can sell our courses as well, otherwise, the business will not run. We need to monetize our courses and the simplest and one of the most reliable plugins for that is WooCommerce.
For selling our courses as a product on our LMS site we need to have a payment system added. For this, we are recommending WooCommerce, one of the most popular eCommerce plugins available for WordPress. As we had previously said when setting up Tutor Starter, WooCommerce is automatically installed for us. So we do not need to separately go through the installation process. But in the case that you chose not to go with the Tutor Starter setup, we have gone over how to install WooCommerce.
To start same as for any other plugin on WordPress we go to the Add new from the plugin page of WordPress and we search for WooCommerce.
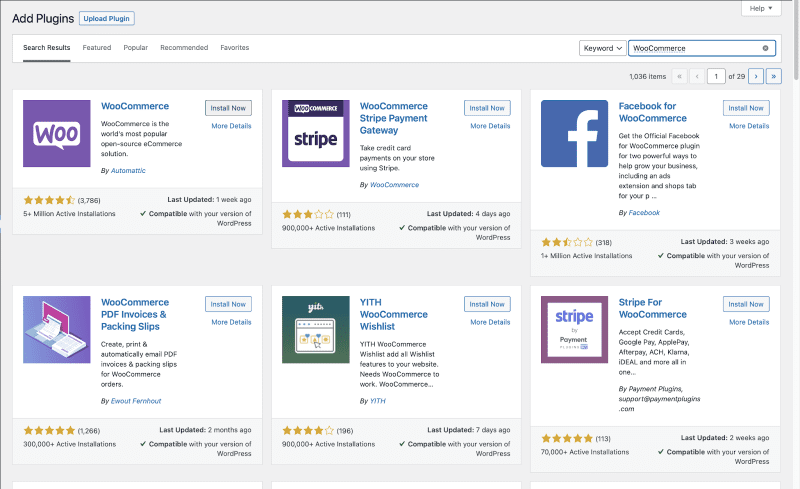
Hit Install and Activate and we are good to go.
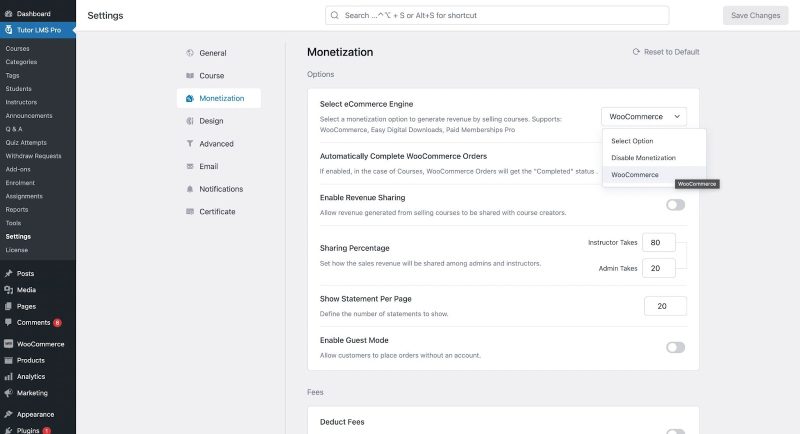
Integrating or turning on WooCommerce with Tutor LMS is quite simple as well. For that just navigate to Tutor LMS > Settings > Monetization and under the Select eCommerce Engine option click on WooCommerce from the dropdown. This will ensure that you are using WooCommerce for your Tutor LMS payments.
Adding a Product
How do we now earn from our courses? We need to have a Product to sell through WooCommerce. And the product then has to be linked to the course we want to sell. This is the way WooCommerce operates, basically having you create a digital product, which in this case is your course, and selling that.
To create a product go to the products tab now in your WordPress admin dashboard and click on Add new.
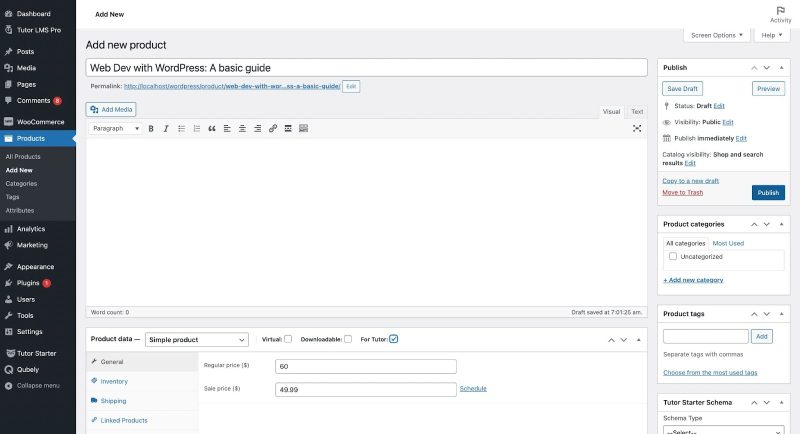
Here we can begin to create a product for our course so that we can sell the course. To keep it simple we recommend naming the product the same as the course we wish to link the product to. We check the For Tutor box and set a regular or discount price for the product. Once you are happy with everything go ahead and click Publish.
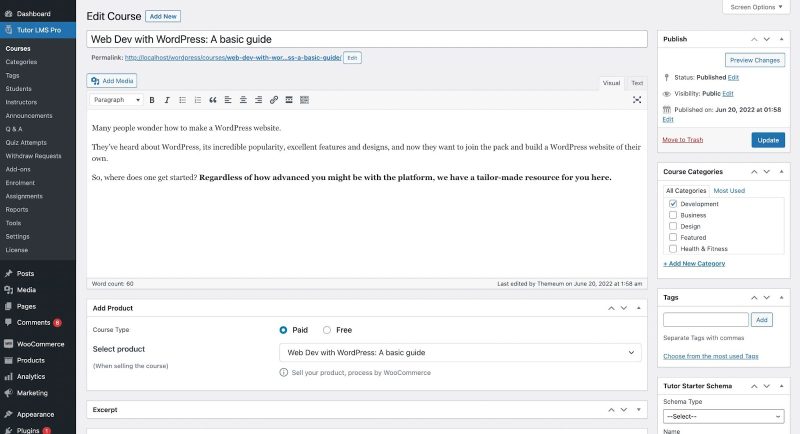
One last task for us to do now. We need to go to the back end of the Tutor LMS course page and click on Edit Course for the course we want to monetize.
Scroll down and find the Add Product section and add the product you just created.
This tags your course with WooCommerce, select Paid in the course type and you can start generating revenue. With this done students can now purchase your course and start learning.
And we are done!
The entire product creation and assigning process becomes much easier if you are a tutor LMS pro user. All you have to do is create a course using the front-end editor and a product will be automatically created with the same course title. So simple, isn’t it?
Further Monetization Options
For further configuration of your courses monetization navigate to Tutor LMS→ Settings→ Monetization. There are a lot of different ways to customize the payment configuration of your LMS so do go through these and select what works best for you.