


WordPress wiki creation refers to the process of creating a knowledge base, reference guide, or informational resource. The goal of creating a wiki on WordPress is to provide a centralized repository of information for a particular topic or community. Making it easier for users to access and share information.
This can be useful for businesses, organizations, or communities that want to create an authoritative source of information on a specific subject or provide a resource for their users. The process typically involves setting up a WordPress website, installing a wiki plugin or theme, customizing the look and feel of the site, and adding content to the wiki.
Things That You Will Learn In This Blog…
- Importance of Having a WordPress Wiki for your website
- Types of the Wiki for WordPress
- Integral Steps to Create a WordPress Wiki
- Let’s Wrap It Up!!!
(Jump to the section that interests you the most!)
We have tried covering all the aspects of Wiki Creation for WordPress in this blog.
Importance of Having a WordPress Wiki for Your WordPress Website
Having a centralized information repository, such as a wiki, can greatly benefit a WordPress-based SaaS organization in several ways:
1. Improved Knowledge Management
It can serve as a single source of truth for the company information, making it easier for employees to share information. A centralized hub makes the information accessible to the individuals working in the organization.
2. Increased Collaboration
Having a wiki for WordPress-based Saas organizations will help you, promote collaboration among team members by allowing them to share and update information in real-time.
3. Enhanced Documentation
A WordPress Wiki i.e. an information repository can provide a platform for documenting company policies, procedures, and best practices, improving transparency and consistency. Organizations generally have a space on their websites, that has all the required information for both customers and employees. This acts like a joining bridge to understand and solve all the queries (if they have any confusion regarding the product or services)
4. Improved Customer Support
A wiki for WordPress websites also serves as a resource for customers, helping them to find answers to common questions and improving the overall customer experience. Having a single source of information makes the customers trust the brand/ company more.
5. Better Organization
This can be a fair concluding point because the end line of having a centralized repository or a wiki can help organize information in a structured and easily accessible manner, improving overall efficiency and productivity.
Overall, a wiki can help a WordPress-based SaaS organization to streamline processes, improve communication, and enhance the quality of its products and services.
Types Of WordPress Wiki Websites
We hope the concept of having a Wiki for WordPress-based Saas Websites is cleared by now, but if it is still not cleared. Stay with us because it will be soon!
- Company Wiki: A company wiki can be used to store internal information and facilitate collaboration among employees.
- Customer-facing Wiki: A customer-facing wiki can be used to provide customers with information about products and services and help them find answers to common questions.
- Project Wiki: A project wiki can be used to store information about a specific project and facilitate collaboration among team members.
- Knowledge Base Wiki: A knowledge base wiki can be used to store information in a structured and organized manner, making it easy for users to find what they are looking for.
- Community Wiki: A community wiki is to bring together members of a community to share information and collaborate on projects
- Collaborative Wiki: A collaborative wiki allows multiple users to edit and contribute to the same page, making it a great tool for working on projects together.
Integral Steps to Create a WordPress Wiki

Creating a wiki using WordPress involves several steps, including choosing a plugin, installing it on your website, configuring the plugin, creating pages, adding content, managing permissions, publishing the wiki, and promoting it.
We have divided this section into four sub-sections, which will help the readers differentiate between the different steps and decide the priority accordingly. We can start with choosing the appropriate plugins.
1. Explanation Of Wiki Plugins And Their Role In Creating A WordPress Wiki
Wiki plugins are software applications that add wiki functionality to a WordPress website. They provide the tools and features needed to create and manage a wiki, including creating pages, adding content, managing permissions, and more.
The role of the plugin in creating a WordPress wiki is to provide a platform for organizing information in a way that makes it easy for users to find what they are looking for.
Here are a few popular Wiki WordPress Plugins:
-
MediaWiki

MediaWiki is an open-source wiki software that powers Wikipedia. It is a powerful and flexible option for creating wikis on WordPress.
-
PB Works

PB Works is a cloud-based wiki platform that offers a range of features for creating and managing wikis, including collaboration tools, access controls, and more.
-
Confluence

Confluence is a team collaboration and wiki platform that provides a range of features for creating and managing wikis, including project management tools, integration with other applications, and more.
-
Tiki Wiki CMS Groupware

Tiki Wiki is a full-featured wiki platform that includes a range of features for creating and managing wikis, including collaboration tools, a built-in blog, and more.
Each of these plugins has its strengths and weaknesses. The choice of the plugin will depend on the specific needs and goals of the WordPress-based websites.
2. Steps To Install WordPress Wiki Plug-In
By choosing the right plugin and configuring it to meet their needs, organizations can create a functional and effective wiki or information repository, that supports their goals and enhances their ability to store, share, and manage information.
Now that we know the different kinds of plugins, we can proceed with installing the plugins successfully.
Here are the steps to install a Wiki plugin in WordPress:
-
Log in to your WordPress Dashboard
Log in to your WordPress website and go to the dashboard. We are taking the liberty to assume that we already have an up-and-functional WordPress website, which is why we directly jumped to this section.
For installing the plugin, Go to the plugin repository: From the dashboard, go to the plugin repository by clicking on the “Plugins” option in the left-side menu.
-
Search for the Wiki Plugins
Now, use the search bar to search for the wiki plugin you want to install. You can go through the different options, that we mentioned above, and choose the one that stands by the mission & vision of the company’s website.
-
Install the Plugin
If you are finding it difficult to narrow it down. Here is a tip for you:
Once you have found the plugin you want to install, click on the “Install Now” button. WordPress will automatically download and install the plugin for you.
-
Activate the Plugin
This is a pretty quick step. After the plugin is installed, click on the “Activate” button to activate it.
-
Configure the Plugin
Go to the plugin’s settings page and configure it to meet the specific needs of your organization. This may include setting up access controls, specifying the layout and appearance of the wiki, and more.
-
Start Using the Plugin
You are all set! Once the plugin has been installed and configured, you can start using it to create and manage your wiki.
By following these steps, you can easily install a wiki plugin in WordPress and start using it to create and manage your wiki.
3. Customize Your Wiki
Customizing a wiki using WordPress provides a range of options to personalize the look and feel of the wiki and to tailor it to meet the specific needs of an organization. Here are some of the customization options that are typically available when customizing a wiki:
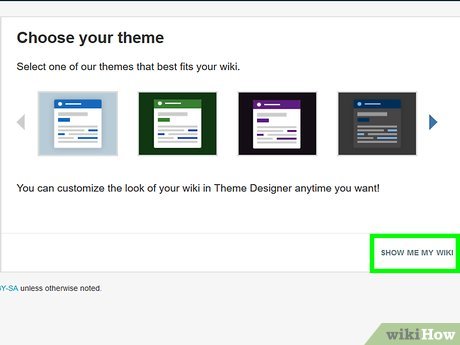
- Theme: The appearance of the wiki can be customized by selecting a different theme or by customizing an existing theme. This is how the dashboard will look,
- Layout: The layout of the wiki is customizable to change the position of elements such as the header, footer, and sidebar.
- Logo: A custom logo can be uploaded to the wiki to give it a more personalized appearance.
- Fonts: The font used in the wiki can be changed to match the organization’s brand or website.
- Permissions: The permissions for different user roles can be customized to control who can access and edit the wiki.
- Navigation: The navigation of the wiki can be customized to make it easy for users to find the information they are looking for.
- Widgets: Widgets can be added to the wiki to provide additional functionality, such as a search bar, recent changes, and more.
By customizing a wiki using WordPress, organizations can tailor it to meet their specific needs and enhance the user experience. The customization options available will depend on the specific wiki plugin used.
4. Add content to your WordPress Wiki Website
Adding content to a WordPress wiki is a crucial step in building a comprehensive and useful resource for your organization. Here are the steps to add content to your wiki. An example of such a resource:
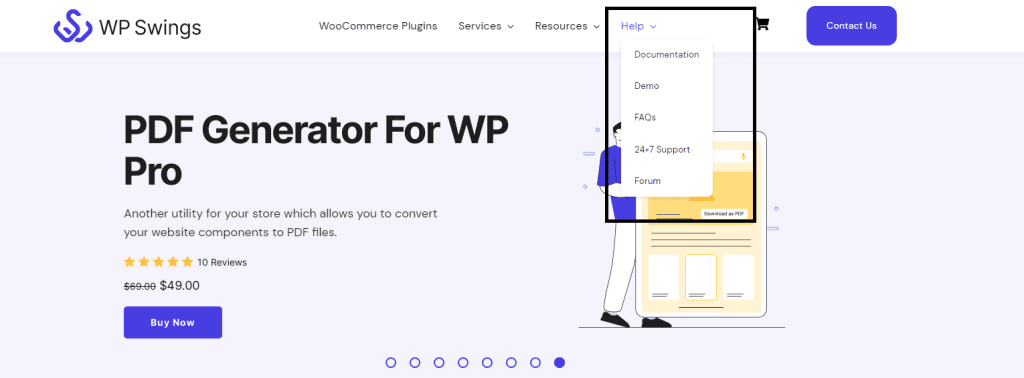
WP Swings has a separate set of information repositories that includes: documentation, demos, FAQs, and Forums & with 24/7 Support.
- Log in to the WordPress Dashboard: Log in to your WordPress website and go to the dashboard.
- Go to the Wiki: Go to the wiki section of your WordPress website. Either by using the navigation menu or by going directly to the wiki’s URL.
- Create a New Page: Click on the option to create a new page or add a new article. This option is usually located in the navigation menu or at the header of the wiki.
- Enter the Page Title: Enter a title for the page that accurately describes its content.
- Add Content: Add content to the page in the form of text, images, videos, and other media. The wiki plugin will provide a WYSIWYG editor that allows you to format and style the content as needed.
- Save the Page: When you have finished adding content, click the “Save” or “Publish” button to save the page.
- Repeat the Process: Repeat the process to add additional pages to the wiki as needed.
By following these steps, you can add content to your WordPress wiki and build a comprehensive resource for your organization. The specific steps may vary depending on the wiki plugin used.
Let’s Wrap It Up!!!
We tried to give the readers, an overview of the WordPress Wiki. It is important to change with time. The customers are woke and even more aware of the products/ services, that they consume. Which makes it essential to have a centralized information repository or WordPress Wiki.
The steps to do so is pretty simple, as we have demonstrated above. Set it Up Today!!!