Headless WordPress Website: no, not a term coined after Nicholas de Mimsy-Porpington.
If you’re into multi-channel publishing, you must have already heard the whispers about the ‘Headless CMS trend’.
To give you a sneak peek of what a headless WordPress website is, I can tell you it is nothing but the decoupling of the front-end and back-end. To know what it is, how do we do it, and why we do it; you must read the entire article.
In this post, we’ll be discussing the concept of a headless CMS and how WordPress site owners can do this.
What Is A Headless WordPress Website?
Before jumping into the ocean of WordPress, let’s first discuss the pond of headless CMS and where it all began.
As you’re aware, a Content Management System is a complete solution for creating and managing content on a website. In contrast to website builders, a CMS is easier to use and offers a great level of flexibility.
So What Is The Role Of ‘Headless’ In A CMS?
A CMS is made up of two major components: the Frontend and the Backend.
With the backend, the webmaster controls the website and performs the management of website data. It is from the backend that the admin can:
- Perform customizations
- Add content
- Tweak the pages and elements via coding
And much more…
On the other hand, the frontend is what is visible to all the users who can access your website using a search engine.
In a regular setup, whatever changes you make on the backend will be visible on the frontend, to say, the backend and frontend are coupled together.
However, in a headless architecture, the frontend and backend are decoupled. This decoupling allows the admin to manage the frontend and backend separately.
As a result, you can smoothly move content from one platform to another. This means, that by using a headless CMS, you could push new content to your website, Google Calendar, and even Facebook; all at once to facilitate multi-channel publishing.
So How Is All This Related To WordPress?
Initially, WordPress wasn’t intended to be a headless CMS. But in recent years, its development shifted in that direction. Thus, enabling the developers to keep their current WordPress websites while taking advantage of the latest technological advancements.
After the creation of WordPress’s REST API, users got the power to make their WordPress website headless. Traditionally, WordPress uses a non-headless architecture that works by combining the front-end and back-end. But I’ll be sharing with you an amazing platform that lets you achieve unprecedented performance with modern frameworks.
Taking the blog further, we’ll be using WP Engine’s Atlas to develop a headless WordPress website.
WP Engine Atlas: The Ultimate Solution For Handling Headless WordPress Websites
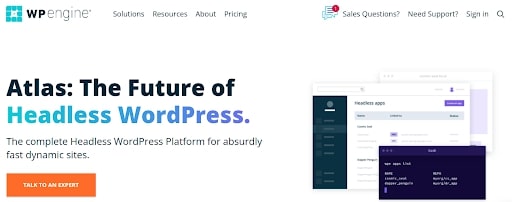
WP Engine Atlas is an enterprise-grade “Node” hosting platform that lets you create and host headless WordPress projects. Using this framework, the admin gets the benefit of controlling how and where the content of your website is consumed.
The WP Engine headless platform works differently from that of a typical WordPress platform. In a monolithic environment, things are done using PHP but for a headless WordPress website, you will be utilizing Node.
How is it different?
With WordPress, the site admins get a server that they can SFTP or SSH into, but with Node, the infrastructure is somewhat opaque. WP Engine has designed Atlas to lock the frontend and provide you a medium with which you can live-preview your headless website and that too from within the admin panel.
All you have to do is point the platform to a GitHub repository which will be watched by WP Engine and consequently, the deployment will be done automatically.
Here are some simple steps to get you started:
1. Prerequisites
Before you start, you need to keep yourself prepared with the following requirements:
- A WP Engine Atlas Account: If you want to build a headless WordPress website with the Atlas framework, the first step is to create an account. You can connect with WP Engine’s sales team for pricing and other details.
- User Portal: Once the account is activated, you’ll see a “Headless apps” option upon visiting the user portal. This is where you’ll be creating headless applications on WP Engine.
- App Requirements: For building or creating applications, you need the following:
- Node.js Node.js is important for scaling network applications.
- Git With Git, you get the power to own multiple local branches that are independent of each other.
- WP Engine Headless CLI tool The Atlas CLI tool will give you access to all the commands for spinning your headless application. Click here to learn the installation of CLI tools.
Once you’ve sorted out all the prerequisites, you’re set to use the WP Engine’s open-source framework. But you know the best way to learn the functionality is by creating a simple application and deploying it.
Next, I’ll be sharing with you the working of a Headless CMS by deploying an application.
2. Creating An Application
For creating an application we’ll be using WP Engine’s open-source headless framework and Next.js. Trace the following steps:
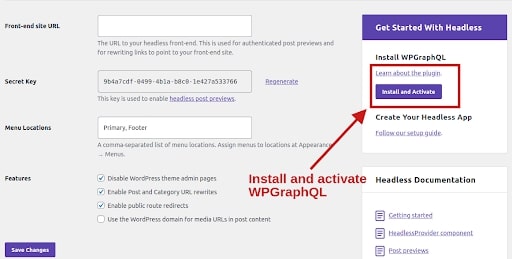
- Visit the admin panel of your WordPress website to access the backend to check the setup for the framework plugin and WPGraphQL.
- Now you’ve to download the wpe-headless plugin and activate it in your WordPress environment.
- The next step is to install WPGraphQL on your WordPress website. You can do this by visiting the Settings → Headless page.

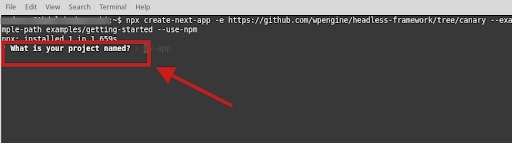
- Open your terminal and run the following command:
npx create-next-app -e https://github.com/wpengine/headless-framework/tree/canary --example-path examples/getting-started --use-npm
Once you run the above command, you’ll be responded to by the Next.js saying ‘What is your project named?’

Simply enter the name of your project and now you’ll see a folder with the same name as your product. The folder has to be replaced with the project name you specified.
- Rename the sample environment i.e.
.envto set the environment variable with the framework.
cp .env.local.sample .env.local
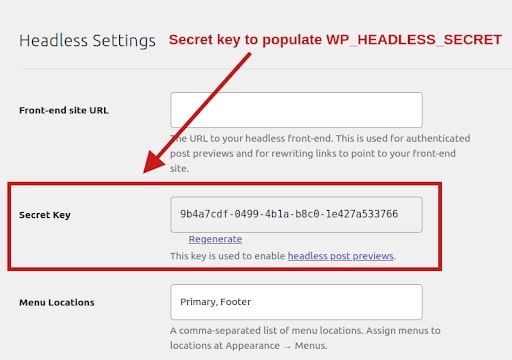
- Next, you’ve to populate the
WORDPRESS_URLin.env.localwith the full URL of your WordPress website. Once this is done populate theWP_HEADLESS_SECRETin.env.localusing the secret key. You can fetch the secret key by visiting the Settings → Headless page on your WordPress admin panel.
- Finally, you can run your app with
npm run dev.
Now that we have created an app for our Headless WordPress CMS, we’ll learn how to deploy it. Before that, don’t forget to add the app to GitHub by creating a new repository by the name of your choice.
Let’s head on to deployment:
3. App Deployment To The Headless Platform
With the deployment process, you can connect your current branch to the Atlas platform. As a result, you’ll be able to create multiple branches that’ll represent the various environments like:
- Production
- Staging
- Development
But here, I’ll be focusing on a single environment. Now, the deployment can be done in the following ways:
- Deploy via the User Portal
- Deploy via the CLI
For now, we’ll be going with the deployment via the WP Engine Atlas User Portal. So here we go:
Firstly, login into the Atlas User Portal to create, update, delete, and troubleshoot headless apps.
View Headless Apps
Once the account is enabled on the platform, you’ll be able to see Atlas in the portal menu.

Getting Started
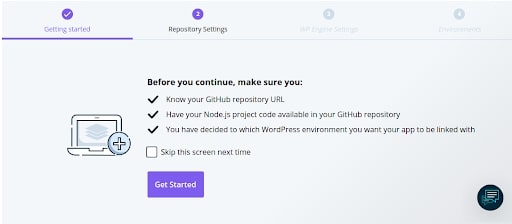
Select the Get Started button. As a result, the deployment wizard will take you through the various steps, and during this, you’ll be verified for various information:
- A GitHub repository URL
- A Node.JS project inside your chosen GitHub repository
- An idea of which WordPress environment you want your app to be linked
After the verification is complete, select the Get Started button and you’ll be asked to fill in the following information by the wizard.
- GitHub repository to authorize the WP Engine to access the said repository.
- Next are the WP Engine settings that include the following:
- Atlas app name: This is the name of your app. It is recommended that the name should be related to the one that you’re creating. The Atlas app name is the logical container for your various environments.
- Atlas app region: The region will be used for all the environments in the app.
GitHub will open a separate tab, requesting permissions to change and monitor the repository.
- Lastly, you’ve to link the headless WordPress environments to the WordPress environment.
Headless Environments
Environments are created as separate branches in the GitHub repository and it includes the following:
- Environment Name: During the app creation process, you’ll be creating the first environment and later you can add more environments after the initial app development. It is highly recommended that you create your first environment as a development environment, it’ll allow you to test your app on the Atlas platform.
- Environment Variables: These are the key values/pairs that will be available to your app during the building step and at the runtime.
Create Application
Once you’re done filling in all the information, click the Create app button. The environment page will appear if there are no errors and you can see the status of your headless app and would look something like this:
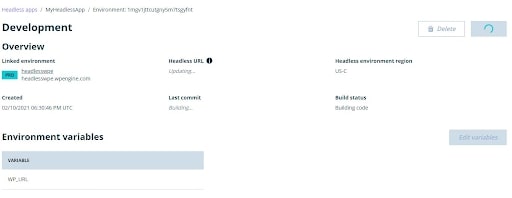
So finally after the app development, you can see the WordPress website running under the Headless URL section of the overview panel.
With the help of WP Engine Atlas, you bring the features of WordPress to the world of headless along with a combination of several advantages such as:
- Protection of SEO ranking by preserving the existing URL structure.
- Suppresses the content from an active WP theme to avoid the penalty for duplicate content.
- Blocks malicious traffic to your site.
- Provide the developers with a decoupled CMS that gives them the freedom to use modern frameworks like React, Angular, Vue, Next.js, etc.
- The platform deployment is easy and the troubleshooting via the portal streamlines the workflows.
- To add the cherry on top of the cake, Atlas automatically pushes the projects and branches to live environments under a secure connection.
- Gives the developers full control over code deployment.
While we’ve discussed the process of disintegrating WordPress frontend and backend, a question still prevails and that is:
Why do you need a Headless WordPress Website?
What wasn’t possible to achieve in a monolithic WordPress CMS that one had to dismantle for better functionality?
Why Do We Need A Headless WordPress Website?
A headless WordPress website solves a lot of challenges for large brand owners but the two primary ones are:
Multi-channel Publication
The multi-channel publication is something that is becoming popular in today’s digital world. It is used by the marketers of leading brands for publishing content on a handful of channels.
Ideally, you cannot go all frenzy by publishing content on different platforms such as social media, applications, blogs, and websites manually. You need an effective solution that reduces the redundancy in the tasks and a headless architecture lets you do exactly the same.
The disintegration of WordPress’s frontend and backend allows the admin to create a different set of programs called stacks. This scales the efficiency of the content publishing process if you maintain many channels for your brand.
Search Engine Optimization
Another complementary advantage that comes along with a headless WordPress website is search engine optimization. It improves the website speed and performance, as a result, enhancing the user experience.
Did you know that 40% of people abandon a website that takes more than 3 seconds to load?
A headless WordPress website speeds up the content that loads on the user’s end. Thus making it a valuable tool for large and complex websites.
Have You Checked The Top SEO Trends To Rank In 2022?
Ready To Go Headless?
So this is all about how going headless with your WordPress website can scale the performance of your business. In a nutshell, decoupling the front-end and back-end interfaces lets you efficiently publish content across multiple platforms.
By default, WordPress isn’t a headless CMS but with the help of a skilled coder and a platform like WP Engine Atlas in your arsenal, you can definitely make it headless. If you’re ready to go headless, you’re definitely ready for the ‘next big thing’ concerned with content delivery on digital media platforms.