Results from findstack state that the world eLearning market is expected to exceed 240 billion dollars by 2022. Given the significant growth of eLearning in recent years, these statistics are not surprising. According to research trends, the digital education and eLearning industries were worth 46 billion in 2016 and are expected to grow to 243 billion by 2022.
According to the data presented above, an easier path to monetization for creators has emerged. Through the use of eLearning tools such as LearnDash, course creators and coaches can begin to own their content and audience. See the list of top LMSs in the industry.
But what is LearnDash in the first place?
An Overview of LearnDash
Learndash is a WordPress plugin that can easily transform your ordinary website into a profitable eLearning business.
This plugin is a learning management system (LMS) that is intended to make teaching and learning easier for both teachers and students. just as essay grader tools do It allows you to conduct online classes, post quizzes, upload various online courses, and receive feedback from students.
It is difficult to find an eLearning platform that allows for highly personalized learning experiences that are tailored to your brand, course content, and teaching style. LearnDash allows us to create personalized experiences, such as those based on learner skill, (which can be determined with an online grade calculator) personality, or input. Platforms like Edmingle also help businesses build branded online academies with course management, analytics, live sessions, and learner engagement tools.
If you want to start a profitable eLearning website that matches your business dreams and aspirations, you should think about using LearnDash, especially since it allows for unlimited customization and personalization.
Learn about the 44 LearnDash Tricks to Get the Most Out of Your LMS (without spending $1)
Now that you get the idea of what LearnDash is and what you can use it for, it’s time to jump into the meat of this tutorial…
What Do You Need for Customizing LearnDash?

LearnDash is fantastic, but it does not do everything for you right away. LearnDash gives you the tools to build an eLearning environment that makes teaching and learning enjoyable for both the teacher and the student.
This implies that you are in charge of establishing that environment. To make things easier for you, we’ve outlined some of the most important customization tools you’ll need to build your dream eLearning business with LearnDash below.
Themes
The first thing to consider when customizing your LearnDash to suit your dreams and business goals is the theme. Themes are critical for creating the looks and feels that enhance your students’ learning experiences. You should choose a theme that is sleek, responsive, and adaptable, for example, the eLumine theme. Your priority should be a theme that is designed for learning.
The cool thing about LearnDash is that it allows you to use the plethora of free and premium WordPress themes. However, you must still select the ones that are intended to benefit your students. A good eLearning theme will typically include the following capabilities:
- A prebuilt website template layout to select from
- A speedy page loading time.
- A clean and organized design to make the website stand out.
- A nice reading layout.
- A night-mood setting to toggle brightness.
- A personalization settings area for students and teachers.
- A course displays cards and pages.
- A translation-ready content for multilingual students, etc.
Does the Infinite List of WordPress & WooCommerce Themes Overwhelm You?
Plugins
Plugins are everything when it comes to developing a superpower LearnDash site. These are software extensions that help expand the capabilities of your website beyond the normal.
For example, a plugin could be a payment gateway that will help you collect payments from students all over the globe. This is an ability that doesn’t come by default in LearnDash. In LearnDash, you have a handful of plugin options to perform the same task. Some are free, others are premium.
The good news is that you don’t need all the plugins in the LearnDash and WordPress space to craft an amazing eLearning site. All you need are the essentials and then move on to other specific areas that you might also need.
Below is a list of recommended plugins you will need to effectively customize your LearnDash site:
Instructor Role Plugin:
What is an instructor role plugin you may ask…, it’s a dedicated plugin that is designed to restructure how operations will be done on your eLearning business.
The instructor role plugin lets you assign course instructors who will create, manage, and administer learning content to your students on your behalf.
In other words, it lets you hire hands that will take care of creating courses, managing them, and attending to your students.
By delegating course creation and management tasks to your instructors, you will now have the time to focus on other important aspects of the business.
Other than delegating tasks to course instructors on your website, the plugin also lets you decide their compensation fees in percentages.
Analytics and Reports Plugin:
You will need an improved reporting system, the plugin will allow you to enhance your students’ learning experience. The reporting tool will provide you with information on course engagement, learner performance, student progress, and the ability to compare learning behaviour through graphical reports.
The WISDM Reports plugin for Learndash is highly recommended for this task. It will give you all the analytics needed to make a well-informed decision for your eLearning business.
Data Reports and Analytics Have a Humongous Role to Play When Planning Ahead!
Group Registration Plugin:
A membership subscription is a payment model that can help your eLearning business generate consistent cash flow. You’ll be able to estimate your business revenue with membership subscriptions to your package. The need to bundle courses and sell them as a group will inevitably arise, which is where the group registration plugin comes in.
You will be able to use this plugin to allow group leaders to purchase courses for students, enroll students in bulk by adding them as group members, view student reports, and manage groups.
Ratings, Review, and Feedback Plugin:
Attaching a credibility booster plugin to your courses will help you sell more of them. It is difficult to trust a course that lacks a review, star rating, or feedback, so students frequently use these criteria to determine which course they should or should not purchase.
The Ratings, Reviews, and Feedback extension is recommended primarily because it adds a complete rating, review, and feedback system to all of your LearnDash courses. This three-in-one plugin will assist you in maintaining a consistent credibility status on all of your courses, giving students a compelling reason to purchase your courses.
Content Cloner Plugin:
Content cloner plugins are critical for launching your eLearning website. We recommend the Wisdm Content Cloner extension for this type of task because it quickly helps you create course copies like a PRO.
You will save time by quickly cloning or editing an existing set of courses. Before publishing new content, you can duplicate the entire course structure and simply change the titles. Bulk editing, of course, is supported, as are lesson and topic titles, which are organized similarly to the original course.
Add-on Packs
You might be the type who prefers speed and wants to get right into the business without wasting time installing plugin after plugin. If you fall into this category, an Add-on pack is the best for you.
What exactly is an add-on pack? It is simply a pre-packaged essential set of plugins to get you started. LearnDash offers a variety of add-on packs. However, the LearnDash Essential Add-Ons Pack is the one we recommend for successfully launching your eLearning business (LEAP).
We recommend this package because it includes all of the plugins mentioned above, and with a single installation, all of the necessary packages for customizing your LearnDash are integrated into your system. This also saves you time and money because the LEAP bundles are cheaper than the singles.
Do You Also Sell Products on a WordPress/ WooCommerce Store?
Steps for Creating a LearnDash Site

The steps below will help you create your LearnDash website.
STEP 1: Install WordPress
Earlier on we mentioned that LearnDash is a plugin that transforms your WordPress site into a functional eLearning website. This means that before you convert your website to LearnDash, you’ll need to install WordPress first!
Now, to install WordPress, you’ll need the following items:
- A domain name.
- A hosting platform.
But you can also get going installing locally and later upload it online to your preferred hosting provider. Here also is a video tutorial that will guide you through this process…
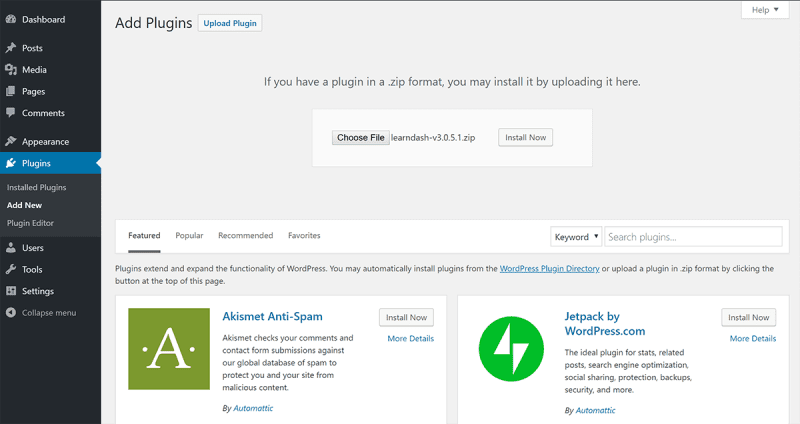
STEP 2: Install LearnDash
The next thing to do is to install LearnDash, which is the engine behind our eLearning platform. On the admin side of your WordPress, head to the plugin tab and install LearnDash.
You can install your purchased LearnDash by locating the file on your computer, see the image example below:
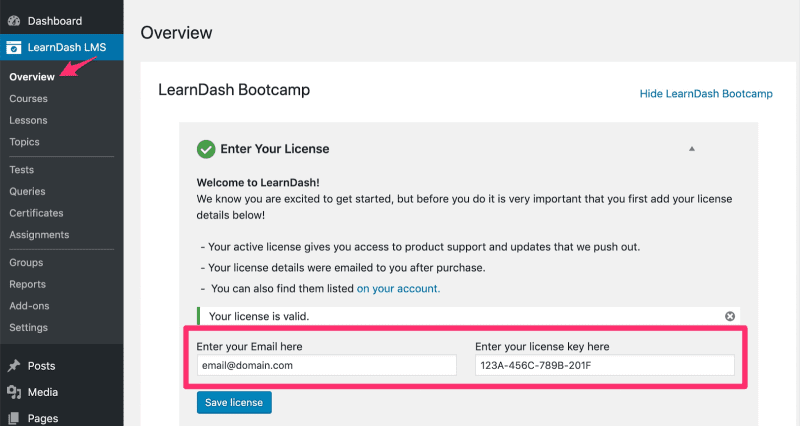
If you haven’t already, buy LearnDash via this page. The file can then be downloaded from your My Account page on the LearnDash website:
After the installation, the next thing to do is to activate the plugin as seen in the image below:
STEP 3: Install LearnDash Theme
Once you’ve installed LearnDash on your website, the next logical thing to do is to install a learning suitable theme.
Remember these words,
Your choice of theme can either help you grab and retain students’ attention or cause you to lose students to your competitors.
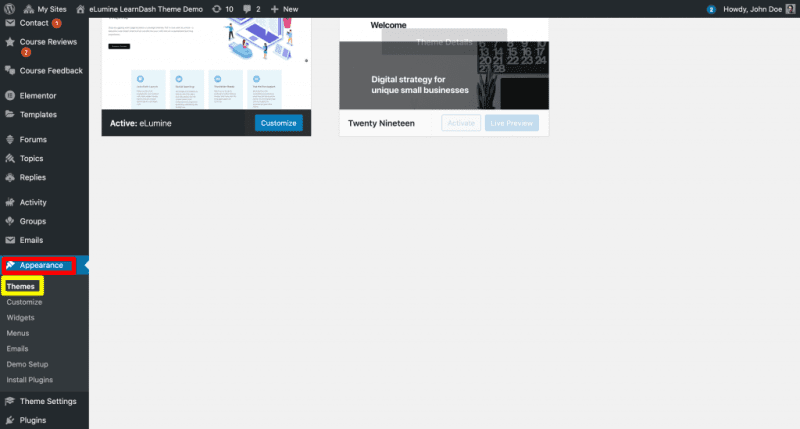
For this tutorial, we will be installing the eLumine theme. Head to the admin dashboard and then to appearance and select theme.
- Click on the add new button.
- Click on the upload theme button.
- Upload the downloaded eLumine zip file.
Once you have successfully done that, you will have the theme among the available ones, see the image below:
For more details on how to install, activate, and update LearnDash eLumine theme, check this page…
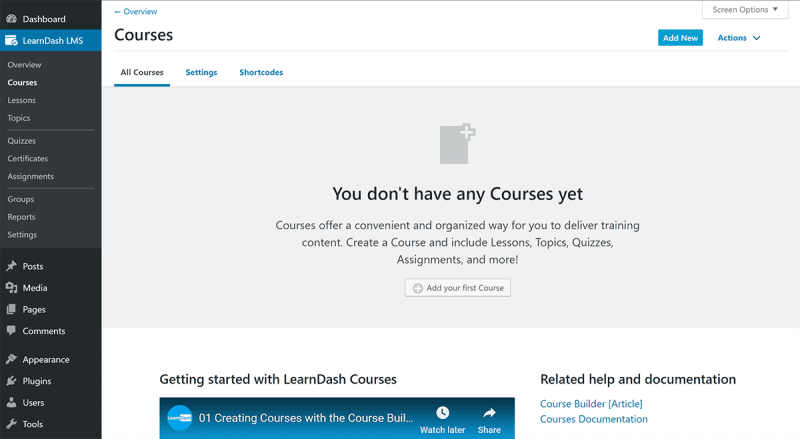
STEP 5: Create Your First LearnDash Course
Once you’ve completed the basic website setup, you are now to start creating courses.
- To create your first course:
- Navigate to LearnDash LMS Courses.
- Select the option: create your course.
- Click the Add Your First Course button.
See the image below for guidance…
Get The 20-Point Checklist to Build a Udemy-Like Website
Add a title and give your course a brief description. Then, navigate to the Builder tab to begin creating your course’s content, which will include sections, lessons, and quizzes. See the image below:
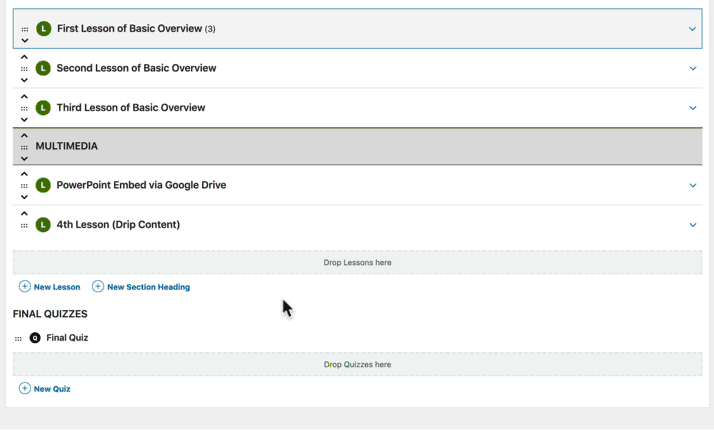
With this page above, you’ll be able to create courses, add sections, lessons, quizzes, assignments, and more.
See this page to create each part of a course in detail…
STEP 6: Install Elementor and Design Core Pages
The next step is to use Elementor to create and design other essential pages to make your website more professional. This is after you’ve finished building your course.
We will take a little break from LearnDash and dive into designing some other important pages on your site, such as:
- Home
- About
- Contact
- Courses Page
- Checkout Page, Etc.
Other plugins will be used for creating the course and checkout page…
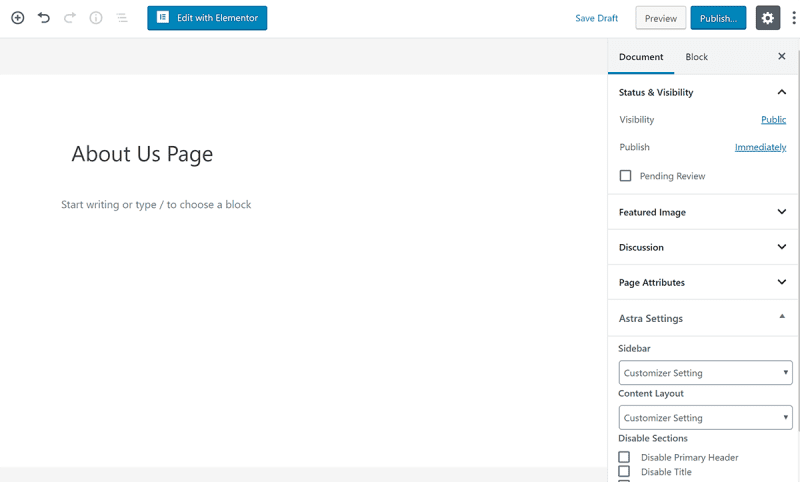
To proceed, we must install the Elementor plugin, which is available for free. Elementor is a page builder plugin with a visual, drag-and-drop interface.
Install it by going to Plugins Add New and searching for “Elementor.” The Elementor interface can then be launched by creating a regular WordPress page and clicking Edit with Elementor:
This video will help you accomplish the designs faster…
STEP 7: Create a Course page with the Course Grid plugin
To set up the course page you install the free LearnDash Course Grid add-on. You can install it in your WordPress dashboard by going to LearnDash LMS Add-ons. See the example image below:

Once you’ve added this plugin, you can then use a shortcode or a Gutenberg block to display all of your courses.
STEP 8: Set up the Login and Registration Page
You have two options for creating a custom login/registration page for your LearnDash course:
- Make use of LearnDash’s login/registration features.
- Make use of a free plugin such as Theme My Login.
LearnDash will automatically add login/registration features to your course pages, and you can also use the [learndash login] shortcode to include a login page in other places such as your Elementor designs.
STEP 9: Create Custom Navigation Menu for Students
You can use the free Nav Menu Roles plugin to enable this functionality.
After installing and activating the plugin, you can navigate to the regular Appearance Menus area.
Then, when you click on specific menu links, you’ll be able to use the new Display Mode options to control who sees which navigation items.
To target anonymous visitors, select Logged Out Users, and to target students, select Logged In Users:
STEP 10: Install and Configure WooCommerce to Accept Payments
Even as LearnDash has built-in payment support, we recommend using LearnDash’s WooCommerce integration instead because it provides a lot more flexibility.
Grab WooCommerce from WordPress.org, install, and configure it. Then, go through the setup wizard, which should launch automatically after you activate the plugin:
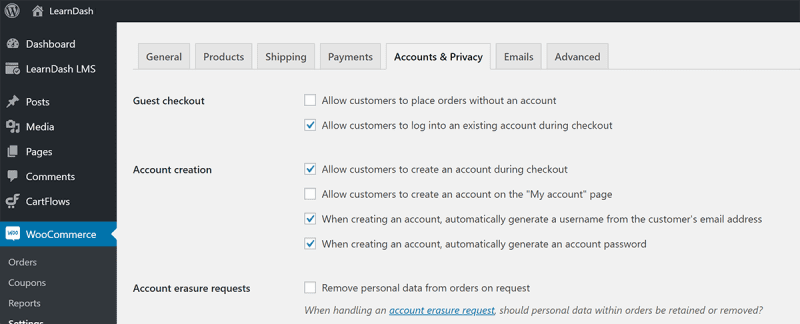
You’ll need to do some additional configuration after the installation. Navigate to WooCommerce Settings Accounts & Privacy:
- Disable the option to allow people to place orders without creating an account.
- Enable the option to log in during the checkout process.
- Enable the option to create an account during the checkout process.
Selling Your eLearning Courses Over Your Established Online Store is the Best Decision You Can Take!
Following that, you must integrate with LearnDash. After you’ve installed WooCommerce, you’ll need to install the free LearnDash WooCommerce integration add-on to link the two. You can do this once more by going to LearnDash LMS Add-ons in your WordPress dashboard.
After you’ve enabled the LearnDash WooCommerce Integration, you can sell your course by creating a WooCommerce “product.”
To do so, go to Products→ Add New and then tell WooCommerce that you want to sell a Course in the Product data box. Then, using the Related Courses picker, choose which course(s) to sell – you can even bundle multiple courses together if you want:
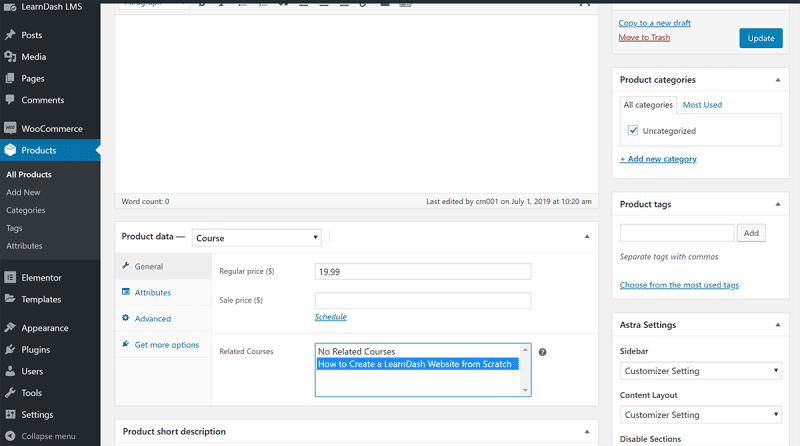
Repeat the process for each course you want to sell on your LMS.
Following that, you must integrate LearnDash Profile with WooCommerce.
To accomplish this, create a single page that displays both a user’s LearnDash profile and their WooCommerce purchase history. You can do so by combining the [ld profile] and [woocommerce my account] shortcodes, as detailed in this post:
STEP 11: Create a Checkout/Funnel Page with CartFlow
We will use the CartFlows plugin to create your checkout pages, which are available in both a free and premium version.
CartFlows allows you to create a conversion-optimized checkout funnel, as well as add as many upsells and order bumps as you want – these are techniques for boosting your revenue.
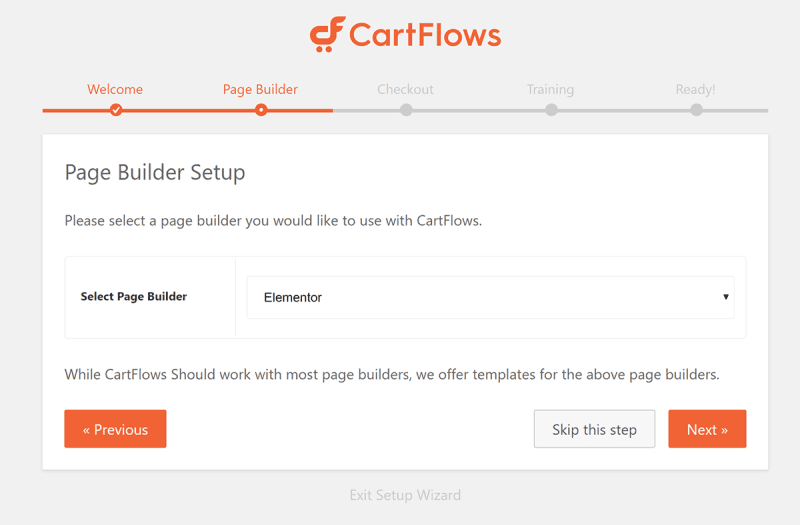
To begin, install and activate the CartFlows plugin – the free version is available on WordPress.org.
Then, in your WordPress dashboard, navigate to the new CartFlows section and run the setup wizard – you should see a prompt.
Here is Our Thoroughly Crafted Guide to Assist You Design Your Checkout Page!
During the setup wizard, choose your page builder – Elementor – as well as some other fundamentals:
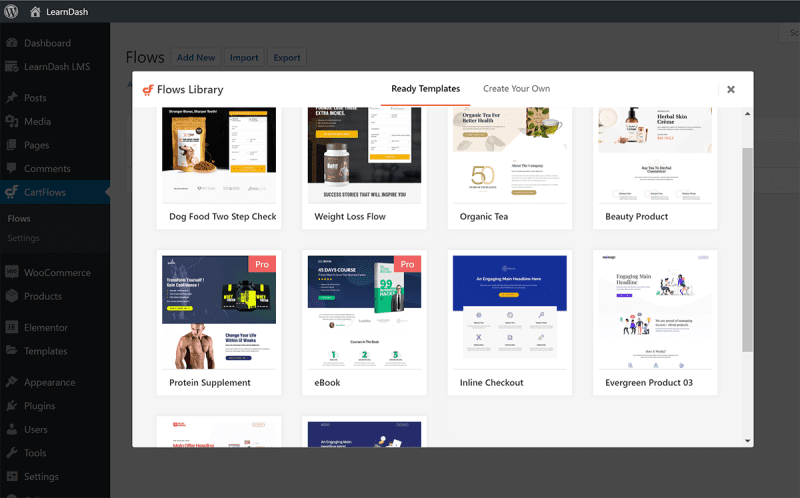
Then, go to CartFlows Add New to create your first “flow” – a checkout page/funnel by another name.
You can start from scratch or choose from a few templates here:
LearnDash 4.0 Update
New and exciting updates have popped up in version 4 of LearnDash, and here are some things to look out for:

Wizard of Onboarding
LearnDash now includes a new Onboarding Wizard, making it easier than ever to get started with LearnDash. In just a few minutes, you can have a fully configured, ready-to-use LearnDash website. Simply enter your course content and you’re done!
LearnDash Gutenberg Widgets
More block widgets are now available in LearnDash 4.0’s Gutenberg Editor. You can now customize the LearnDash login page, profile page, course list, and more with the new blocks.
Stripe Integration
Stripe Connect is the newest and simplest way to begin selling your online courses. Previously, you had to install an add-on and then configure everything to use Stripe with LearnDash.
For more details of the breaking changes to LearnDash 4.0, kindly check out this page!
Conclusion
Finally, we’ve arrived at the end of this tutorial. We’ve discussed the prerequisites and steps for launching a full-fledged LearnDash website.
Learndash is still one of the most popular eLearning platforms and LMS builders available, and I believe you will be pleased with your decision. It includes a plethora of free themes and plugins in addition to the must-have plugins and themes discussed previously.
Check out our LearnDash development service if you want a professional team to deliver a classic LearnDash site for you.
Enjoy yourself until the next time!