Accounting – the most boring part of a business but we all know it’s a necessary pain. For the smooth functioning of an online business venture, you need to have your numbers in place and be prepared for the tax season.
If you’re a WooCommerce store owner who stresses over accounting and taxes, then it’s time to relax. In this article, I’ll share with you a complete guide on how to set up WooCommerce taxes.
Let’s begin…
Step by Step Guide to Setup WooCommerce Tax Rules
Many business owners have a very hard time when it comes to managing the WooCommerce taxes and accounts of their business. While setting up a store can be very easy, it can be pretty tough to set up duties and tax rates.
So yes, taxes can be complex but WooCommerce has tried to make the setup process very straightforward, which you’ll see in a while.
For setting up tax rules in WooCommerce, you need to enable some settings and follow these steps:
Steps For Setting Tax Rules In WooCommerce
- Enable Tax
- Configure Tax Options
- Enter price with or without taxes
- Calculate tax based on.
- Shipping tax class
- Rounding at subtotal level
- Additional Tax Classes
- Display price in the shop
- Display price on the cart and checkout page
- Price display suffix
- Display tax total
- Setting Up Tax Rates
- WooCommerce Tax Reports
- Special Tax Setup
- Tax based on subtotal
- Tax based on user roles
1. Enable Tax
To access the settings screens in your WooCommerce dashboard, you first need to enable them.
To enable tax settings:
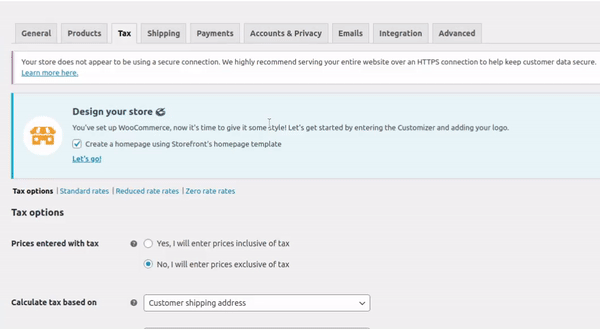
- Go to: WooCommerce > Settings > Tax
- Select the checkbox beside “Enable Taxes”
- Now “Save Changes”
2. Configure Tax Options
Once you’ve enabled the tax settings, you can now start configuring your taxes. Just go to: WooCommerce > Settings > Tax.
Once you reach the tax tab, you’ll see a few options that can be adjusted to your liking.
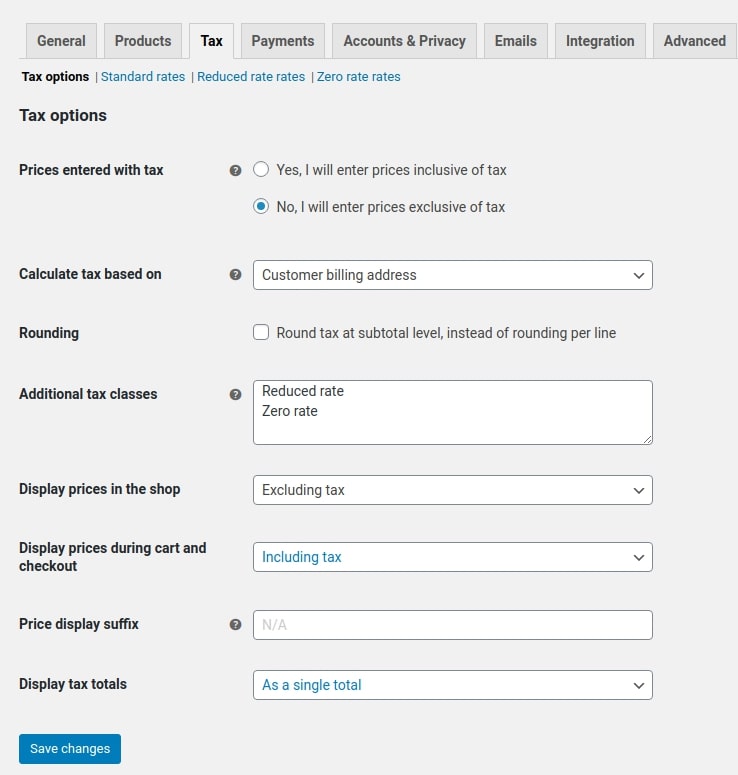
In the tax tab, you’ll see some options under the “Tax Options” that have to be filled by you.
1. Price Entered With Tax
WooCommerce provides you with an option to display the prices on your store with or without taxes. It is perhaps the most important option when it comes to managing taxes on your store.
There are two choices that WooCommerce gives you in this section:
- “Yes, I will enter prices inclusive of tax”: This means that all the catalog prices are input using your store’s base tax rate.
- “No, I will enter prices exclusive of tax”: When you want to enter prices exclusive of taxes, choose this option. If you choose this option, the actual price with tax will be visible to the customer at the checkout.
How Do Taxes Work In WooCommerce?
2. Calculate Tax Based On
In this setting, you determine which address is to be used for tax calculation. As a WooCommerce store owner, you get the following options:
- Customer billing address
- Customer shipping address (default)
- Store base address
Note: In the store base address, taxes are based on your store’s location rather than your customers’ location.
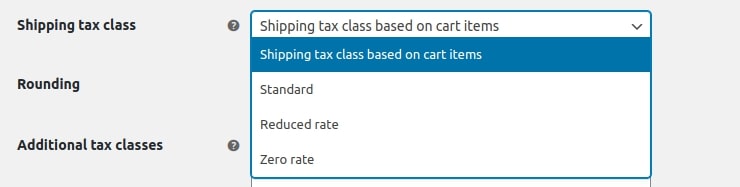
3. Shipping Tax Class
The Shipping tax class determines which tax class should be applied for shipping. If you want a specific item from your store to be shipped at a lower price, then select the Reduced rate option from the dropdown menu.
Usually, the shipping tax class is determined by the product in the customer’s cart. If the customer has selected an item with a different tax rate, the shipping cost calculation will be done at a similar rate. Remember to consider your jurisdiction and choose the tax class accordingly.
Empower Your Store With A Complete Order Tracking Solution Now!
You can select the tax class from the dropdown menu as in the screenshot below. If you’ve defined any shipping tax class of your own, it will also appear in the same menu.
4. Rounding At Subtotal Level
If you want the tax to be rounded at the subtotal on the cart page, hit the checkbox beside the Rounding tax.
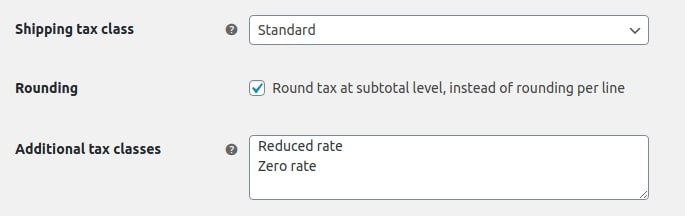
5. Additional Tax Classes
If you’re selling goods in your store that fall under a different tax class, WooCommerce allows you to create additional tax classes. To get started, WooCommerce has already given the following tax classes:
- Standard
- Reduced Rate
- Zero Rate tax
If you want to create a new tax class, enter the tax name in the tax field.
Below, is an example in which we’ve created a tax class with the name MyTax.
Once you have created a new tax class and saved the changes, your new tax class will appear as a separate section in the tax options.
6. Display Price In The Shop
Now in this setting, you can choose to display the price on your WooCommerce store with or without taxes. So obviously the two options are:
-
- Including Tax: To display the price on your storefront with the taxes.
- Excluding Tax: To display the price on your storefront without the taxes.
7. Display Price On The Cart And Checkout Pages
While setting up WooCommerce taxes, you can also choose to display the price with or without taxes on the cart and checkout pages. So yes, you get two options here as well – Including tax and Excluding tax.
How To Create High Converting WooCommerce Checkout Pages?
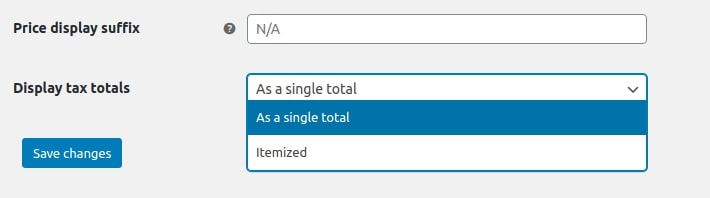
8. Price Display Suffix
In this setting, WooCommerce allows you to change the text next to the displayed price of your products. Some popular suffix examples can be, “Inclusive of taxes”, “inclusive of VAT”, or “exclusive of taxes.”
9. Display Tax Total
So finally coming to the last configuration of tax options – Display Tax Totals.
Here, you can set how to display the tax totals during checkout – whether club multiple taxes as one total or list each one of them as a separate item.
As per your choice, you can choose any one of the following options:
- As a single total
- Itemized
3. Setting Up Tax Rates
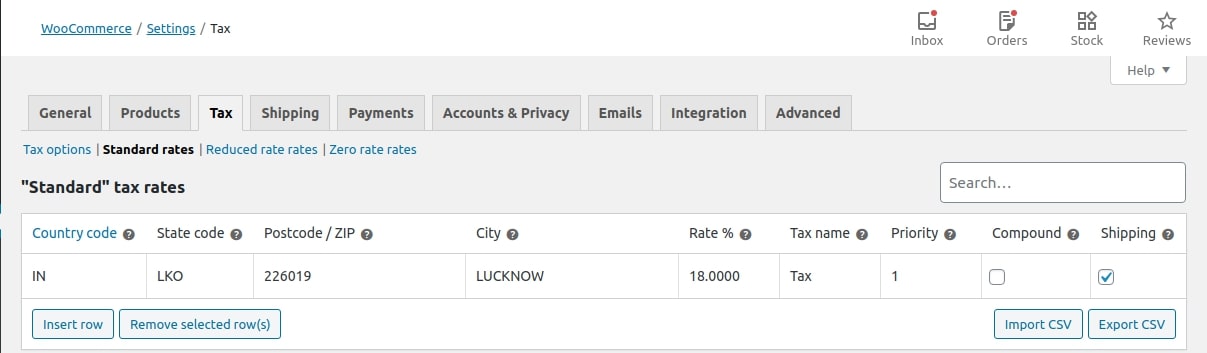
Until now you must be aware that the tax classes are displayed on top of the tax screen. Click on any one WooCommerce tax class to view the tax rates for a specific class.
Now each tax rate has the following attributes:
- Country Code: 2 digit country code for the rate.
- State Code: 2 digit state code for the rate.
- ZIP/Postcode: You can enter several values for the field, just separate them with a semicolon (;). Leave blank to apply all postcodes.
- City: Similar to Postcode, you can enter multiple cities separated by semi-colons (;). Leave blank (*) to apply to all cities.
- Rate Percent: Enter the tax rate, for example, 20.000 for a tax rate of 20%.
- Tax Name: Name your tax, e.g. VAT, Sales Tax.
- Priority: You can choose a priority for this tax rate. Only one matching rate per priority will be used. For defining multiple tax rates for the same area, you have to set a different priority for each rate.
- Compound Taxes: Tick this checkbox if you have an additional tax rate that is to be applied on top of all the other taxes.
- Shipping: If you want this tax to be applied to shipping charges then hit this checkbox too.
Below is an example of a tax rate:
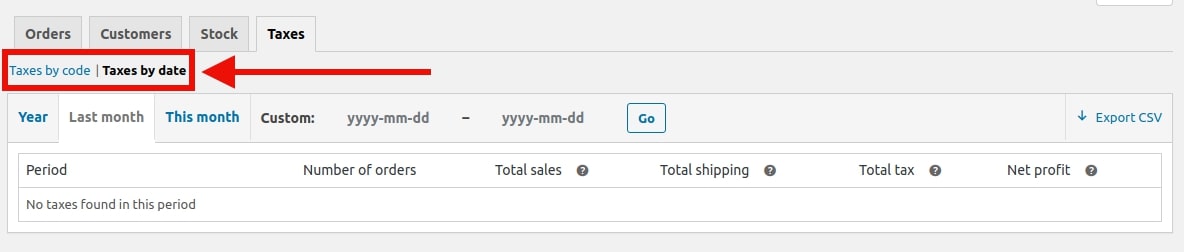
4. WooCommerce Tax Reports
WooCommerce offers its users a complete report to see the tax for the year. Your WooCommerce tax reports can be found in Reports > Taxes > Taxes by Date > Year.
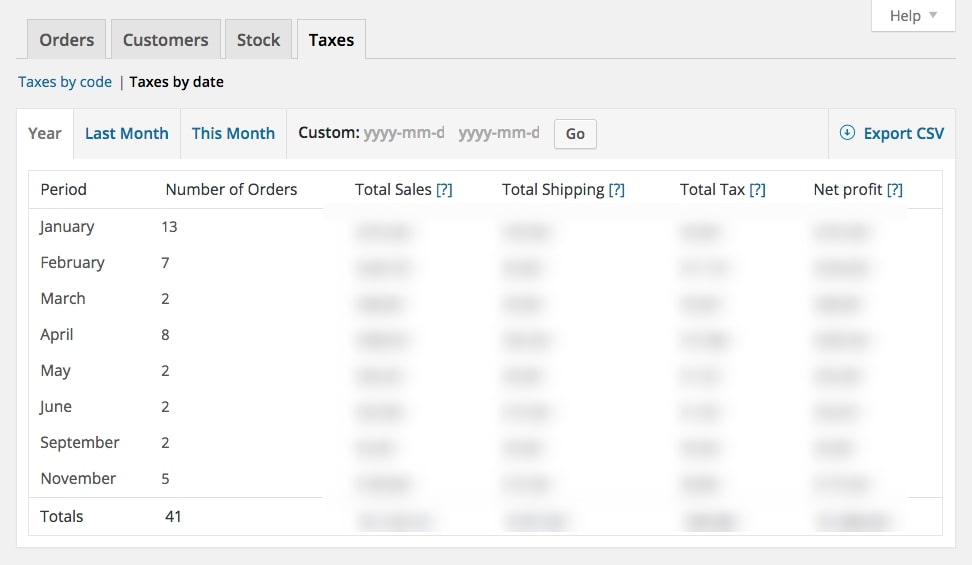
WooCommerce provides tax reports in two forms:
- Tax by code
- Tax by date
5. Special Tax Setup
The best part with WooCommerce is that you can set up special taxes based on certain parameters. Let’s see in-depth:
-
Tax based on subtotal
Under this option, you can set up a tax rate depending on the order subtotal of a customer.
Here’s the snippet for setting WooCommerce taxes based on order subtotal:
In the above code, you just have to specify the tax rate to be applied when the order subtotal is equal to or less than $110. You can change the amount from $110 to a different value as per your store requirements.
-
Tax based on user roles
WooCommerce store owners can also apply a tax rate based on user roles. Here’s the code snippet for applying tax rates based on user roles:
In the above code, you can apply the Zero Tax Rate for the user role “administrator.” And yes, you can modify the user role and tax rate according to your need.
Essential WooCommerce Accounting Tips To Make Taxes Less Painful
Okay, so we’ve covered all the steps for configuring the tax rules in your WooCommerce store. Now I’ll be covering some basic accounting tips that can ease your taxation journey.
Just the thought of tax season gives business owners a headache. But as I said at the beginning of this article, to see consistent growth in your business, it’s important to have your numbers in order and be prepared for every tax season.
Thus, I’ll be sharing some simple yet essential accounting tips to make WooCommerce taxes less painful.
Ready to dive in?
1. Use A WooCommerce Accounting Solution For Tax Management
Being an eCommerce platform, WooCommerce offers its users everything that is needed to start their eCommerce business. But remember, neither it is an accounting platform nor does it offer any accounting feature.
To manage the finances of your eCommerce business you need a helping hand. And, I can tell you the perfect solution to all your business accounting challenges – Quickbooks Intuit.
Quickbooks offers solutions that help merchants:
- In keeping a track of all their expenses and income
- Has tools like live bookkeeping that help your business thrive.
- The solution efficiently manages everything for every business whether an agency or freelance.
The only drawback of Quickbooks Intuit is that a third-party service because of which you have to manually enter all the data. But, WP Swings has developed an eCommerce solution that automatically syncs your WooCommerce data with Quickbooks and automatically manages accounting for your business.
We called this Quickbooks Integration for WooCommerce.
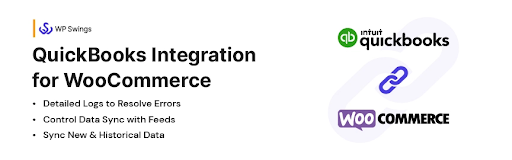
QuickBooks Integration for WooCommerce connects your WooCommerce store to QuickBooks as a result, letting you sync your online store data to the platform. It synchronizes information like:
- Orders
- Customers
- Products
These attributes are mirrored as per the modules of QuickBooks therefore, letting you create properties like Customers, Items, and Invoices on the platform. Many businesses also benefit from outsourcing bookkeeping, ensuring accurate records, saving time, and freeing you to focus on growth while experts handle the financial details.
Know More About The Plugin With Live Demo & Documentation:
2. Keep Track Of Key Figures
Once you’ve synced your WooCommerce to an accounting platform, you’ll be able to see some metrics that will help you closely monitor your business. It is highly recommended that you keep track of key figures like the cost of goods sold, expenses, revenue generated, etc.
With the help of WooCommerce accounting platforms, you can very easily view reports and analyze the business’ health at a glance. Within the dashboard of your accounting platforms, you can see several metrics, our goal is to eyeball some key figures that can’t be ignored. Let’s see some of them:
1. Cashflow
So the first important figure is cashflow. Firstly, it is highly important that you create a separate business account for managing your finances to make things easier.
Keeping track of your cash flow is the most convenient way to track if your business is actually making money. It will also make sure that you are meeting all your financial obligations on time.
2. Cost Of Goods Sold (COGs)
Another important number is the Cost Of Goods Sold or simply (COGs). The cost of goods is actually the calculation of all the costs involved in selling a product. This may include expenses on material, labor, and even operations for handling a product.
Tracking the COGs will make you understand:
- Your business margins
- Bestsellers on your eCommerce website
- The profit you are making on a product when it sells
3. Sales and Profits
Another important number is sales and profits. Nothing complicated, sales and profits simply tell you the profit made by your organization upon selling the commodities in your store.
3. Never Miss Your Deadlines
If you’re not planning to make the tax officers angry, then never forget your deadlines. It is highly recommended that you create events and reminders in your calendars or do anything you need to remember.
There may be chances that you might have to file your taxes every quarter. If you’re unsure, you can always check with your accountant. When it comes to filing taxes, punctuality is important. Thus, it is suggested that you prepare yourself ahead of the tax season and possibly make use of automated systems for filing tax returns.
4. Consult An Accounting Expert
As a business owner, it is very difficult to manage everything. When it comes to taxes, you need to be very cautious and it also demands some accounting skills. You have to be good with numbers.
But as someone has rightly said – “You cannot be equally good at everything.” For some jobs, you need an expert hand, the same is the case with accounting.
Consulting an accounting expert can be very helpful in getting personalized recommendations and saving big numbers every year. To add the cherry on top of the cake, an accounting expert can be a great advisor to help you adhere to all the rules and regulations.
As an eCommerce store owner, you need to ask a few questions before hiring an account for your organization, like:
- What services do you provide?
- Is the accountant familiar with eCommerce?
- Can the accountant provide advice on the stats where your business serves?
- Most importantly, what will be the fees?
If we have to compare an accountant with someone, I’ll say an accountant is just like a doctor; Very important and vital for evaluating and maintaining the health of your business. They tell you what’s working and what’s not, and give you suggestions and tips for making improvements.
If you want to have better collaboration between you and your accountants. Utilize software for accountant tasks.
Conclusion…
So this was it!! I’ve covered all the necessary steps required to set up WooCommerce taxes. Also, I’ve discussed a few important tips for efficient WooCommerce accounting. Just remember your taxes are subject to legal obligations and selling location. Thus, be very careful while determining tax rules in WooCommerce.
I hope this article will make taxes less painful and more enjoyable for you. If you have any questions, feel free to leave a comment. Also, if you are planning to start your online business venture, connect with our expert now and start your online selling journey.