

“Events become Feelings, Feelings become Events…” -Jerry Spinelli
So, now it’s Time to Create your Feelings with our Event Tickets Manager!
So are you ready for your next big gig? But still, confused about how to create WooCommerce Event Tickets for your event?
You can certainly turn to third-party marketplaces like StubHub or Viagogo to sell tickets for you. The only catch here is that you’ve to pay hefty commissions and outrank your competitors in the marketplace to reach your audience.
Then what is the solution?
Why not create WooCommerce event tickets on your own? Yes, you read it correctly. Why not create your own event management and ticketing website? A website where you have zero competition and you have zero commissions.
Is it possible?
In this article, I’ll be sharing with you how to use the power of eCommerce and sell tickets with WooCommerce to your event.
Table of Contents
- What Is A WooCommerce Tickets Plugin?
- Why Is There A Need For WooCommerce Event Tickets WooCommerce?
- How To Sell And Create WooCommerce Event Tickets?
- On-Demand Features Of Event Tickets Manager
- FAQs For WooCommerce Event Tickets Manager
- Benefits Of Selling Event Tickets On WooCommerce
- Tips To Make Your Event A Big Hit
- When Is Your Next Big Event?
What Is A WooCommerce Tickets Plugin?
A WooCommerce tickets plugin is an extension specifically designed to handle ticketing and event management within the WooCommerce framework.

These plugins are responsible for making the WooCommerce event ticket creation and selling those tickets for events, such as concerts, conferences, workshops, or any other gatherings, easy and seamless for the merchants. These are directly sold through their WooCommerce-powered online stores.
The key features that an event plugin must include are –
- The ability to create and manage events
- Support different kinds of tickets: early bird, VIP, general admission
- Barcode or QR code for tickets
- Dynamic settings to create WooCommerce event tickets for different events
- Automated email and SMS notifications for ticket confirmations and reminders for upcoming events.
- Tools for tracking ticket sales, revenue, and attendance statistics
In the coming sections, we will talk about creating WooCommerce event tickets.
Why Is There A Need For WooCommerce Event Tickets WooCommerce?
When there are so many popular services and marketplaces where one can easily sell his or her events then why go with WooCommerce?
Why sell tickets with WooCommerce?
The question is a bit loaded. It depends on different factors and the size of an organization is one of them. But it is not wrong to say that by selling events with WooCommerce you can save a lot of money.
As said by me earlier WooCommerce is a completely free platform with the help of which one can sell almost anything and everything. On the other hand, third-party marketplaces charge you a hefty commission and there’s a lot of competition for you.
After knowing the needs, let me explain the steps of selling event tickets on WooCommerce.
How To Sell And Create WooCommerce Event Tickets?
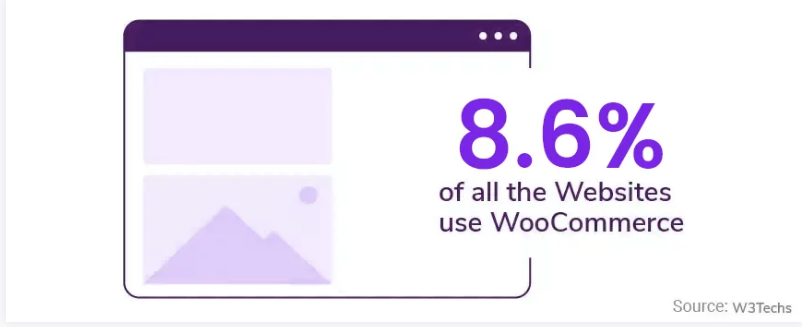
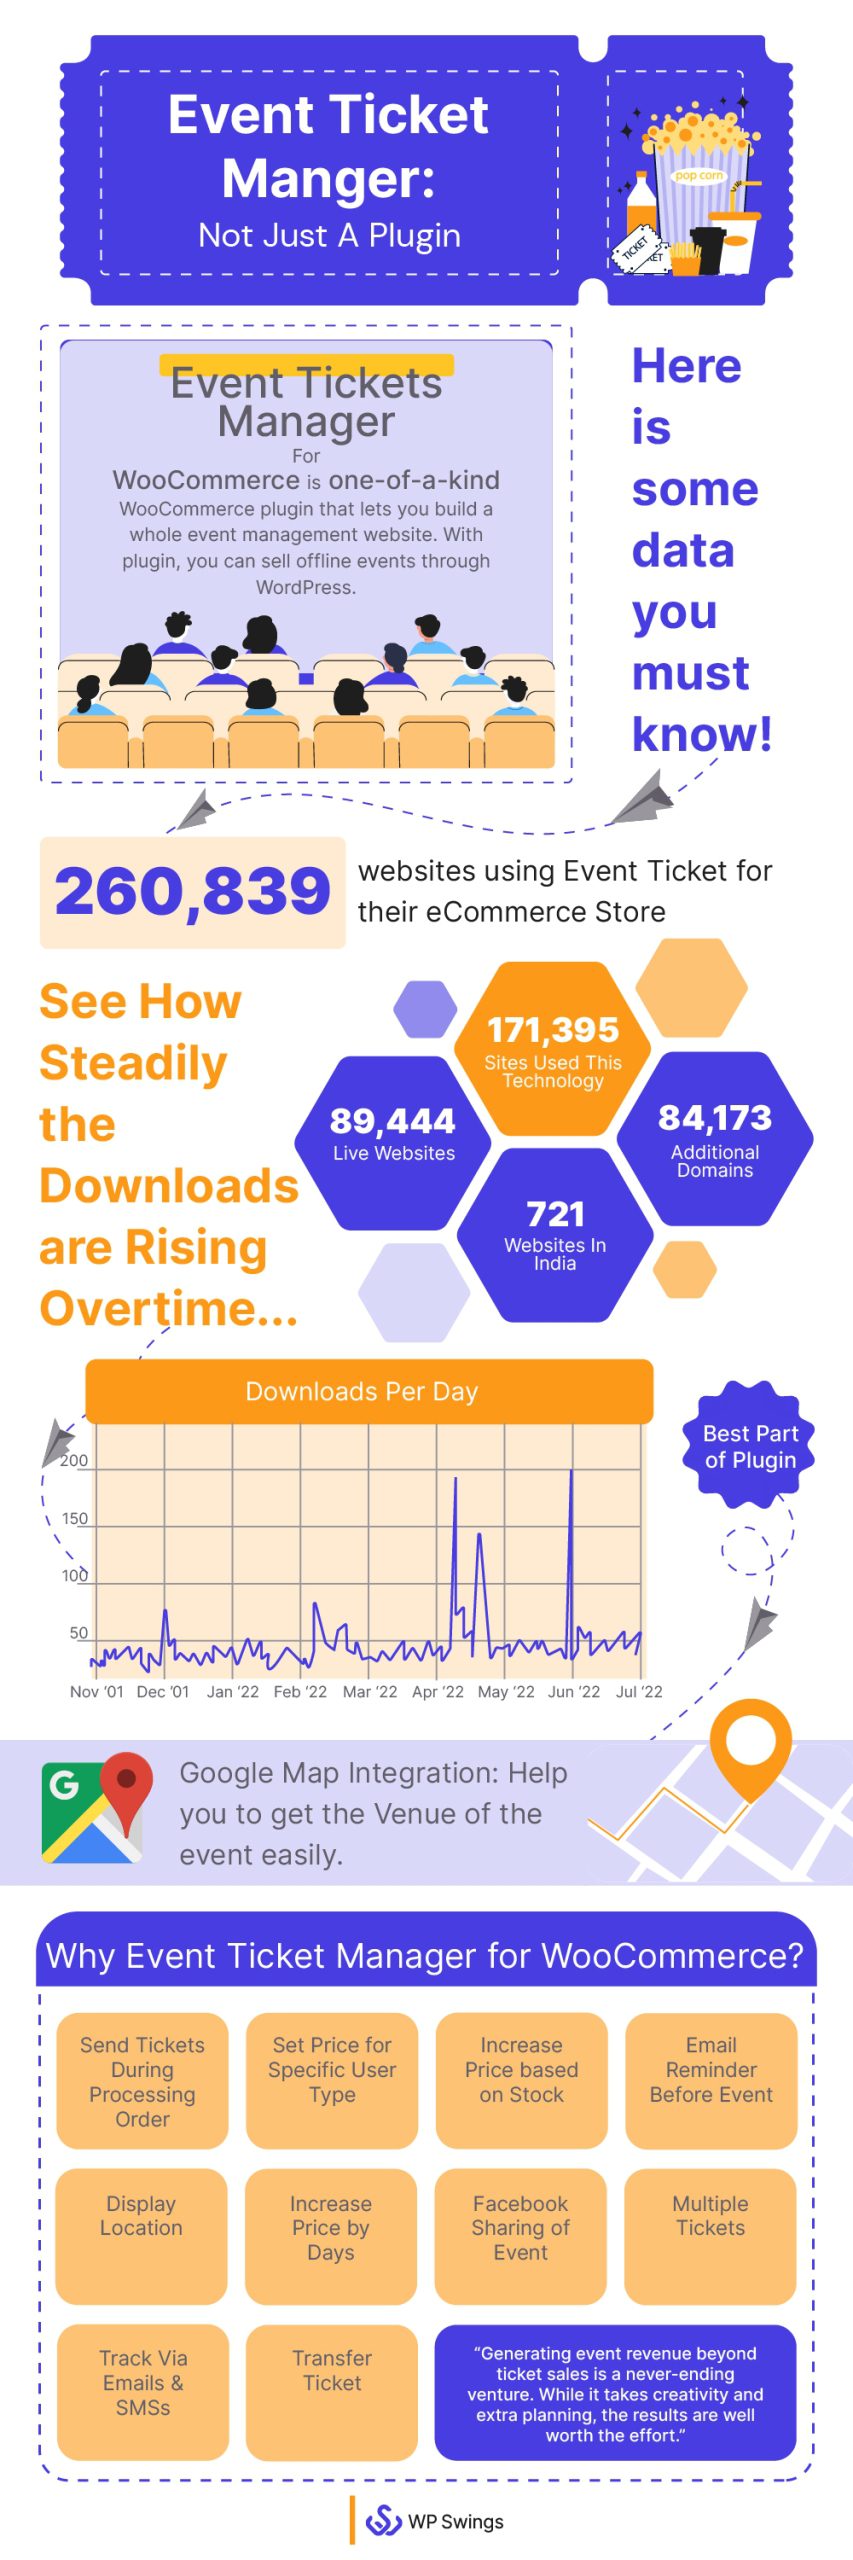
WooCommerce is one of the biggest online selling platforms. As per a stat, more than 6.5 million websites are powered by WooCommerce.
Today with WooCommerce you can sell almost anything online, including tickets to your events. So without wasting any time let’s begin our comprehensive guide on how to sell event tickets with WooCommerce.
Want To Create, Sell & Manage WooCommerce Event Tickets?
This is a completely free solution that allows merchants to add event-based products to their WooCommerce store. Let’s learn How to Sell WooCommerce Event Tickets Online…
1. Create Your WooCommerce Store
Learn how to Set up your WooCommerce Store first.
To create WooCommerce event ticket-related websites you need a domain name and WordPress hosting service. After WordPress installation and configuration are done. Install the WooCommerce Plugin, Configure settings, and Start selling event tickets online.
Do you want to check out our in-depth WooCommerce tutorial to set up your WooCommerce store? We have WooCommerce Tutorial
2. Enable The Event Tickets Manager For WooCommerce Plugin
To sell event tickets from a WooCommerce store you have to add them as products to your store. By default, you cannot add events as a product on your WooCommerce store. In the stock WooCommerce, you can only add the following types of products:
- Simple
- Grouped
- Downloadable
- Virtual
- External/Affiliate
Therefore, you need to extend WooCommerce’s core functionality to add a new product type. As you might be aware this can be done in two ways: either you can code or you can use WooCommerce add-ons.
With the help of this plugin, you can add events as products to your WooCommerce store. As a result, you can very easily manage the entire process of selling tickets and managing the seats for your events from your WooCommerce store. Most importantly, you’ll be able to create a fully functional event management and ticketing website.
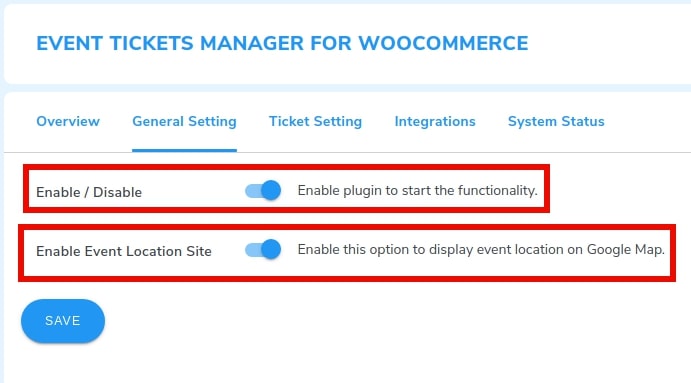
Once you’ve downloaded the plugin and activated it in your WooCommerce store, enable the plugin and event location site from the general settings of the plugin.
3. Configure The Ticket Settings
Now that you have enabled the plugin you need to configure some settings. One of them is the ticket settings. In the ticket settings, you must configure how your ticket will be mailed to the customers.
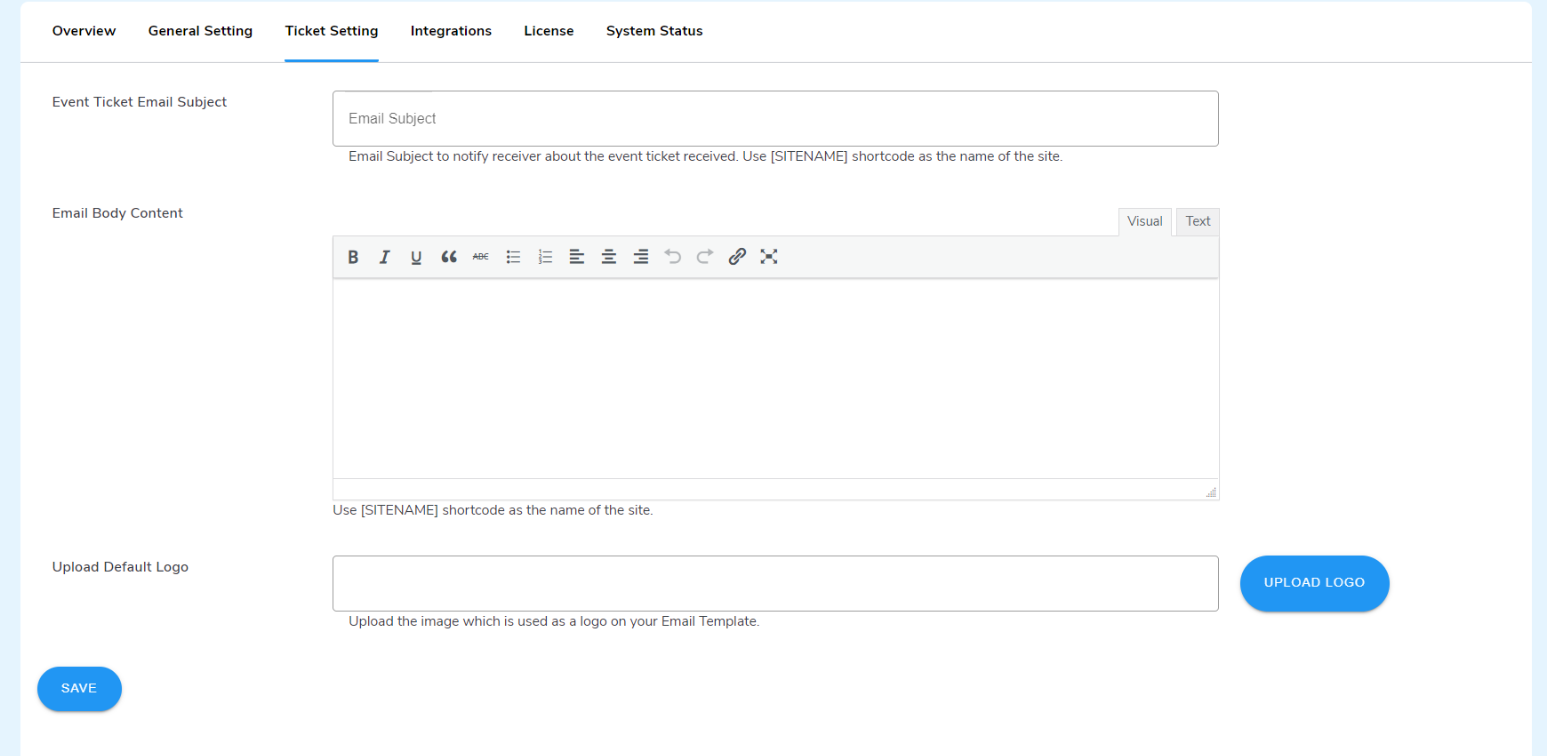
When a customer buys an event from your store, an email is sent to them in which they’ll have the ticket to your event along with the PDF.
You’ve to configure the following details:
- Event Ticket Email Subject: Here you have to enter the subject of your email.
- Email Body Content: In this section of the setting you’ve to enter the body of the email.
- Upload Default Logo: Lastly, you have to upload an image that will be used as a default logo image.
Once you’ve updated your ticket settings and submitted all the details as per your brand goals you can press the save button.
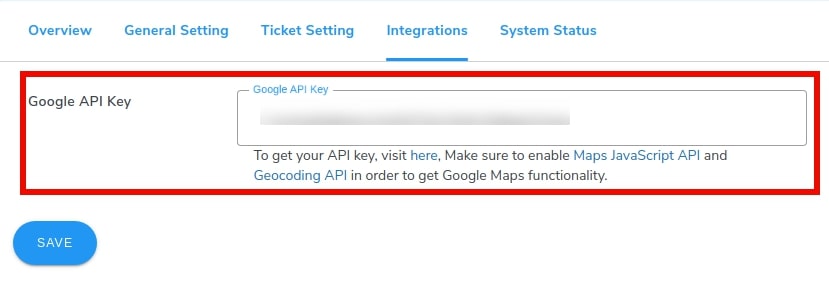
4. Integrate Google Maps To Show the Live Location Of Your Event
With the help of this plugin, you can show the exact location of your event to your audience. The Events Tickets Manager For WooCommerce can be integrated with Google Maps. To integrate the plugin with Google Maps, you have to generate an API key. Also, make sure to enable the Maps JavaScript API and Geocoding API to enable the Google Maps functionality.
5. Twilio Integration (For Pro Users)
The pro version of the plugin has been integrated with Twilio which allows the merchants to send SMS notifications. Under the Integration tab, you can find an option for integrating Twilio by implementing the following steps:
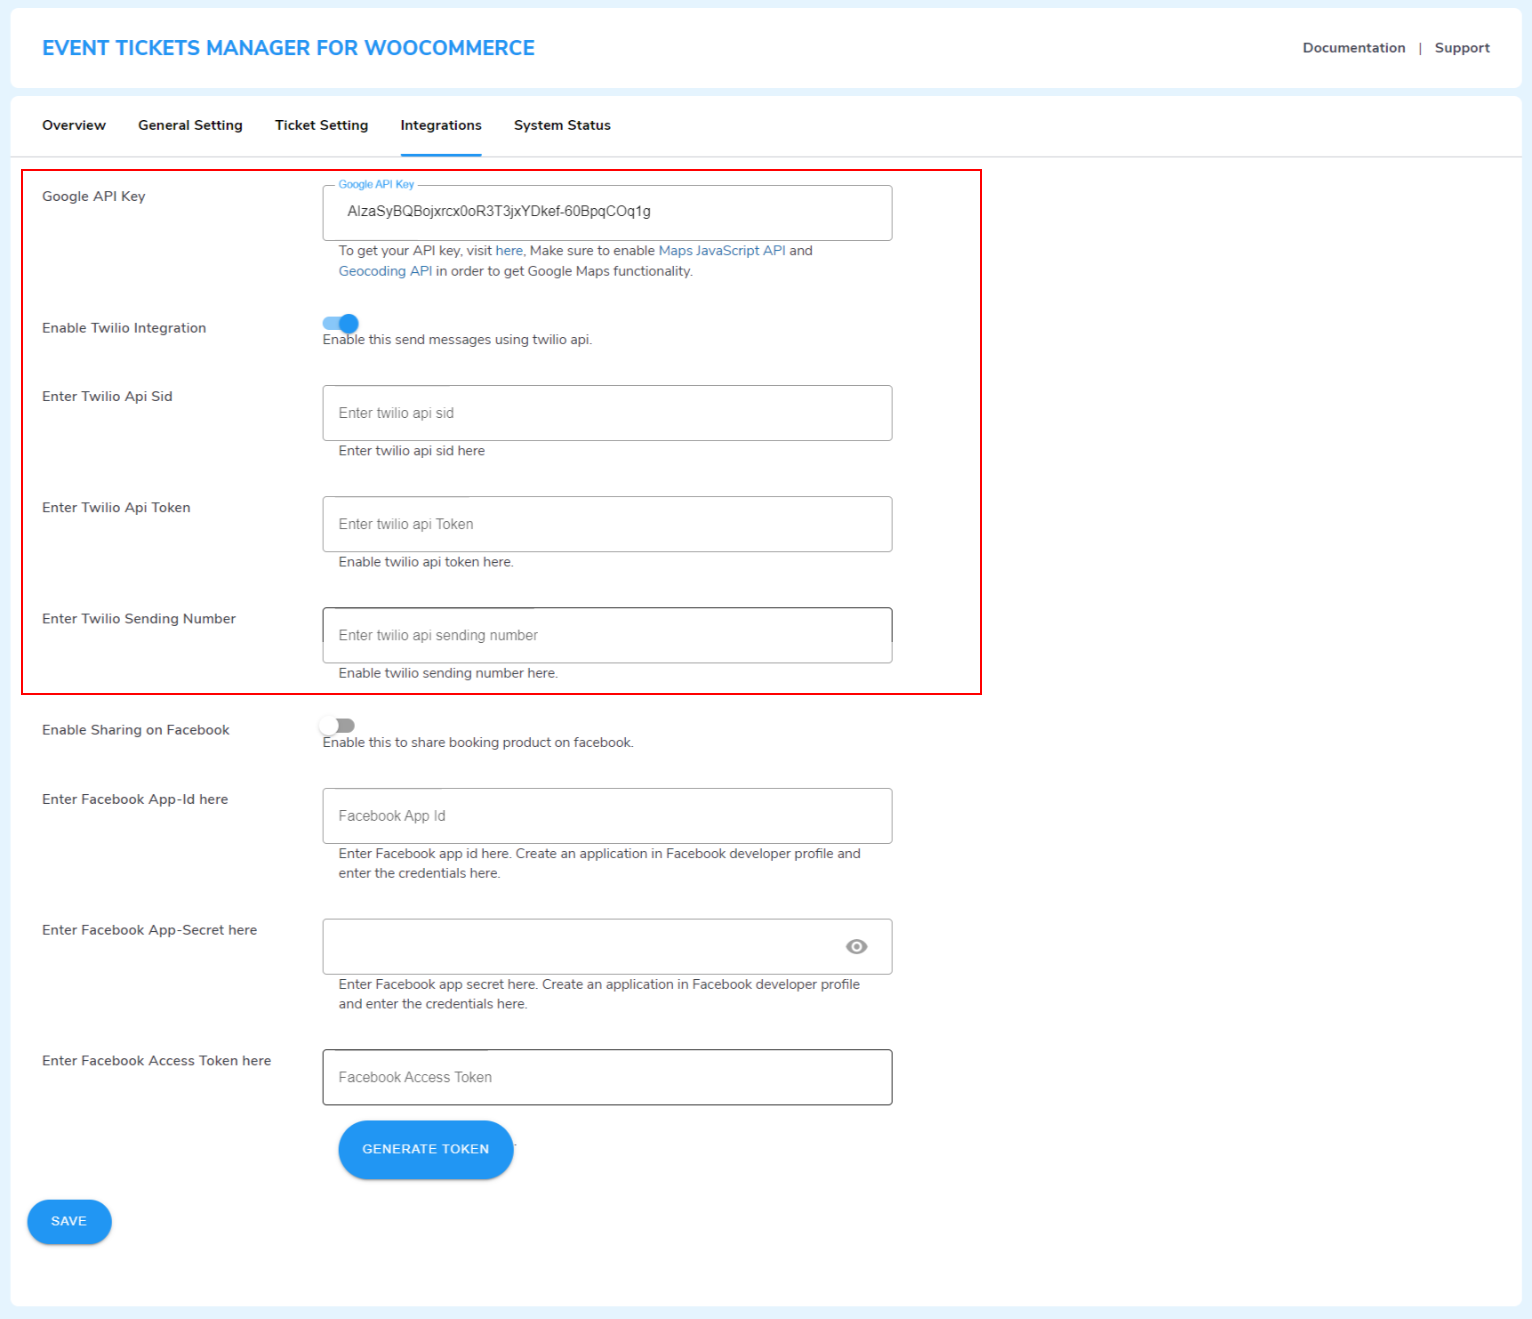
- Firstly, Enable Twilio Integration by pressing the toggle switch next to this option for enabling the Twilio Integration.
- Secondly, enter the API SID in the text field next to the Enter Twilio Api Sid option.
- Thirdly, enter the API token next to the Twilio API Token option.
- Lastly, enter the sending number, and the phone number from which you want to send a message to your customers.
6. Adding Your First Event For Sale
Now it’s time to add your event to your WooCommerce store. Adding events is the same as adding any other product on a WooCommerce store. However, there are a few options that have to be configured to successfully list your event.
Trace the following steps to add an event as a product to the WooCommerce Store:
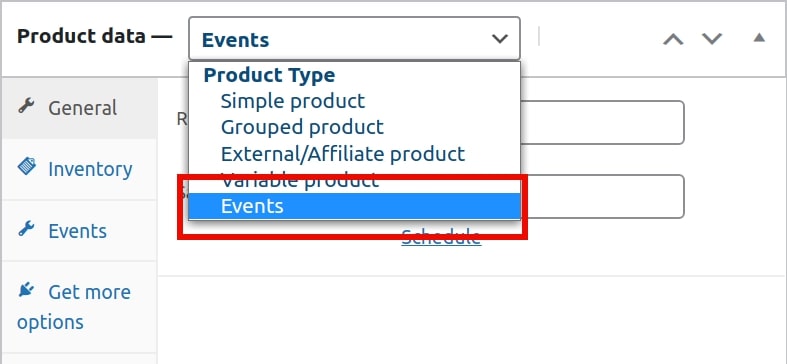
- Firstly, navigate Products → Add New.
- Now scroll down to the product data box and from the drop-down menu select Event.
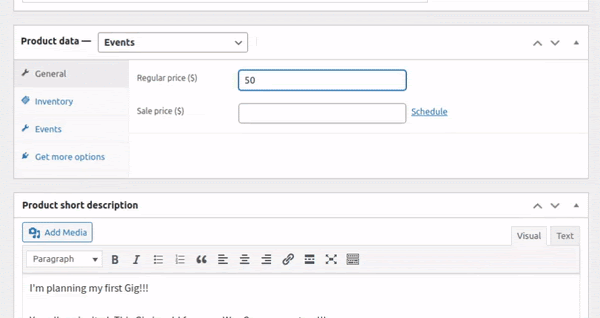
- Lastly, enter the price of the ticket. If the event is on sale enter the actual cost besides the Regular price and the price at which you are selling it next to the Sale price.
You can also schedule for how long the event should be sold at a discounted price.
7. Manage Your Event Inventory
Now if you are hosting a concert you may have limited seats. Therefore, there’s a need for stock management. Just like any other physical product, the inventory management for events is the same.
To manage the stock of your tickets you need to know the following two settings thoroughly:
- SKU: You can assign a unique stock-keeping unit to each of your events, SKU is a unique identifier for each distinct product or service that can be purchased from your store.
- Stock Quantity: In stock quantity, you’ve to enter the maximum number of attendees you want to invite to your event.
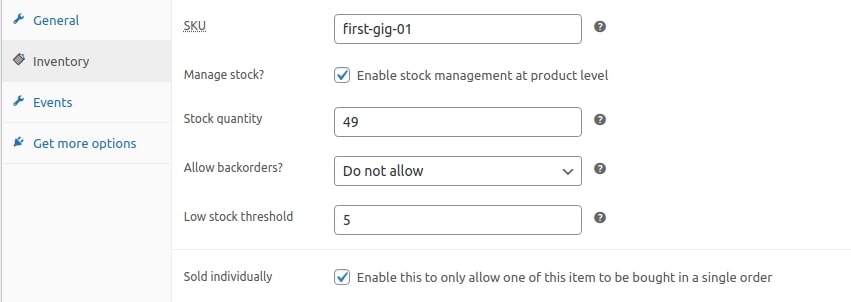
Once you’ve configured the inventory settings for your event, do not forget to save the settings.
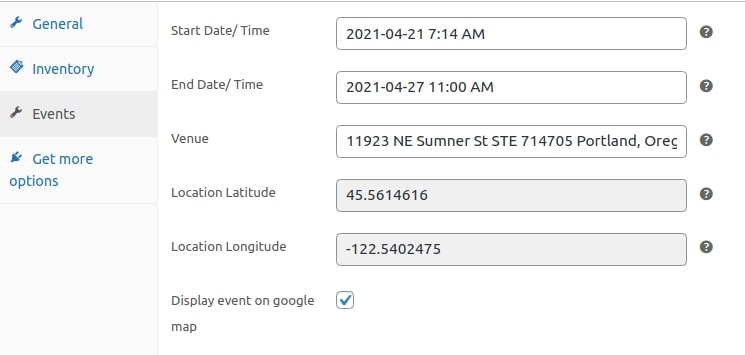
8. Set Event Date, Time, and Venue
To sell WooCommerce event tickets, the three essential details that are needed are:
- Event date
- Time
- Venue
Within the product data box, a special setting will appear when you select events as products. As a result, you can configure the date, time, and live location of your event. Just follow these simple steps:
- Firstly, select the Events option in the product data box.
- Secondly, you have to fill in some important information like:
– Start date and time
– End date and time
– Venue
- For the venue enter the exact location of your event and eventually the exact latitudinal and longitudinal location will be fetched automatically.
- Lastly, make sure to enable the Display event on Google Maps to portray the event location on the product page.
9. WPS Organizer/Attendees
Next from the WPS Organizer/Attendees tab of the product data box, you can configure the following:
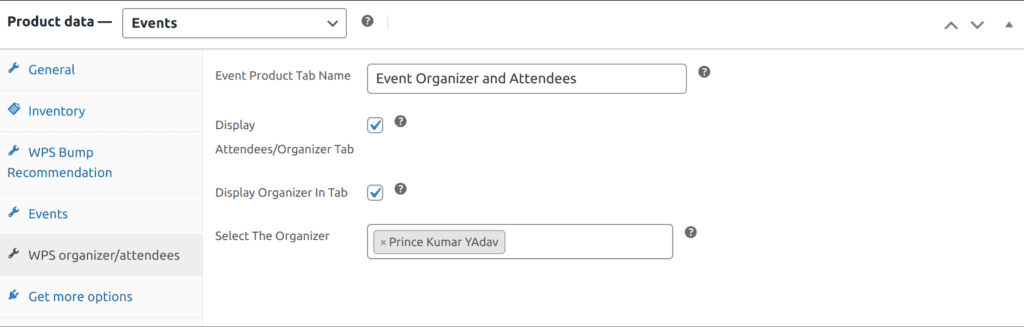
- Event Product Tab Name: The admins can customize the name of the tab using this setting
- Display Attendee/Organizer Tab: The admin can toggle between these settings to enable/disable the attendee/organizer tab from the events page
- Display Organizer Tab: Admins enable this feature if he want to show the organizer, similarly disable if he just wants to show the attendees tab.
- Select The Organizer: The admin can choose the organizers for different events from this section.
With the step of your setup now let me introduce you to the top features of Event Ticket Manager for WooCommerce:
On-Demand Features of Event Tickets Manager
Sell and Create WooCommerce event tickets seamlessly by using our plugin. But why our plugin? See for yourself…
1. Event Date Formatting
The admin can change the formatting for the dates over the website, by utilizing this feature.
2. Show Organizer/Attendees Details
By incorporating this feature of WooCommerce event tickets, admins can show the details of the organizer and the attendees on the product page.
3. Barcode Scanning
The admins can utilize the event calendar plugin to provide the customers with a secure user experience – scannable barcodes containing the unique ticket code.
4. Bulk Upload Attendees Order Ticket
The admins also bulk upload details of the attendee’s order ticket details in a single click by just importing the CSV file.
5. Check-In Using QR Code
The WooCommerce Event Manager allows customers an easy check-in process by using a QR Code.
6. Fully Customizable PDF Tickets
Admins can fully customizable PDF tickets by using WordPress events. This allows the users to create event tickets for an event the way they want.
7. Multiple Layouts for Tickets PDFs
The Events Calendar plugin offers a feature that allows users to select multiple layout options for event ticket PDFs when creating and managing events.
8. Send Ticket Details with SMSs
Utilize the unique feature of the WooCommerce event tickets to ensure that the customers have received their products/ticket details by tracking SMSs.
The WooCommerce Event Tickets Plugin Is Your One-Stop Solution!
FAQs For WooCommerce Event Tickets Manager
We understand that incorporating a new plugin can be intimidating and overwhelming. Merchants have thousands of questions before they finally get on board with it. And we are here to help. Some of the “Frequently Asked Questions” are –
Q1. Is it possible to add a QR code to the event ticket?
Yes, we have provided this feature in our plugin Admin can scan the QR code of the Guests to check-in.
Q2. Is it possible for the merchant can share the event on Facebook?
Yes, we have this feature in our plugin you need to enable the share event on Facebook option. Also Please go to the product edit page and tick the Enable Facebook sharing
Q3. Do we have the possibility of creating any bookable service for hour based booking unit?
Yes, we have this functionality in our plugin. The admin can create a bookable service based on its hours. For that, just visit the Product Edit Page to do this. Select Hours when scheduling a booking unit.
Q4. Can the calendar for bookings display a booking time along with the booking date?
Yes, the admin must enable the date and time setting from the backend for this. To amend a bookable product, visit the Product Edit Page < Select days in the booking unit, and enable to show hours in the calendar.
Q5. How many payment gateways does the Event Tickets Manager for the WooCommerce plugin support?
The event ticket manager supports all the WooCommerce payment gateway for Example PayPal, Stripe, Direct bank transfer, and Check payment.
Q6. Your question is not listed.
Don’t worry, you can visit the WP Swings knowledge base for more detailed documentation and support.
Know More About Event Tickets Manager For WooCommerce…
Benefits of Selling Event Tickets on WooCommerce
A complete solution that allows you to create an event and ticketing website is called event tickets manager. This tickets manager plugin allows you to simply sell WooCommerce event tickets and manage your events on your store.
Know more about the benefits of selling event tickets…
- Attached Webinar URL in Mail: You can avail the URL of any webinar organized in your email. This will help for a hassle-free and simple process not only process but helps to understand the purpose of the event, admin can integrate the webinar URL within the email sent to customers.
- Event Reminder: A reminder of the Event is sent to customers before the event, email reminders can be issued to customers to remind them of the event’s status. Customers can continue communicating with the agent handling their request by accessing the ticket through their email inbox.
- Tracking Feature: Online ticketing platforms often include monitoring options for built-in reporting. The tracking feature helps admins in getting the status of a ticket whether a product or ticket reaches the client or not. The other purpose of tracking is for security reasons.
- Location Accessibility: Any Event is all dependent on the venue. And to get the venue you need maps. So for this, you get an option of location attached to your ticket. This helps clients to reach venues easily.
- Event Promotion: When a merchant sells WooCommerce event tickets, event promotion is another way to increase revenue. Clients can share their events on different social media platforms for awareness as well as attractions.
- Generate Recurring Revenue: Minute Event ticket bookings help you generate more recurring revenue. You can also use it for WooCommerce event tickets for one-time events with time selection options. This addon is perfect for selling tickets for any kind of event, including city tours, museum visits, and zoo visits.
- Easy Check-In Process: Nowadays Easy is the new trend, customers switch very quickly to another option if they face any kind of difficulty in operating the plugin. QR Codes are sent to the client’s mail for an easy check-in process. Ticket Scanner helps hassle-free check-in.
Tips To Make Your Event A Big Hit
Okay, now that you have created your event management site with WooCommerce. But just creating a website is not enough, you need a complete plan to make your event a big success. You need a plan in which you can handle all your numerous tasks and efficiently tackle constantly changing to-do lists.
So here I’ll be sharing with you 3 tips to make your event a big hit:
1. Pay High Attention To Prerequisites
Before you go ahead with selling your events with WooCommerce it is crucial to sort all your prerequisites. It may include things like logistics, content, and marketing promotion strategies. All this has to be sorted before you sell WooCommerce event tickets.
Also, you have to make sure if you’re working with a team all the tasks are aligned and appropriately distributed among your team members. Design a time frame for your teammates in which each job related to your gig should be accomplished.
2. Pay Close Attention To Your Budget
Whether you sell WooCommerce event tickets or any other product on your WooCommerce budget plays a vital role. Even if you have huge funds, prevent yourself from jumping on the bandwagon to invest in unnecessary things.
3. Investing In Event Management Software
Whether marketing or selling, every task can become easy if you have event management software in your arsenal, like the Event Tickets Manager For WooCommerce. An event management plugin will let you accomplish the following tasks:
- Add events as products on your WooCommerce store.
- Manage the number of tickets sold from your online store.
- Send invitation emails to your WooCommerce customers.
- Allow the customer to see the live location of your events on Google Maps.
So these were some of the simple and basic tips that lay the foundation of successful event management and ticketing websites. Though these are some really basic and simple tips, the implementation of these can decide the destiny of your events’ success.
When Is Your Next Big Event?
So we’ve reached the end of this article and we learned a very easy way by which you can sell WooCommerce event tickets right away.
Selling your events through WooCommerce also lets you gain better exposure to your products. Consequently, letting your target market directly engage with your gigs with a better reach.
I hope you found this article helpful and informative. So what are you waiting for? Start planning your next big gig and don’t forget to invite team WP Swings to the party.